Free Shipping On U.S. Orders Over $100 | 10% Off Entire Order On International Orders Over $300
- Bits & Bits Company
- CMT Orange Tools
- Hongdui Tools
- Jay's Custom Creations
- Katz-Moses Tools
- Rubio Monocoat
- Suizan Japanese Saws
- Dovetail & Joinery Tools
- Forged Hand Tools
- KM Tools Templates
- Measuring & Marking
- Router Bits and Forstner Bits
- Safety and PPE
- Sanding and Finishing
- Saw Blades and Table Saw Accessories
- Walnut Slabs
- Best Sellers
New Arrivals

Build Plans
- Build Up Initiative Plans
- Digital Content
- KM Tools Apparel
Woodworking Classes

- About KM Tools
Creator of the Week
- Katz-Moses Woodworkers with Disabilities Fund
- Partner With Us

- Free Router Table Plans
- Five Cut Method Calculator
- Linear Board Foot Calculator
- Wood Movement Calculator


Subscribe to the KM Tools Newsletter
Educational woodworking content, early access to new products, and flash sale discounts for subscribers only. Directly to your inbox. And did we mention a free copy of the Katz-Moses Router Table Build Plans ?
Cookie policy
I agree to the processing of my data in accordance with the conditions set out in the Privacy Policy.
Your cart is empty

2 Easy Ways to Remember Router Feed Direction (Quick Tip)
One of the most important aspects of router safety is getting feed direction right.
That means being aware of how you make cuts relative to the router bit’s rotation.
Essentially, you want the direction you push the router along the edge of a board to be the opposite of the bit’s rotational direction .
Cutting in the same direction as a bit’s rotation is called a climb cut — and if you’re not careful, it can cause the router to shoot out of your hands… or send the board you’re cutting shooting across the shop.
Overtime, cutting direction becomes second nature.
But when you’re first getting started, it can be a bit confusing (punny, I know). Especially if you’re switching between a handheld router and router table.
To make it easier, I’m sharing 2 easy tricks to help you remember router feed direction — until safety becomes second nature.
1. THE RIGHT HAND TRICK
When you’re first getting started, this trick is the easiest way to quickly remind yourself of the correct feed direction.
It uses your right hand — with your fingers and thumb representing different elements of the router.
Start by making a “thumbs up” sign with your right hand.
Your thumb represents the orientation of the router bit. So if you’re using a router table, point your thumb up. If you’re using a handheld router, point your thumb down.
The direction your fingers curve represents the router bit’s rotation. So whichever way they’re pointing is how the bit spins in that orientation.
(You’ll notice that for handheld routers the bit spins clockwise, and on router tables it spins counterclockwise).
Your feed direction should be the opposite of whatever direction your fingers are pointing.
So whether you're pushing a handheld router — or pushing a board over a router table — the direction that the board’s edge moves along the bit should be the opposite of that bit’s rotation.
For example, say you’re cutting a rabbet in a board with a handheld router. Make a “thumbs down” sign next to the edge you’re cutting and look at where your fingers point.
Push the router the opposite way through the cut — and you’ll have all the control you need!
2. THE PICTURE FRAME CLOCK
This method isn’t as intuitive as the right hand trick, but can still be a good frame of reference (dang it, another pun).
Imagine you’re rounding over the edges of a picture frame.
For a handheld router , you want to push the router:
- Counter clockwise on the outside edge of the frame
- Clockwise on the inside edge of the frame
On a router table, you can think of the same directions — but now you're moving the workpiece instead of the bit.
So on a router table you’d rotate the workpiece :
- Counter clockwise for the outside edge of the frame
- Clockwise for inside the inside edge of the frame
The clockwise/counter clockwise idea remains the same. What changes is whether you're rotating the router or the actual board .
Just remember:
- Outside edge = Counter clockwise
- Inside edge = Clockwise
For handheld routers that rotation refers to the actual router, while on router tables that rotation refers to the workpiece.
Cutting with the correct feed direction will give you greater control with your router — keeping you safe as you build.
And with the two tricks above, you’ll have no problem remembering… until you get enough experience to just know.
Want more router safety tips? Read this.
Got your own trick for remembering feed direction? Let us know in the comments below!
Follow us on Instagram @katzmosestools , on TikTok @katzmoseswoodworking , and check out my YouTube channel for more great woodworking content...
And as always, STAY SAFE IN THE SHOP!
Continue reading

6 Tips for Starting Hand Saw Cuts (Quick Tip)

How to Flatten Slabs and Wide Boards with a Router Jig

I’ve been struggling with my router for years. This was a very good explanation. Totally helpful! Thank you.

David Meadow
I use the left to right method. When facing the piece, cut from left to right. Doesn’t matter if you are holding the router or it’s in a table.

Thanks JKM, another great article. The “right hand trick” I learned for handheld routers is; make an “L” with your right thumb and index finger like a kid makes an imaginary pistol. Then with your palm facing down touch your thumb to the edge you want to rout. Your finger points the way of the router. Works for inside and outside edges. We used the “thumbs up” for a reminder of bit rotation on the router table.

I had trouble routing a wide blind slot (both ends blind) – I hog out as much as possible with a forstner bit – drilling each end of the slot oversized to drop the piece over the router bit – then cut each side – problem is should I cut the between the bit and fence or the side opposite of the fence?
Maybe I need to glue up two pieces of wood with spacer blocks then plane, joint and cut to size…

Tom Albertson
Food for thought: if you change the “right hand trick” to the “left hand trick” then your fingers would point in the feed direction. Maybe easier to remember if you want to know which way to push the router/work piece and don’t care which way the bit spins. (No, I’m not left handed.) In any case, this info is great! Thanks!

Jim A. Paschis
The picture from interior and exterior surfaces present a good example for router feed directions. When advancing toward the next 90 degree piece with the exterior edge extremely thin there is a chance for corner tear out. For crucial, delicate work a protective piece can be clamped and routed.

Joseph Lowe
EXCELLENT! This really should not be difficult, and it’s embarrassing how many times I’ve had to figure this out moving between routers, particularly if I haven’t routed in a couple of weeks. Many thanks.
Leave a comment
This site is protected by reCAPTCHA and the Google Privacy Policy and Terms of Service apply.

Sign up and receive free build plans for the Katz-Moses Router Table as well as exclusive access to:
- Early notifications for upcoming product launches
- Sales and discounts on our most popular products
- Weekly educational woodworking content

What Router Direction Should You Use (Clearly Explained)
The router direction can make a big difference between nice, smooth cuts or dangerous cuts with an increased risk of accidents and uneven and untidy edges. But what is the correct router cutting direction?
The correct router direction is always in the opposite direction of the rotating router bit. When you know that a router bit always turns clockwise, you will understand that you have to push the router in the opposite direction.
In this article, you will get a good idea of which direction to use a router , depending on whether you are using a handheld router or router table. In addition, there are some router cutting direction exceptions, which you will understand after reading all the useful information you can find below.
Disclosure: At zero cost to you, I may get commissions for purchases made through links in this post. I earn from qualifying purchases as an Amazon associate. Products featured are selected based on quality, performance, and reputation, regardless of affiliate relationships.
What happens when using the wrong Router Direction
If you use the wrong handheld router direction or the wrong feed on the router table, the routerbit will push itself away from the wood you want to work . Due to the high router bit speed , this will make the router difficult to handle and make sudden uncontrollable movements that can be very powerful.
When using a handheld router, the router can be pulled out of your hands and the router bit can cause injuries. With a router table, the material will be pulled out of your hands or your hands will pull towards the router bit.
Whatever you use, hand router or router table, feeding the wood incorrectly can cause serious injury . In the least bad situation, you will end up with an uneven and messy-looking edge.
When working with cutting tools, there is always a risk of injury. Be well-prepared and set up a first aid kit in your workshop. You can read how to do this in my article How To Make A Workshop First Aid Kit – N°1 Guide | FREE CHECKLIST
Understanding Router Direction
To know which direction to use a router bit into the wood (hand router) or the correct input of the wood into the router bit (router table) , you must first know in which direction the router bit will rotate.
The correct router cutting direction is always against the direction of rotation of the router bit. This way, the router bit will cut into the wood (conventional cut) instead of pushing the wood away (climb cut). I’ll go into this in more detail in a moment.
In a handheld router, the router bit rotates clockwise, so if you have to enter it in the right way, the feed direction is usually from left to right. Please note , there are exceptions to this rule, which I will discuss further in this article.
When using a router in a table or mounted on a worktop, the direction of rotation of the bit changes. By mounting the router upside down , the router bit now rotates counterclockwise. As a result, the feed direction will often be right to left.

What is a conventional cut
The most secure cut is the conventional cut. The feed is in the opposite direction as the rotating cutter. In other words, a conventional cut is made by turning the router bit clockwise and pushing the router from left to right.

What is a climb cut
The climb cut is the opposite of the conventional cut. The wood is fed in the same direction as the rotary router bit. So when the router bit is turned clockwise, and you move the router from right to left, you make a climb cut.
The climb cut is therefore the unsafe way to work with the router. Because the router moves in the same direction as the rotating router bit, it will tend to push itself away from the wood instead of cutting into it. Due to the shedding, the router bit will therefore move away from the wood and thus make a “climbing” movement, hence the name climb cut.

Different router feed directions for handheld routers
From all the information you could already read, you now know that when milling along an outer edge with a hand mill , you always have to work from left to right, against the rotation of the mill (conventional cut).
This is the safest way to work with a handheld router and will result in a smoother cut.
However, there are sometimes exceptions to this rule. For example , if there is a chance that wood will break out on the corner, it can be good to make a short climb cut to prevent this. After that, you can continue with the conventional cut.
There are other situations where the push direction of the router is different. Below I will explain all possible router directions briefly and clearly.
Routing along the outer edge
This is the most common situation you will face. When you have a workpiece that you need to mill the outside of, always move the router counterclockwise.

Routing inner edges
Here you have to think the other way around. Remember that the bit always turns clockwise, so you have to push the router in the opposite direction.
When milling along the inside edges of a piece of material, you should work in a clockwise direction. this will allow the router bit to cut into the wood.

Routing a circle or arc
Although the circle has a different shape than a square workpiece, the method is the same. When milling an arc or circle with a handheld router, always move counterclockwise.
Routing a groove through the material.
When milling a groove through the center of a workpiece, there will always be material on both sides of the cutter. So you will wonder what the correct router direction is for this.
Well, if you’re cutting a freehand groove there’s really no right answer to this question. Any direction you use is the correct push direction since the router always has one side that moves with its rotation and one side that moves against its own rotation at the same time.
However, do not try to change the feed direction abruptly at any time, as this may cause the router bit to unexpectedly engage the wood and make uncontrollable movements.
However, if you are using a guide/side stop it is a good idea to choose the direction where the router bit always pulls the router towards the guide, thus avoiding climb cuts where the guide comes loose from the wood.
Different router feed directions for router tables
Routing an outer edge.
When milling an outer edge with a stationary router, you must feed the material from right to left, as you could read earlier in this article.
Making a reverse feed motion is dangerous and increases the risk that the bit will pull the material out of your hands and your hands may come into contact with the router bit.
Route a groove through wood
As with milling a groove with the hand mill through the center of a workpiece, the router table will always have material on both sides of the mill.
So the correct direction for milling a groove with the router table is the direction where the bit always pulls the wood against the fence . This way you avoid the wood being pushed away from the fence by a climb cut.
The router bit rotates clockwise at all times. All you have to do is run the router counterclockwise to cut into the wood . This allows you to make the safest cuts while also ensuring that the cut is always nice and smooth.
If you want to learn more about how to get the most out of your router , I recommend reading my article, How To Use A Router – Easy 5-Minute Starter Guide .
How to build your workshop on a budget?

Building your workshop can be daunting, filled with trial and error. Believe me, I’ve been there too. But it was “The Ultimate Small Workshop” course, a gem I discovered and now endorse on Christofix.com , that provided insights unparalleled to any other. This expertise empowered me to invest wisely and save substantially.
I really suggest it to all of my fellow DIYers and creators!
I hope this information about the correct router direction was helpful, and that this blog inspires you. Feel free to share this blog on Facebook, Pinterest, or other social media . You can do this by using the buttons below or at the top of the blog. It will be much appreciated. I’m looking forward to seeing you soon in another blog or video. Greetings, Christophe, founder of Christofix.com Woodworking | DIY | Home decoration

Meet Christophe - Founder & Woodwork Artisan Behind Christofix.com
Hi, I'm Christophe. With a daily dedication to woodworking, my expertise has grown immensely since starting in a modest garage in 2018. Today, I'm a recognized figure in the woodworking community, sharing daily insights and techniques at Christofix.com for enthusiasts at all levels, emphasizing sustainable and artistic woodworking.
Router Tips
Direction of feed.
When using a router it is important to know the correct direction of feed. The following guidelines will help you to determine this.
Router Direction
Always feed into the cutter, never with it. Routers generally run clockwise when hand held, and counterclockwise when turned upside down in a table.
Check Before Cutting
The easiest way to make sure you are doing things right with the table-mounted router, is to get your eye at table level and look at the bit. You will want to push stock into the bit so the carbide cutting edge hits the material first. When you are looking at the bit at table level notice where the carbide edge is and make sure you push the stock toward that edge, and NOT toward the back of the bit.

Cutting Outside Edges

Cutting Inside Edges

Home Articles Basic Links Projects Reference Tips & Tricks Tool Reviews Video Woodturning Contact About Us
This is a Veteran Owned site
Confusion is easy!
Text and photos by Tom Hintz
Considering that the router is one of the most popular woodworking tools, it is no surprise that questions regarding its use are common. Of nearly 300 email questions in my "hold" folder, 188 of them related to basic router use. What is especially interesting is that the majority of these questions involve feed direction and rates, both of which are crucial to safety and the quality of the cut.
Feed Direction and Danger
The good news about feed direction is that with very few exceptions, the stock always moves against the rotation of the bit. The bad news is that making a mistake with feed direction can easily initiate a very dangerous kick out with little or no warning.
Feeding the material against the rotation of the cutter affords control because the cutting action creates resistance to the force being applied by the operator to move the wood across the bit. This balance of forces makes controlling the wood much easier.
If the wood is introduced in the same direction as the bit is rotating the cutting edges instantly become extraordinarily efficient high-speed power feeders that can suddenly eject the wood, leaving the operators empty hands dangerously close to the cutter. This situation is particularly dangerous because the force the operator was applying to the wood before it kicked out immediately causes the now empty hands to lurch toward the bit. Disaster can be the instantaneous result.
Confusion Is Easy
It is apparent that the most frequent cause of feed direction errors is operator confusion regarding which side of the cutter, in relation to the operator, is turning which way. The router is the only commonly used wood working power tool that can be used with the cutter facing up in table-mounted situations, or down for hand-held operations. When router orientation is changed from bit up to bit down modes, the operator has to remember that feed directions change as well.
For clarity in this story, the "rear" of the bit is the cutting edge farthest from the operator and the "front" refers to the edge closest to you.
Consistent Practices
The easiest way to reduce feed direction errors is to develop standard operating procedures used each time a task is performed. Taking the time to double check the feed direction before each operation is a very good habit to get into.
Hand-Held Operations
I always start at the lower left corner of the piece when cutting the outside edge in the hand-held mode. The bit is spinning in a clockwise direction from my perspective so engaging the rear of the bit with the wood means the router always moves left to right and goes around the remaining sides of the piece in a counter clockwise direction.
When routing an inside edge, like when cutting the inside edge of a frame or opening, I start at the upper left corner so the rear of the bit again engages the wood and the router moves left to right. The only difference is that when cutting the inside edge, continuing the left to right motion takes the router around the opening in a clockwise direction.
Using the same starting point every time develops a habit that goes a long way towards preventing directional errors and the damage and danger that can create.
The exception to this would be when therre are end grain sections that are to be routed. Generally, we route the end grain segments first, and then the rest of the piece so any chipping that occurs at the end grain is removed in the final passes. I usually do the end grain first, then start at my normal position and go all the way around the piece, including a second pass over the end grain segments, so I get nice clean transitions from one side to the other.
Router Table Operations
safety note: whenever routing pieces on a router table be sure to use proper push stick, pads or other safety equipment that keep your hands a safe distance from the cutter..
When the router is installed bit-end up in a router table, bit rotation from the operators perspective is counter-clockwise. When using a fence or miter guide, the edge of the cutter closest to the operator is used and the material is fed right to left.
An exception is when cutting a centered slot in a piece of wood. The first pass is made by holding the wood against the fence and then plunging it down over the bit at the start point and then feeding the stock into the cutter from right to left. However, when the piece is reversed to make the second pass to center the slot, the rear edge of the bit is often doing the cutting. In this case, the piece has to be fed from left to right.
When making this type of cut, I have found it safest to make the first pass (right to left) and then shut off the router. I reverse the work piece and hold it in position above the router bit to make sure which edge of the bit will be doing the cutting. If the rear edge of the bit is doing the cutting, the work piece has to be fed across it from left to right.
It should be noted that cutting centered slots on a router table is always a difficult and somewhat dangerous operation. If you are at all unsure of your skills or safety equipment, make the slot by drilling holes at either end and then removing the material between them with a jig saw.
Occasionally router bits equipped with bearings are used in the router table without the fence. We have to remember that the router bit rotation is counter clockwise and adjust feed directions accordingly. When the front edge of the bit is used, the stock is fed right to left. If the rear of the bit is engaged, feed direction is left to right.
Remember to use the proper push sticks or pads to keep your hands far away from the bit. Without the fence, the bit will be totally exposed if the wood kicks out or breaks.
Climb Cutting
There are two situations when climb cutting, moving the router in the same direction as the bit rotation is acceptable. Climb cutting is always difficult and care must be taken to maintain control of the router.
The most common climb cut is on a dovetail jig with the router in the hand-held position. A small portion of the cutters edge is used to make a very light scoring cut, moving from right to left, to reduce tear out. Even though very little of the bit is engaged in the wood, care must be taken to maintain control of the router as it could want to accelerate down the wood.
The other situation when climb cutting is used is when using some laminate trimmers. Feeding the router against the bit rotation sometimes causes these materials to "chip" ahead of the cutter. In these cases, the laminate is trimmed as close to the base material as possible with other tools and then the router can be used to clean the edge, moving it in the same direction as the bit rotation.
Whenever climb cutting, whether on a dovetail jig or trimming laminates, keep the cuts very light and a firm grip on the router to avoid having it get away from you. Climb cutting without using proper procedures is very dangerous.
Determining the proper feed rate for any bit is relatively easy, assuming the router speed is set correctly for the bit. If the bit burns the wood, the feed rate is too slow. If the wood chips or blows out ahead of the bit, the feed rate is too fast. Granted these are generalizations and there are other factors that could contribute to these problems, but they remain important clues about what you may be doing wrong.
Feed rates and bit performance are directly related to the depth of cut. Trying to remove too much material in a single pass can cause or increase burning and blow out ahead of the bit. It is always better to make multiple light cuts than fewer deeper cuts. Lighter cuts are far safer and produce much better results.
The Bottom Line
Routers extremely useful in the workshop, but they can also be very dangerous if used improperly, including the failure to employ adequate safety equipment, procedures and feed direction.
If you find yourself faced with a router-related task that you do not completely understand or do not have the proper safety equipment for, the only prudent course of action is to stop! Wait until you get the information and equipment to make the operation safe. The task will be there later, your fingers may not.
As with all power tools, the major cause of accidents is operator error. Not taking the time to be certain of feed direction with a router is dangerous, and could lead to severe injury. There are many woodworkers who have learned to pursue this hobby with a disability caused by a moment of lost concentration. Take the time to make sure you do not join those ranks.
Other Router-Related Stories
Reading the Grain Using Rabbet Bits Setting Up Rail and Stile Bits
Do you have a comment about this page? - Email Me!
Back to the Tips & Tricks List
LOOKING FOR A PROJECT? Check out our DIY plans we’ve made to help you build beautiful and sustainable items for your home.
A Beginner’s Guide On How To Use A Router
Are you ready to up you’re woodworking and DIY game using a router? Check out this beginner’s guide on how to use a router. From installing bits to proper routing direction, we’ve got you covered!
Disclaimer: This post includes affiliate links, and I will earn a commission if you purchase through these links. No additional cost for you. Read about our privacy policy .
A router is one of those tools that many people have never used as it takes a little more learning compared to other power tools. Even as experienced DIYers, we didn’t touch a router that we owned for many years until recently. While there are always multiple ways to achieve a final outcome on a woodworking project, routers can truly be a game-changer making it perfect grooves, professional-looking edges, and beautiful joinery. So don’t be afraid to learn how to use a router!
If you know your bit types and have a router on hand, it’s time to dive into the intricacies of using this powerful woodworking tool. We will guide you through the essentials for how to use a router, from safety measures and installing bits to height adjustments and routing directions.
Our Recommended Routers
Below are the routers we have, love using, and will use as examples below with how to use a router. We have several routers, both secondhand and new.
- Dewalt Fixed & Plunge Router Set – Its great height adjustment rings are easier than other brands we’ve tried.
- Bosch Trim Router – The advantage is the micro-adjust wheel that makes it easier to dial in exactly the right height for corner profiles.
- Porter Cable Fixed Base Router – we have a very old secondhand one that honestly can be a little annoying to adjust. However, this is a long trusted brand and the newer models look more promising.
These are less pricey options than something like a Festool router and can be a more budget-friendly option for DIYers, hobbyists, or newer woodworkers. For more, check out our recommended tools and products on our resource page .
Router Safety First
Before we dive into the practicalities of using a router, let’s emphasize the importance of safety.
- Eye and Ear Protection: Always wear eye and hearing protection to shield yourself from debris and the noise generated by the router.
- Dust Mask: Routers produce chips and dust that can be hard to capture with a vacuum, so protect yourself by wearing a dust mask .
- Clothing and Hair : Like with all spinning blades, avoid wearing gloves or loose clothing while using the router. If you have long hair, pull it back to prevent entanglement with the bit.
Now, let’s get started on using a router safely.
How To Use A Router – The Basics
Let’s go over the basics of how to use a router. We’ll cover installing a bit, setting the height, correct routing direction, and using guides and bearings when routing.
Installing a Router Bit
To start, you have to install the router bit. But first and foremost, always unplug your router before changing the bit. Honestly, do this with any blade on any tool for that matter to prevent accidental injury.
The shank of the router bit is inserted into the router’s collet. As you tighten the nut, the slits in the collet compress, securing the router bit within the tool. To install a bit, you will likely need a wrench. If your router has a collet lock button, you can press this button and spin the collet until the button clicks in and locks the collet in place.
While holding that button in, you can grab the wrench and loosen the nut. You don’t want to fully remove the nut, just loosen it. Then you can slide the chosen router bit in and tighten the nut back down.
If your router doesn’t have a collet lock button, it will probably have two flat spots on the shaft next to the collet nut like our Porter-Cable router. You’ll need to put a second wrench on these flats to keep the collet from spinning while you tighten and loosen the nut.
Right Hand Rule For Loosening Nut
You will want to make sure you are going in the correct direction to loosen the nut, and you don’t over-tighten and strip it. A good trick to remembering the correct direction to loosen the nut is by using your right hand.
You want the nut to come off, so you point your thumb up in the direction the nut needs to go. Then look at the way your fingers are curled. The way your fingers curl is the direction you will have to spin the nut to get it off.
Reducing Sleeve
For routers with a larger opening, a reducing sleeve may be needed for smaller bits. Some routers can accept ½” router bits and you will need a reducing sleeve to use smaller size bits. Our router with a ½” opening came with a sleeve for ¼” bits. You just need to install the sleeve in the collet, then install a bit and it tightens up perfectly.
If you live where the metric system is used, then your bits might be 6, 8, 10, or 12 mm. You can likely find an adapter sleeve for any of these sizes, but make sure you get one with multiple slits in it to get better compression and a more secure hold on the bit.
Bit Removal
When it’s time to change a bit, just reverse the process from before. Lock the collet, loosen the nut, and remove the bit. If you find that your bit is a little stuck, it can help to give it a gentle tap to free it and then pull it out.
Related – The Ultimate Guide to Router Bits: Exploring Types and Applications
Tips for Router Cut Depth and Width
To achieve the desired outcome, it’s essential to adjust the router bit’s cutting depth and width according to the task at hand. As a general rule of thumb, you should never cut deeper than the diameter of your bit in a single pass.
For deeper cuts, consider making multiple passes rather than pushing the bit too hard in a single attempt. This not only ensures a cleaner finish but also prolongs the life of your router bit. If kickback is likely in an area, make multiple smaller passes to work up to your final depth.
Setting the Height For Fixed Routers
Adjusting the height of the router bit is crucial for achieving the desired cut depth. The process varies between router brands. Here are three examples using our three routers.
Porter Cable
Starting with our older router, the first thing you have to do is release the clamp holding it in place. This usually comes in the form of a latch. Once that is released, there is usually an adjustment screw somewhere. Ours has this plastic screw that turns a metal shaft inside it. This one has seen better days and the mechanism often gets jammed. So we work in the direction of gravity, and turn the knob until we get to the desired height, then lock it down.
Our Dewalt fixed base router is much more convenient. You release the latch, then spin the ring to dial in the height up or down and lock it in. To get a more precise measurement, you can align the 0 on the yellow ring to the arrow on the router, then turn the adjustment ring to get the dimension you want and lock it down.
Trim Router
Our trim router is pretty unique. Bosch’s trim router has a three-position knob. In the top position, the base is completely loose and you can slide it up and down freely. In the second position, it engages with the thread inside the base. Then you turn the wheel to finely adjust the position height of the bit. Finally, you turn the knob to its third position to lock it in place.
Height & Depth Adjustments for Plunge Routers
We also have a plunge base for our Dewalt router . A plunge base operates completely differently from a fixed base router, but the operation of setting the height between brands is pretty similar.
In its simplest form, a plunge base allows you to push the router down to a specific depth and then lock it at that position. Ours has a lever on the backside that you can toggle. What is cool is where you go from here.
If you want to go to the same depth in multiple locations, you can drop the depth stop and lock it in place. Some routers will have a screw down here, or a dial up above to finely adjust the position of the depth stop in case the original setting was slightly off. Once this is set, it will limit the depth of the plunge and you can get uniform results in multiple locations.
Using Depth Stops To Make Deeper Cuts
Say you want to make a pocket that is ½” deep. You won’t want to take that in one deep plunge with the router. What you can do is plunge the bit down until it is touching your surface. Drop your depth stop so it is touching the highest incremented step, and lock it in place. Then you turn the stop one click. That’s the first pass and on most routers, it is probably ¼”. You make that pass, then you turn it again, and now you are at ½”.
Routing In the Correct Direction
Understanding the correct direction to move the router is crucial for safe and effective routing. Like anything else in the workshop, the key to safety is control .
You see, router bits cut wood by spinning blades. These blades have to exert force on the wood fibers to shear them. If you are routing a groove in the surface of a piece then both sides of the bit are touching wood and direction doesn’t matter as much. The problem comes when you are on the edge of a piece.
With edge routing, one side of the bit is touching the wood and exerting force while the other side isn’t. This imbalance makes the router want to pull itself along the piece. This can cause the router to run away from you, which can be dangerous. And in the case of a router table, it can quickly pull the piece along the blade which may catch an unsuspecting finger. To cut safely, it is better to resist this motion and move the router in the opposite direction that it wants to pull .
Right Hand Rule For Routing Direction
The easiest way to determine this direction is with another right hand rule. Use your right hand to determine the direction based on the position of your thumb and index finger relative to the edge of the workpiece.
On your right hand with your palm facing upwards, hold your thumb and index finger flat and middle finger out pointing upwards. Then turn your palm over and pretend your palm is the base of the router and your middle finger is the router bit. If you touch your thumb to the edge of the workpiece that you want to cut, then your index finger will point in the direction you need to go. This works regardless of whether you are on the outside of the piece, the inside of the piece, holding the router by hand, or using a router table.
When To Break The Direction Rule
Now let’s talk about when to break this routing direction rule. If you are routing along the edge of a piece, there is a possibility that the blade’s teeth will catch the wood fibers and split them instead of shearing them. This is especially true if you are taking larger passes, or working with wood that is prone to splitting like the Alder we used on our DIY headboard . And if the wood isn’t prone to splitting, the blade may catch and that energy will cause the router to kick back.
In certain situations, like edge routing, climb cutting can prevent tear-out and kickback. Climb cutting means allowing the router to go in the direction it wants to. Because you are now going the opposite direction, instead of cutting in the direction of the wood grain, the teeth are now cutting perpendicular to the wood grain. So they shear the wood grain and then scoop it out. You have to be careful doing this and have a firm grip on the router or piece. The router will want to pull, but you have to resist that. Climb cutting can save your piece so long as you do it carefully.
Related – Hubby How To – Modern DIY Platform Bed Frame
Using a Guide
A common use for a router is for routing slots and grooves. To do this, you need a guide to ensure you have a straight line. Some routers come with an edge guide accessory, but those aren’t really necessary. All you need is a straight edge. Even the factory edge on a sheet of plywood will do the trick.
To cut a groove with a guide, first start by placing the router where you want the groove to be located. Then bring a straight edge up until it’s touching the edge of the router’s round part on the base, and clamp it down. After that, use the router to check the other end of the groove, and then clamp that side of the straight edge down as well. Now if you route along this line, you will get a perfectly straight line.
Utilizing Router Base Concentricity
The trick here is that you are using the round part of the router base. This works because the router bit is concentric to the base plate. This means it is always the same distance from this circular edge. If you twist the router or bobble while making your cut, the line will stay straight. If you used the straight edge of the router base here instead, then every little bobble would show up in the finished cut.
Tip – Straight bits work great for cutting slots and grooves, but we’ve found that a nice downcut spira l bit enables us to do grooves in plywood that result in almost no tear-out. This means less cleanup and sanding work later and no ruined workpiece that’s hard to repair. It’s totally worth the little extra cost for the bit.
Using a Bearing
There are six different types of router bits and each has a specific purpose. Several bits use bearings to reference the edge of a piece. These bearings make it extremely easy to get consistent and perfect results from your bits. However, there are three things that you need to keep in mind when using these bearings.
Proper Positioning
First is proper positioning for flush trim and template bits. You want the bearings to ride perfectly along the template or other surfaces, but you don’t want to risk cutting into those surfaces. So only set the position of the bearing as close as possible to the surface you intend to cut. The last thing you want to do is shave off part of your template.
FAQ – Aren’t the bearing and blades exactly the same size, so why would it cut into my template? There are two possible reasons this could happen. The first is a manufacturing error. They may not be exactly the same size. However, this is more common when using cheap bits. The second possible reason is an incorrect technique.
Gentle Pressure
The second thing to keep in mind is to use gentle pressure. You want to hold the bearing against the side of the piece, but this should be a gentle motion. If you press too hard, you will cause deflection in the router bit’s shaft, and you’ll end up with a bad cut. Let the router bit do the work. You are just there to guide it.
Maintain A Flat Router Base
Lastly, you also want to be sure to keep the router base flat on the surface of the piece. You don’t want to let the router tip or it will mess up the cut. If you have two handles, it is good practice to keep one over the surface of the wood and pushing down, while you use the other to guide the router around.
Many trim routers have a place by the base for you to put your fingers. Then you can rest your hand on the piece and apply downward pressure to prevent tipping as you work your way around the piece.
Related – How To Use Router Guide Bushings For Inlays
More Router Guides & DIY Projects
We’ve covered the basics of how to use a router in this guide to help you enhance your woodworking skills and achieve professional results. You can learn more from our other router guides too. Now it’s time to get started on a DIY project!
So check out more of our DIY projects articles for inspiration or grab some DIY plans from our Site Shop or Etsy Shop !
- Hubby How To: DIY Flipping Workbench
- Hubby How To – Modern DIY Platform Bed Frame
- Hubby How To – DIY Modern Headboard With Floating Nightstands
- Hubby How To: DIY Hanging Daybed Swing Plans
- Hubby How To: DIY Stacked Rain Barrel System
15 Awesome DIY Projects At Home You Can Do
A simple eco-friendly checklist for spring cleaning, interior door makeover: easy diy project at home.
Hope this guide helps you get started with using a router! Let us know what projects you are going to do with a router in the comments below!
Disclaimer: This post includes affiliate links, and I will earn a commission if you purchase through these links. Please note that I’ve linked to these products purely because I recommend them and they are from companies I trust. There is no additional cost to you .
Similar Posts
How to use router guide bushings for inlays.
Curious about how to use a router guide bushing for an inlay? In this post, we’ll cover how to determine the size of guide bushings needed and how to use…
How To Make A DIY Garland Using Power Tools
Want a faster way to make party or holiday garlands? Using scissors and hole punches are a thing of the past. Check out how to make a DIY garland using…
Why Rubio’s SheenPlus Is Better Than Polyurethane
Looking for a Polyurethane alternative? Or simply want to increase the sheen on surfaces? We’ll show you why we prefer Rubio Monocoat’s SheenPlus over polyurethane, when to use it, how…
23+ Gifts For DIY Lovers That They’ll Actually Use
Gifting will always be around as it’s a way people celebrate a life event or show love and appreciation to another person. However, people are unique and can be hard…
A Comprehensive Guide On How To Use A Drill
Looking to understand how to use a drill like a pro? Power drills are a staple tool in every DIYer and woodworker’s toolkit. We’ll cover all you need to know…
Hubby How To: Custom DIY Storage Shelves
Most of us always have some storage totes or seasonal decor stuffed away somewhere. Well, the best way to organize items like this in an efficient manner is by building…
Leave a Reply Cancel reply
Your email address will not be published. Required fields are marked *
- svg]:stroke-accent-900"> 826K
- svg]:stroke-accent-900"> 622K
- svg]:stroke-accent-900"> 246K
- svg]:stroke-accent-900"> 45K
How to Use a Router the Right Way
By Timothy Dale
Updated on Dec 31, 2022 12:55 AM EST
12 minute read
We may earn revenue from the products available on this page and participate in affiliate programs. Learn More ›
Woodworking can challenge your DIY skills and encourage creativity. However, sticking to the most basic tools can be limiting. It’s helpful to familiarize yourself with different tools of the trade to keep your options open, and one such power tool is the woodworking router .
Using a router table or a handheld router, woodworkers can make cutouts, sharp edges, rounded edges, joints, decorative cuts, rabbets, and dadoes, and they can even make duplicates from a pattern. There are many router projects woodworkers can tackle with a standard cutting bit, but switching to one of several router bit shapes to create unique designs and intricate patterns can open up more customization options.
If you want to learn how to use a router the right way, this guide has you covered.
Important Router Parts
Knowing how to use and maintain a router tool properly begins with understanding the key parts of a router and how they function.
- Motor: An electric router typically has a vertically mounted motor that converts electrical energy into mechanical energy to drive the cutting blade.
- Collet: A collet is essentially a steel sleeve enclosed within a locking or retaining nut that secures the router bit in the router while working.
- Base: Handheld router bases have a hole in their center, through which the router bit protrudes to cut into the target material.
- Speed control: This dial can be used to increase or decrease the router cutter’s operating speed.
- Depth stop: A depth guide that can be preset to a specified depth for making cuts at consistent depths or stopping the router from being lowered too far into the material.
- On/off switch: A switch or trigger that turns the router on or off.
4 Types of Routers to Know
There are multiple common router types, including fixed-base routers, plunge routers, trim routers, and router tables.
1. Fixed-Base Router
The most common type of handheld router is known as a fixed-base router . With this type of router, the position of the router bit remains fixed. For instance, if you set the cut depth to ¼ inch, the router bit will only protrude past the base ¼ inch until the depth is changed. Fixed-base routers are designed for a wide range of shaping and edging jobs. A fixed-base router is a good option as a first router to get started, since it is relatively easy to learn how to operate and often costs less than plunge routers or router tables.
Our Recommendation: Bosch 2.25 HP Electronic Fixed-Base Router at Amazon for $149 The 12-amp motor and adjustable speed dial allow users to find the right pace for a given project, and the hardwood handles add comfort and stability.
2. Plunge Router
A plunge router tends to provide greater ease and control when woodworking because the tool’s base can rest on the material surface while the router blade is lowered for the cut. This is in contrast to a fixed-base router, where the bit protrudes from the bottom of the router to a set depth. Experienced woodworkers can use plunge routers to create dovetail, groove, dado, and mortise cuts, as well as deep through cuts. Just make sure to set the depth stop to avoid inadvertently cutting deeper into the material than originally intended.
Our Recommendation: WEN RT6033 15-Amp Variable Speed Plunge Woodworking Router at Amazon for $87.03 This plunge router has a variable speed setting for improved control, edge guide for accuracy, and protective carrying case.
3. Trim Router
Similar to a fixed-base router, a trim router is a smaller tool best suited to cutting through thin pieces of wood or laminate. Most trim or laminate routers have small, light-duty designs and are easy to guide with one hand. Expect these tools to have smaller motors than fixed-base and plunge routers, so they may not be the best general-purpose tool option.
Our Recommendation: WEN RT1460 6-Amp Handheld 1/4-Inch Variable Speed Laminate Trim Router at Amazon for $53.97 A guide fence for straight cuts, trim guide for curved cuts, and variable speed dial help this trim router produce optimal results.
4. Router Table
One drawback of a handheld router is that the tool relies on the user for control and accuracy. If the router slips, shifts, or kicks back, material can potentially be cut, nicked, or otherwise damaged. However, a router table can help improve control and accuracy by providing a stationary position in which the router tool can sit. Once attached to the router table, the router bit sticks up out of the table surface. The material can then be guided into the blade for a variety of jobs, including shaping trim, cutting rabbets, or making tongue-and-groove edges.
Our Recommendation: SKIL 10 AMP Fixed Base Router Kit at Amazon for $199 This SKIL router bundle includes a router table with built-in bit storage and a 10-amp fixed-base router tool for smooth, precise routing.
Router Safety Tips
Consider these key safety tips before picking up a router, so you can stay safe while you work.
- Keep a firm, two-hand on the router, especially when the bit first comes in contact with the material. This also helps to keep control of the tool if it becomes stuck in the material and kicks backs while in use.
- Make sure to disconnect the power to the router when changing bits, performing router maintenance, cleaning the tool, or mounting router attachments.
- Make personal protection a priority when using a router. Put on long pants, a long-sleeve shirt, closed-toe shoes, gloves, safety glasses, a dust mask, and consider using ear plugs or similar hearing protection.
- Regularly inspect, clean, and maintain the router to ensure that it functions properly while you work. Replace worn-out parts, discard old bits, and make repairs as necessary to keep the tool in good condition.
RELATED: The Best Router Lifts for Your Workshop
Initial Setup and Calibration
An initial setup, inspection, and speed calibration is necessary before attempting to use a router. Typically, a 2 horsepower (hp) router is suitable for most DIY and home woodworking jobs. You can also get small, 1.25hp routers for trim, or full-size 3hp routers if you feel the need for extra power. Before using a new router, consult the owner’s manual to get a detailed breakdown of the parts and controls.
- Disconnect the power and turn off the power switch before changing bits.
- Select the appropriate router bit for the job by checking the type, shank strength, cutting length, cutting diameter, and sharpness of the bit.
- Set the router bit depth to ensure that you don’t cut deeper into the material than intended.
- Make sure the set speed is suitable for the target material.
- Test the bits, attachments, clamps, and locking devices to ensure that they are properly tightened and secured.
- Clamp the target material to prevent it from shifting while you work.
- Clear the immediate area of any people or pets.
- Connect the power and line up the router bit to make the initial cut.
- Set up a guide fence to make straight cuts in the material or use a trim guide for curved cuts.
- Do not bring the router bit into contact with the material until it has had enough time to speed up, otherwise the bit may kick back instead of cutting through.
How to Use a Router for Cutting Decorative Edges
A common use for routers is to cut decorative edges into a project to give it a more intricate finish. Follow these steps to learn how to cut decorative edges into the target material with your router.
STEP 1: Select a suitable bit, set the depth, and position the router.
The bit for the job typically depends on the type of cut desired. For cutting straight through wood, a basic straight bit is the best choice, but if you want to make round edges, then it’s better to go with a round-over bit. There are a wide assortment of router bits available for making decorative edges. Keep in mind that the type of decorative edge is determined by the type, size, and shape of the router bit. Consider which bit would be right for your project and insert it into the collet.
Check the depth of the bit and set it to the desired level, then line up the router with the material. It’s important to note that for the best results, you may need more than one pass with the router to get an accurate cut. The router bit should be set to a shallow depth to remove a small amount of material with the first pass. Reset the depth to take off more material with the second pass. Repeat this process as necessary for a smooth finish.
STEP 2: Turn on the router and begin cutting the material.
Connect and turn on the router, then let the bit get up to speed. Do not touch the bit to the material before it has had time to speed up or it might kick back. When the bit is at the set speed, move the router to start cutting into the material.
Keep in mind that the router direction matters. Always push the router from left to right for routing the perimeter of the material and push the router from right to left if you are routing an interior cut. If left and right are a bit confusing, you can also think of it in terms of a clock. Push the router in a counterclockwise direction when you are routing the perimeter and push the tool in a clockwise direction when working on an interior cut. This means that the router should be moving against the rotation of the bit.
However, in some cases, the grain might pull away when you attempt to move the router in the usual direction. In these instances, you will need to use climb-cutting to finish the cut. With climb-cutting, the user pushes the router with the rotation of the bit instead of against it.
STEP 3: Make a pass with the router to cut the decorative edge.
As the router bit is cutting into the material, move the router along the edge of the material to start creating the decorative edge. Begin with the grain sides first because if you get a tear-out on the corners, you can clean them up as you route the other two sides. Move the router at a steady pace while routing in a counterclockwise direction for perimeter cuts and in a clockwise direction for interior cuts.
STEP 4: Reset the depth and route the final pass.
After the first pass is complete, reset the depth and route the next pass. Repeat this process as necessary until you route the final pass. Some projects will require only two passes, though others may require three or four to get the desired results.
RELATED: The Best Woodworking Tools
How to Use a Router for Cutting Rabbets and Dadoes
A rabbet refers to a step-shaped or L-shaped cut along the edge of a piece of wood, creating a shoulder in the material. It’s typically made to form a match to the edge or tongue of another piece to create a rabbet joint. Another common cut that you can do with a router is called a dado. This refers to a grooved cut in the face of a board. It’s usually cut across the grain and is intended to fit the edge of another board to form a dado joint.
To cut a dado or a rabbet, it’s usually best to use a straight or rabbeting router bit. Set the desired depth for the project, but make sure that the initial depth is more shallow than the final depth. The purpose of this shallow setting is to remove a small amount of material with the first pass before resetting the depth for a subsequent pass. By making cuts with more than one pass, a woodworker helps reduce the chance of burning the wood, wearing out the bits, or damaging the piece.
Line up the router and bit with the area that will be cut. Consider using one or more guide fences to ensure that the cut is straight.
Connect the router, turn on the switch, and allow the router bit to speed up. Do not touch the router bit to the material before it has reached the set speed because the bit may get caught or kick back off the material if it is not operating at a high enough speed. Once the router bit is up to speed, move the router bit to the material to start cutting.
For a rabbet joint, push the router counterclockwise across the edge of the material to cut an L-shaped shoulder. If you are cutting a dado, push the router counterclockwise across the face of the material to create a grooved cut in the face of the board.
STEP 3: Reset the depth and route the final pass.
After making the initial cut, reset the depth, and push the router through a second pass to remove more material. Depending on the desired depth, you may only need two passes to complete the rabbet or dado cut, but cuts might require three or four passes to get the desired result.
Other Router Projects for Beginners
Beyond finishing edges and routing rabbets and dados, here are a few more common applications for this versatile power tool.
Shaping stylish molding : Decorative molding is perhaps the most interesting thing a router can create. Using different bits, you can craft everything from simple rounded moldings to more elaborate Roman ogee or beaded patterns for doors, windows, baseboards, or chair rails.
Recreating patterns : Routers can be used to cut patterns, grooves, and designs across multiple pieces of wood. For instance, if you have a broken table or other piece of wood, you can use the router to “trace” the outline of the original piece and re-create it as many times as you like. Routers can also be used on flat pieces of wood to trace intricate designs or lettering.
Recessing door hinges : Routers can be used with a jig to cut space for recessed door hinges or lock faceplates. Recessed hardware yields a more finished appearance and smoother operation.
Router Maintenance Tips
One of the most important factors to keep in mind is that a router requires regular maintenance to ensure that it will continue operating properly. Use these router maintenance tips to ensure that your router lasts for years.
- Don’t clean a router by blasting with a burst of high-pressure air from an air compressor. This often can force dust and dirt further into the machine. Instead, use a shop vac to clean out the router after every use. This will prevent sawdust from being pulled into the router by the cooling fan and creating future problems.
- Corded routers can put a lot of strain on the electrical wire as it constantly winds, unwinds, shifts, pulls, bends, and is maneuvered for better access to projects. Make sure to inspect the power cord for any areas that show signs of wear or significant strain. Repair or replace damaged parts before using the tool again.
- Cordless routers can also develop problems due to the constant insertion and removal of the battery packs. Check the batteries, battery compartment, and the battery contact areas for wear and tear. Make repairs or replace any parts that are too worn out to safely use.
- Routers typically have a plastic facing on the base that is intended to prevent the router from scratching or marking the surface of the material as you work. However, over time this facing can become dusty, grimy, or worn, so you need to ensure that the facing is clean and in good condition before using the router.
Final Thoughts
Handheld routers come in a small variety of types and can be used for a wide assortment of cuts, grooves, joints, and decorative edges. By learning how to use a router, amateur woodworkers and DIYers can take their skills to a new level with a powerful tool that can cut straight lines, shape decorative edges, and create connections between two or more pieces of wood with intricate joints and detailed joinery.
Like most power tools, users need to be aware of the potential dangers and risks of these tools to avoid damages and personal injury. Take router safety seriously and make sure to stay on top of regular maintenance tasks, like inspecting and cleaning the tool before and after every use.
RELATED: The Best Power Tools and DIY Products Tested by Bob Vila Experts
Your Biggest Questions About Heat Pumps, Answered Your Biggest Questions About Heat Pumps, Answered
By Tony Carrick
Anker’s New Home Battery Tower Is a Sleek, Modular Step Toward Complete Energy Independence Anker’s New Home Battery Tower Is a Sleek, Modular Step Toward Complete Energy Independence
By Chase Brush
The Right Way To Use a Router
Many woodworkers consider the router to be the most versatile portable power tool in the shop. Here's why.
Gear-obsessed editors choose every product we review. We may earn commission if you buy from a link. Why Trust Us?

We love the Bosch's beechwood knob handles. But more impressive is the whopper of a 2 ¼-hp motor that allows you to control its speed with the turn of a red thumbwheel. The Bosch doesn't roar. With a sharp carbide bit, that big motor just purrs as the router leaves a gleaming, crisply shaped edge in its wake. It's a wonderful thing to behold, and as power tools go, it's a classic that makes every amateur look good.
Move to the Right
The biggest mistake novice woodworkers make is advancing the router in the wrong direction. It's easier to practice the correct technique than it is to explain it, but here goes: First, always move the router against the rotation of the bit. That allows the bit to cut into the work, giving you full control over the tool. If you advance the router in the same direction as the bit's rotation, the router will run along the edge of the workpiece and you'll have to fight to keep control.
When looking straight down at the top of a router, the bit rotates in a clockwise direction. That means you should move the router from left to right, but—and this is important—that's only true when the router is positioned in the middle between you and the workpiece.
For example, if you were routing the edges of a board, you'd move the router from left to right across the edge closest to you. But, when routing the opposite edge, the one farthest away, you'd advance the router from right to left. That's because the workpiece--not the router--is now in the middle. In that position, the router is moving right to left, but it's correctly cutting against the rotation of the bit.
Be the Co-Pilot
One of the best and safest ways to begin routing is to use router bits fitted with ball-bearing pilots . The bearing rides along the edge of the workpiece, effectively keeping the bit on course and in control. Simply set the depth of cut and you're ready to rout. There's no need to attach an edge guide to the router or straightedge fence to the work. The bearing alone will ensure the bit cuts to the proper width. Nearly all edge-shaping and trimming bits are available with ball-bearing pilots, including rounding-over, Roman ogee, chamfer, rabbeting, and flush-trimming.
Take the Guided Tour
Once you've mastered basic routing techniques, create a precise milling machine by equipping your router with a guide bushing and straight-cutting bit . A guide bushing (aka template guide) is simply a steel collar that mounts onto the router's base. Protruding from the collar is a short steel tube through which the bit extends. The tube is guided along the edge of a template, allowing you to quickly cut boards to virtually any size or shape. Here's a brief description of how to use a guide bushing:
Start by cutting a template to the desired shape out of plywood, MDF or hardboard. When making a template, take into account the offset between the outside edge of the bushing and the cutting edge of the bit; a distance that's usually about 3/16 in. Also, be sure to sand the template edges perfectly smooth. Otherwise the bit will transfer any imperfections to the workpiece.
Clamp the template in place, then advance the router into the workpiece. Be sure to keep the guide bushing pressed tightly against the edge of the template. Guide bushings are useful for routing curved, irregular shapes, but also for precisely cutting hinges and mortises. You can buy guide bushings individually, but it's usually more economical to buy a multipiece set .
Turn it Upside Down
Mounting your router upside down in a router table greatly expands the tool's capabilities, making routing easier and safer. With the tool held securely in place, you can use both hands to safely feed the stock into the bit. And since the bit is clearly visible, you can see exactly what you're doing. (That's not always possible with handheld routing.) Router tables are especially useful when milling smaller parts, cutting stopped grooves, or using large-diameter bits. In fact there are some bits, including certain raised-panel bits, that should only be used in a router table.
You can make your own router table easily enough, and many table saws have extension wings that accept a router. But for most DIYers, a store-bought router table is the best option since it comes ready-to-use with all the necessary equipment, including an adjustable fence, miter gauge, On/Off switch, dust-collection port and bit guard. However, router tables typically don't come with a router, so check the specs before buying one to ensure your router fits the table.
Claim Your Door Prize
Building traditional frame-and-panel cabinet doors is virtually impossible without a router. The stiles and rails that form the door's frame are joined together with tight-fitting coping and sticking joints. The door's raised panel has beveled edges that fit into shallow grooves cut in the frame parts. The frame is assembled with glue only, so all the joints must be milled precisely for the parts to properly fit together. And the router is the tool to use to cut these joints. You'll also need a router table to safely make the cuts.
Rail-and-stile bits are sold in sets, and raised-panel bits are sold individually. You can also buy cabinetmaking sets , which include all three bits.
Dovetail Details
There are few wood joints as strong or as beautiful as a dovetail. Wedge-shaped pins fit snugly into dovetail-shaped tails, effectively locking the two boards together. Dovetail joints are commonly used to build drawers, blanket chests and jewelry boxes.
And while it is possible to cut dovetail joints by hand, using a router and dovetail template is precise and much faster. A dovetail template is essentially a vise that's equipped with adjustable metal fingers. You clamp the tail board into the template and then use a dovetail router bit to cut the tails. Next, install the pin board into the template and use a straight router bit to cut the pins. It's a little tricky getting all the pins and tails properly aligned initially, so make a few test cuts in scrap wood before routing the workpieces.
Four Ways to Rout
Straight groove.

Grooves appear everywhere in woodworking. For example, use one to seat a drawer bottom in drawer sides, front and back. To make a groove with a router, use a fence accessory. Set the fence the required distance from the bit and set the bit's depth. Not much more to it than that.
Dovetail Joint

Dovetailing with a router requires two things: a dovetail template and a corresponding bit. You perform two operations with the template. With one you cut the dovetail and the other you cut the pins. Push the two parts together with wood glue between them and you have a nearly unbreakable joint.
Routered Edge

A router can cut any decorative edge on a workpiece, from a simple rounded corner to a series of curves in a single pass with a Roman ogee bit. These shaping operations may be guided by a ball-bearing bit or a bit minus the bearing. With either method, take a test run on scrap before working on the actual piece.
Template Cut

The fastest way to make exact duplicates of a part, such as four bracket feet for a blanket chest, is to use a pattern and a top-bearing straight bit. The bearing rolls along the pattern as the straight bit carves the wood.
Joe Truini is a former carpenter and cabinetmaker who writes extensively about remodeling, woodworking, and tool techniques. He's the author of eight DIY books and is a long-time contributing editor to Popular Mechanics .

Roy Berendsohn has worked for more than 25 years at Popular Mechanics, where he has written on carpentry, masonry, painting, plumbing, electrical, woodworking, blacksmithing, welding, lawn care, chainsaw use, and outdoor power equipment. When he’s not working on his own house, he volunteers with Sovereign Grace Church doing home repair for families in rural, suburban and urban locations throughout central and southern New Jersey.

.css-cuqpxl:before{padding-right:0.3125rem;content:'//';display:inline;} Tools Reviews .css-xtujxj:before{padding-left:0.3125rem;content:'//';display:inline;}

The 9 Best Pole Saws for Every Tree-Pruning Job

The 4 Best Garbage Disposals, Tested

The Best Cordless Impact Wrenches

The 8 Best Battery Stringer Trimmers for Lawn Care

Amazon Warehouse Craftsman Tool Sale: Get 50% Off

The 9 Best String Trimmers of 2024

The Best Reciprocating Saws for Powerful Cuts

The Best Portable Table Saws

The 5 Best Zero-Turn Mowers of 2024

The Best Dust Collection Systems for Your Shop

The Best Electric Mowers of 2024 for Any Yard
Select store
How to Use a Router

Intermediate
Under 2 hours
Learn how to use a router to widen your DIY horizons. Using a wood router to shape and cut wood lets you finish edges for a professional look. You can use a router to create patterns and grooves in wood.
This guide will outline how to use a router. There are two main types of routers: table routers and handheld routers. These steps will apply primarily to how to use a table router. It’ll cover safe usage, router mounting and operation. You’ll also learn how to tighten, loosen and remove a router bit .
Safety Tip: Always read the manufacturer’s instructions prior to operating any tools.
Router Basics and Safety
Router mounting and router types, how to cut grooves and rout edges, how to change router bits, minimize splintering when routing, how to use a router fence, tips for router use.

What does a router do? It allows you to make:
- Customized cuts to shape the edges of a board
- Finished laminate edges
- Tongue-and-groove or other special joints in woodworking
- Detailed mouldings and trimwork
A handheld router or table router is a good choice for small-scale DIY woodworking projects. It helps you get used to the motions and methods of the tool.
First and foremost, consider safety. This includes both protective gear and best practices for router use:
- Always wear safety glasses and ear protection . Routers are loud and splinters and sawdust will fly.
- Cut-resistant work gloves are also a good idea when you’re learning how to use a router.
- Remove jewelry.
- Avoid wearing loose clothing.
- Securely pull back long hair.
When you’re geared up, know how to use a table router safely:
- Hold onto both handles when operating it. This helps you maintain control of the tool.
- Plan your cuts. You want to be out of the way when the router leaves the wood or starts cutting.
- Make several shallow passes instead of a single deep pass. Each pass is one run of the wood through the router. It’ll protect you, your project and your router.
Follow the same tips when learning how to use a trim router. Trim routers are smaller versions of wood routers. They’re used for trimming laminate.

You can mount a router to a workbench or a router table. Attach a router to a workbench with a shop-made jig. If you have a router but need to purchase a table, make sure they’re compatible with each other.
Router tables have a hole for the bit. They allow for adjustments to the bit height. Tables also have a router fence and a dust port. The dust port can connect to a shop vacuum or dust collector.
Router Mounts and Routers Vs. Shapers
Mounting a router upside down underneath a table turns the router into a small shaper. This is a versatile tool to make moulding for a custom trim work piece.
Shapers and routers are quite similar. One difference is shapers have larger bits, called cutters. These cutters are strong enough that a single cut may be enough. A shaper is more powerful than a router. It can make it through huge projects without faltering. Some may consider the shaper to be an upgrade from a table router. Shapers are sometimes another name for huge industrial routers.
Table Routers Vs. Handheld Routers
The router on a router table is upside-down compared to a handheld router. Feed stock from right to left along the fence. Stock is a board or piece of wood.
Always feed the wood the opposite direction of how the bit is turning. In general, this means:
- Feed counterclockwise on a router table with the bit facing downward. This is an uncommon setup.
- Feed clockwise on a router table where the bit sticks up from the table. Most table routers are like this.
- Feed counterclockwise when using a handheld router.
Sometimes you may guide a stock against a piloted bit instead of a fence. In that case, feed the stock so that it travels clockwise around the bit while cutting.

Understanding the answer to “What does a router do?” means properly using the tool. You could run a router quickly along a board to get done faster. However, if you take your time, the project will turn out much better.
As with many power tools, practice makes perfect:
- Try your technique on scrap wood to get used to the router. If possible, use the same wood and bit you’ll be using on your project.
- Always make shallow test cuts to determine a safe feed rate.
- Figure out the cut-speed and amount of wood to remove with each pass.
- Once you’re comfortable with the tool, use it to finish your woodworking.
- Use a push stick when your wood is nearly through. It will protect your fingers from the bit.
Safety Tip: Recklessly running wood through the router could injury you, the project or the tool. Always carefully run the wood against the spin of the blade. Slow and shallow cuts are key.
Feed a table router slowly from right to left for best results. The wood goes in against the direction the blade is spinning. You should feel light to moderate resistance as you work. The resistance means the router is doing the work. Feed speed is determined by the wood and the type of cut you’re making.
If you push the material with the spin of the blade, it’s called climb cutting. This is dangerous and should be avoided. The blade might pull the material from your hands. It could even pull your hands or fingers into the blade.
If you’re working too fast, you’re force-feeding the router. Force-feeding stock means the bit touches the wood fewer times per cutting pass. Avoid doing this. It often bogs down the machine. Put another way, it slows down your router in a way that you can hear it struggling.
Force-feeding gives a rough surface. It also leaves wavy lines called chatter marks. They’re unattractive and you’d need to sand them off for a smooth finish. Working slowly means you’ll have less to polish up when you’re done.
Feeding wood too fast could give you these unwanted results:
- Snap the bit off at the shank
- Damage your router
- Overheat the bit and char the wood
- Give you an uneven cut and chatter marks
- Damage your project
Make shallow passes for smoothest results. Try to resist the urge to make a cut in a single pass. The larger the bit, the deeper the cut. Work even slower on harder materials. For a successful deep cut, you’ll need to make more shallow passes.
Read on for specifics on using a router to smooth edges or cut grooves in wood. These are two common uses for a table router or handheld router.

To cut a groove with a router, follow these steps:
- Set up the cut. Use a guide fence if needed.
- Adjust the bit so it's cutting somewhere around 1/4-inch deep.
- Run the wood through the router to make the cut.
- Raise or lower the bit and repeat until you've cut a groove to the depth you want. A handheld router needs the bit lowered. Raise the bit on a table router where the bit faces upward.
Tip: Listen to the machine. Any change in sound gives you clues. The pitch changes when you're working the machine too hard by feeding too fast. The router may also sound different when your bit is dull and needs replacing. Over time, your ears can help guide your router technique.
Follow these steps to rout the edge of a board with a bit that has a bearing:
- Set the bit to the final depth of cut and leave it there.
- Start routing. Hold the router bearing near the edge. The bit should only cut 1/3 or 1/4 of its final width.
- Rout the edge. Gently run the board through.
- Move the bearing in so it’s half the distance to the edge and repeat.
- Don’t worry about a wavy edge for the first few passes. It’s not possible to make a straight line as you cut a base.
- Clean up the edge in the final pass. Guide the pilot along the edge of the board to smooth it.

Tightening or loosening the router bit depends on the individual router. Routers have either a dual-wrench collet or a pin lock collet. The collet is the nut that holds the bit to the router. Some routers require two wrenches to tighten or loosen the bit. Others need only one wrench.
On a router without a locking shaft, you’ll need two wrenches. One wrench holds the base plate steady or arbor shaft. The other loosens the collet itself. Most dual-wrench collets are on large routers, such as table routers.
Before changing bits or rotary tool attachments , unplug your router. Double-check that the router is off and unplugged. Do this before doing any maintenance or changing out router parts .
To loosen the router bit on a dual-wrench collet, follow these steps:
- Unplug the router.
- Put the router on the bench with the bit pointing to the right.
- Put the left wrench on the arbor nut.
- Place the other wrench on the collet nut.
- The wrench holding the collet should be slightly higher than the wrench on the arbor nut.
- Grip the two handles together like a pair of scissors.
- Squeeze to loosen the arbor nut.
- Once the torque has lessened, use the collet wrench to loosen the nut.
- Pull the bit from the collet. Take care not to cut yourself. The bit is sharp.
To tighten the bit on a dual-wrench collet, follow these instructions:
- Make sure you’ve got the correct shank and collet combination. Not all bits fit all collets.
- Turn the router so the bit points left.
- Repeat the steps above for loosening the bit, but tighten the nut instead.
- Put the right wrench on the arbor nut.
- The wrench securing the collet should be a little lower than the wrench on the arbor nut.
- Using one hand, squeeze the two handles together like a pair of scissors.
- Tighten the nut to hold the bit in place.
If your router has a shaft that locks in place, you’ll only need one wrench. These are often seen on smaller routers, like trim routers. They’re called lock pin or pin lock collets.
To loosen the bit on a lock pin collet, follow these steps:
- Put the router on the bench. Make sure the bit points to the right.
- Lock the collet in place following the manufacturer's directions. Consult your router manual.
- Put a wrench on the nut with the handle pointing toward you.
- Push down on the wrench, toward the table, to loosen the bit.
To tighten the bit, turn the router so the bit points left. Follow the same steps as above.
Tips on Changing Router Bits:
Most router bits have 1/4-inch or 1/2-inch collets. Almost all routers have collets that fit both shank sizes. Trim routers lack this option.
When inserting the bit, don’t push the shank all the way into the collet. Instead, leave a 1/16-inch to 1/8-inch gap. The space between the bit collet and the base of the mounting hole reduces vibration from the bit to the machine. It also allows room for the shank to seat properly as the nuts are tightened.
Tighten the bit firmly. Avoid overtightening.

When you’re routing a board, you do all four sides. The end of a board often splinters when you rout it. The culprit is the transition from routing end grain to routing side grain. One of the challenges of learning how to use a table router is getting a smooth and unsplintered edge.
Minimize splinters while cutting by trying one of these methods:
- Using light passes, start cutting on the end of the board. Then work your way around it.
- Rout the side of board next.
- Rout the other end, then the last side.
- You’ll rout away damage from the end grain when you rout the side grain.
More advanced users can try this to eliminate splintering entirely:
- Clamp a piece of scrap wood along the edge of the stock you're routing.
- The side grain on your woodworking project is protected by the scrap wood.
- The scrap board will splinter instead of your project.
- This gives the wood the support it needs at the base. In many cases, it keeps piece from splintering.
When you’re doing other finishing work and know how to use a trim router, it’s important to go slowly. Splintered laminate won’t give the same finished look. By carefully guiding your router along the edge, you can get a smooth finish on your work.

Learn how to use a router guide to get straight lines with unpiloted bits. Straight bits, also called unpiloted bits, have no guide bearings on the end. They’ll only cut in a straight line when you guide the router against a fence. Always use a router guide, or fence, when using unpiloted bits.
Router bits that have bearings are called pilot bits. Pilot bits work in handheld or table mounted routers. You can use them with or without a fence to guide the workpiece.
Before using a router fence, make sure there is no wood waste on the work surface. Debris could interfere with the wood from laying flat and flush against the fence.
Run test cuts before routing your final piece. Use the same scrap wood and bit that you plan to use on your project. Feed the router from right to left if the fence is between you and the router. Feed in the opposite direction if the router is between you and the fence.
Follow these steps to use a router fence:
- Set up the fence so the amount of exposed bit along the cutting edge is small.
- Push the material flat against the fence and down to the work surface as you run it through the router.
- Always use consistent pressure and speed. Work at a slow and steady pace. Patience is key.
- Control the cut depth by changing your bit height. Make sure it only cuts a little at a time.
- The rotation of the bit pulls the router tight against the fence.
- Adjust the bit to cut a little deeper after each pass.
- Stop when you’re reached the depth of cut or groove you want.

Always set up your router and table per the manufacturer’s guidelines. If you're working on a router table, check your router and mounting plate. Make sure that both are tightly fastened before cutting.
Test cuts are important for router users of all skill levels. Use the same bit and wood type as your project to find what speed works best.
Make as many passes as you need for the bit, material, and your comfort level:
- Once you've got a smooth profile for a template, make a light final pass routing the opposite direction. This smooths out minor blemishes. It also helps give you a mirror-smooth finish.
- The bit will still want to push the stock along at a fast pace, but don’t let it. You can control the speed because you're removing such a small amount of wood.
For a handheld router:
- Always rout counterclockwise when using a handheld router for cutting.
- Run a final pass clockwise.
Some wood splinters or chips at the edge. In those case, stop routing normally when you've got 1/16 inch of wood to remove. Make the final pass working clockwise.
Use sharp bits. Sharpened bits let your router work most efficiently. Discard damaged or broken bits. Sharpen or replace dull bits.
Dull bits can cause many problems, including:
- Bogging down the motor
- Burning your project
- Kicking the wood back out of your hands
To see if your bit is sharp, look at the edge in the light:
- On a sharp bit, you’ll see two surfaces coming to a point for the edge.
- If you see a white line, get the bits sharpened.
When you’re buying a router, choose one with lots of horsepower. The greater the horsepower, the less noise a router makes. Table mounted routers typically have more horsepower than handheld routers. If possible, get one with a speed control and adjustable base.
Learning how to use a router may take a bit of practice, but it's worth it. Knowing the answer to “What does a router do?” is a valuable skill for any DIY enthusiast. Enjoy professional results on your woodworking projects by routing the edges.
Find the router bits or lumber you need to get started today. The Home Depot delivers online orders when and where you need them. For special projects and one-time jobs, consider our tool rental options for all your woodworking needs.
Shop this Project
")
Royal Mouldings 5534 4/25 in. x 1 1/8 in. x 96 in. Finished PVC White Lattice Moulding (1-Piece − 8 Total Linear Feet)
Related guides.
Explore More on homedepot.com
- White Standard Shower Curtain Liners
- Pegasus 36 in. W x 31 in. H Rectangular Aluminum Medicine Cabinet with Mirror SP4589
- Shop Soft Close Doors Zeafive Medicine Cabinets
- Shop Puluomis Bathroom Vanities
- 2 Person Adjustable Jet Direction Freestanding Tubs
- Shop Regular (60-96 in.) Arms Chaise Lounges
- Classic Attached Pillow Sofas & Couches
- Costway White Folding Bed with Twin Mattress, Rollaway Guest Bed with Sturdy Metal Frame and Foam Mattress Made in Italy HW66085
- Shop Leather Black Sofa Beds
- Shop Home Decorators Collection Assembly Not Required End & Side Tables
- Clear Prime-Line Door Hardware
- Grade 8 3 in Bolts
- 1/4 in Structural Screws
- T1 Mailboxes
- Nickel Door Latches
- Brown Wall Mount Mailboxes
- Twin XL Laura Ashley Sheet Sets
- Shop Landscape Small (Under 20 in.) Art Prints
- Hooks Amanti Art Wall Mirrors
- Abstract Black Art Paintings
- Highly Rated Luggage Sets
Shop by Brands
- Shop Arctek
What's in Season
- Shop Polymer Sealants
- Crimp Zurn PEX Fittings
- Shop 24 x 24 Gym Mats
Download Our App
Customer Service
- Check Order Status
- Pay Your Credit Card
- Order Cancellation
- Shipping & Delivery
- Product Recalls
- Help & FAQs
- My Preference Center
- Privacy & Security Center
- Specials & Offers
- Military Discount Benefit
- DIY Projects & Ideas
- Truck & Tool Rental
- Installation & Services
- Moving Supplies & Rentals
- Protection Plans
- Rebate Center
- Subscriptions
- Corporate Information
- Digital Newsroom
- Home Depot Foundation
- Investor Relations
- Government Customers
- Suppliers & Providers
- Affiliate Program
- Eco Actions
- Corporate Responsibility
- Home Depot Licensing Information
Our Other Sites
How can we help?
- ©2000-2024 Home Depot |
- Privacy & Security Statement |
- My Preference Center |
- California Privacy Rights & Report |
- Limit the Use of My Sensitive Personal Information |
- Do Not Sell or Share My Personal Information |
- California Supply Chain Act
- Store Directory

Subscribe Today!
Save up to 64% and get a free gift. Subscribe »

Which Way Does the Router Spin? – Tricks of the Trade
We may receive a commission when you use our affiliate links. However, this does not impact our recommendations.
I learned this in engineering school and soon found out it worked for my router. It is called the “right-hand thumb rule.”
When trying to remember which way your router bit is spinning so you can feed the wood in the correct direction, you can use the right-hand thumb rule.
Pretend your right hand is a router and your thumb is the router bit. If you are holding the router with your hands and the bit is pointing down to the floor, then hold your hand in front of you with your thumb pointing to the floor. Then curl your fingers. That’s the direction your router bit is spinning.
If you are using a router table, hold your hand with your thumb pointing to the sky. Curl your fingers, and that’s the direction your router bit is spinning.
That way you will never get confused again and always know the correct feed direction.
And it works for almost anything that spins: faucets, screws (regular thread), changing a tire (if you want to know which way to tighten or loosen the nuts) etc.
With Power Tool Essentials – Digital Collection you’ll learn:
About proper drill press speeds for different bits and how to set the pulleys to match. Tips for tilting & realigning the drill press table for accurate drilling. The simple steps to keep mortiser chisels and drill bits sharp and cutting true. How to set the mortiser bit and chisel perfectly to avoid heat build-up and improve chip removal. Ripping and cross-cutting tips for sheet goods and solid wood. How to improve cuts using the proper blades. Where to stand and how to position your hands and body for the safest, most accurate performance. Simple maintenance and accurate setup and much more!
Learn the ins and outs of power tools with this digital collection!
Here are some supplies and tools we find essential in our everyday work around the shop. We may receive a commission from sales referred by our links; however, we have carefully selected these products for their usefulness and quality.

PSA Sandpaper Roll
Flush Trim Saw
Safety Glasses
I get the router bit explanation. I don’t get the lug nut or any thread explanation though. Is your thumb supposed to be the exposed thread of a lug nut? If it is, then your fingers would’ve loosening. How about a faucet, what is your thumb supposed to be?
- How to Videos
- Customer Service
- Advertise/Media Kit
- Affiliate Program
- Become a Contributor
- Active Interest Media
Start typing and press Enter to search

Your Cart is Empty
Have an account?
Log in to checkout faster.
You may also like
Save BIG on Power Tools:
- Magazine Home
Handheld Routing

Getting a grip on the essentials
When you get your hands on a router for the first time and turn it on, it’s easy to be intimidated by the power that jumps to life in that small package. But once you learn to wrangle the little beast, you get to be fast friends as you realize all the tricks it can do, from shaping profiles and cutting joints to making perfect shapes and identically sized multiples.
Mastering the router starts with knowing how to set up the tool and guide it. Regardless of whether you’re using a fixed-base router or a plunge router, successful work means getting clean cuts located exactly where you want them. There are two basic approaches to routing. The first is handheld routing, which is taking the tool to the work. The second is mounting the router in a table, in which case you’re bringing the work to the tool. Each approach has its advantages and disadvantages. In this article, we’ll focus on handheld routing, covering the fundamentals of tool setup, proper feeding technique, and basic router guidance for making common cuts.
A Bit About Bits
Clean cuts depend first of all on using sharp, good quality bits. Carbide is the order of the day here. Don’t expect high-speed steel (HSS) bits to keep their edges for long. Also, avoid suspiciously inexpensive bits, which are often poorly machined from inferior materials.
Many bits are available with either a 1⁄4"- or 1⁄2"-diameter shank, and most routers these days include interchangeable collets to allow use of either size. Select the larger shank when possible. It provides a better grip in the collet, and the extra mass minimizes chatter, especially on long or large bits. A notable exception here is a bit used for mortising. In that case, it’s best if the shank is the same size or smaller than the diameter of the fluted area, because it allows you to plunge deeper than the fluted section.

First things first: installing a bit. To ensure a good grip, don’t let a bit drop fully down in the collet recess before tightening it. If the shank touches the bottom of the recess, tightening the collet nut may then jam the end of the shank against the bottom of the recess, making removal difficult. To prevent the problem, raise the bit 1⁄8" or so before tightening the collet. If the top of the cutter is allowed to sit on top of the collet, the rounded fillet may prevent the collet from fully tightening on the shank (Photo A). Again, lift the bit slightly before tightening the collet.
When tightening a collet nut, there’s no need to bear down with killer pressure. If two wrenches are required for the job, squeeze them together with one hand as shown in Photo B to achieve proper tightness. To loosen the nut, reverse the wrench positions.

Securing the workpiece can be as important as securing the bit. Work that shifts or slides around invites miscuts and possible injury. Use a vise, clamps, bench dogs, or whatever suits the piece. I-beam risers work great for holding panels up off the bench (Photo C). By clamping the risers to the bench, and the work to the risers, you can work at a more comfortable height, while a bit projecting below the panel is largely unobstructed. A portable router rest provides a protective platform for bits, as well as convenient storage for wrenches and bits in play (Photo D).

Feeding a router
For a bit to cut as intended, the router needs to be fed in the correct direction, as shown in Figure 1. Proper feed direction ensures that the rotation of the bit pulls it against the workpiece edge (in the case of a bearing-guided bit) or against a fence. Feeding in the opposite direction (called climb-cutting) causes the bit to push the router away from the edge or fence, resulting in an erratic cut. Climb-cutting does have its uses, as explained in the sidebar at left, but should only be used with bearing-guided bits, not with a fence.
Proper feed speed depends on the bite, the bit, and the density of the wood. Don’t try to hog off too much at once, especially in dense wood, or you risk bit chatter or breakage. As a general rule, when dadoing, grooving, or mortising, take a series of 1⁄4"-deep passes to get to the final depth you want. Most profiles can be cut in a single pass, but sometimes the cleanest profile is achieved with a first pass a hair shy of final depth, finishing up with a very light cut. This is a particularly good approach when routing woods that are prone to tear-out or scorching.

When dadoes intersect a rabbet, rout the rabbet last so it will remove any cross-grain tear-out.
Pay attention to the sound and feel of the tool as you cut. If it seems to be straining, take a lighter cut and/or decrease your feed rate. Try to feed at a consistent speed; neither so fast that you stress the bit, nor so slow that you risk burning the wood. If you’re relatively new to routing, the best thing you can do is to practice on scrap before laying into your project wood. Ideally, use scrap of the same species or density.
No matter how carefully you feed, the unsupported fibers at the end of a cross-grain cut are likely to blow out to some degree. When routing profiles, make it a practice to rout the end-grain edges of a workpiece first. The subsequent long-grain cuts will remove any tear-out (Photo E).
If an adjacent long-grain edge isn’t to be routed, you can back up the profile cut with a piece of scrap to eliminate tear-out (Photo F). When routing a dadoed board that terminates into an edge rabbet, as in common cabinet joinery, cut the dadoes first, as the subsequent rabbet will remove any tear-out (Photo G).

The Climb-Cutting Controversy
Climb-cutting means feeding a router “backwards” from the usual direction shown in Figure 1, above.
Some woodworkers argue against this operation because it causes the router to self-feed, compromising control. However, climb-cutting can be valuable in that it eliminates tear-out because the bit is cutting downhill to the grain instead of lifting it up, as shown in the drawings below. For example, rabbeting the back of a picture frame often causes tear-out along the inner edge. To eliminate the problem, set your bit for full depth of cut, and then climb-cut for the first pass, disregarding neatness. Then follow up with a cut in the regular direction, as shown in the photo.
Check it out yourself next time you’re experiencing tear-out. Just make sure when climb-cutting to hold the router very firmly against the edge of the workpiece as you rout, and always finish up with a pass in the regular direction.

Guiding a router
A router is seldom guided freehand. Its travel is usually directed by the pilot bearing on a bit, a template-guided bushing, or by a fence or edge guide. The approach you take depends on the availability of a suitable bit, the location of the cut on a workpiece, and whether you’re using a template or not.

A guide bushing runs along the edge of a template, allowing routing of hinge mortises and other shaped recesses.
Let the bit be your guide
A bearing-guided bit is a great option for precisely controlling a cut. The bearing on most bits sits below the cutter. This is the case with most profile bits, such as the one in the lead photo at the top of the article, as well as rabbeting bits, slot cutters, and others. The bearing rides along the edge of the workpiece, while the cutter above does the shaping work. A flush-trim bit is basically a straight bit with a bottom-mounted bearing whose diameter is just a few thousandths of an inch larger than the cutting diameter of the bit. This makes it the perfect choice for routing two surfaces flush to each other for operations like trimming laminate (Photo H). A pattern bit has a top-mounted bearing, which is designed to follow a template attached to the top of a workpiece (Photo I).

When using bearing-guided bits, it’s important to prevent the router from tipping. To keep it flat, orient one handle over the workpiece, applying firm downward pressure as you work. When rounding a corner, rotate the router to maintain handle orientation and downward pressure over the workpiece. With a flush-trim bit, adjust the bearing so that it rides only 1⁄16" or so below the top edge of the reference surface. That eliminates the possibility of the cutting flute scoring the surface.
Keep in mind that flush-trim bits and pattern bits aren’t designed to hog a lot of material. With the exception of plastic laminate and other thin materials, a workpiece should first be rough-cut (usually with a saw) to within 1⁄16" or so of the final edge before routing.
Guide bushings for template routing
Guide bushings (also called template guides) are metal collars that attach to a router’s sub-base. In use, a bit (usually straight) projects through the bushing, which rides along the edge of a template that’s fixed to the top of the workpiece. Bushings are available in a variety of sizes to accommodate bits of different diameters.
Bushings are ideal for template-routing hinge mortises and other recesses (Photo J). You can also use them to create multiple identically-shaped parts in much the same fashion as you would use a pattern bit. However, when making a template, you’ll need to account for the offset between the edge of the bushing collar and the cutting diameter of the particular bit you’re using.

Using a fence
One of the simplest router guidance methods is to run the edge of the base along a straightedge fence fixed to the workpiece. You can use a jointed piece of wood or a proprietary self-clamping straightedge like the one shown in Photo K above. To set up the cut, draw a cutline on the workpiece, measure from the edge of the router base to the cutting perimeter of the bit, and then place the fence that distance from the cutline. For fast, efficient setup of multiple cuts made with the same bit, make up a couple of offset blocks to the distance required.
When routing against a fence, feed direction is important in order for the bit to pull the router against the fence instead of causing it to veer away. Always feed the router left to right as you face the bearing edge of the fence. Never climb-cut against a fence.

Edge guides
An edge guide is basically an accessory fence that attaches to the base of a router via one or two extension rods. The fence attaches to the body of the edge guide, which can be adjusted to any location on the rods and then locked in place.
The fence rides along the edge of the workpiece to guide grooves, dadoes, mortises, and other cuts (Photo L). An edge guide fence typically extends about 8" from the bit, which is useful for routing grooves relatively near the edge. However, it doesn’t have enough reach to cut most shelf dadoes and other joints near the center of larger workpieces. One of the best uses for an edge guide is cutting accurate mortises in table legs and other furniture parts.
Most manufacturers offer proprietary edge guides for their particular routers. Better models are compact and include a tight locking mechanism and micro-adjustability. The body should include a notch at the center to accommodate the bit when shaping workpiece edges with non-bearing-guided bits.
Related Categories
Power tools & accessories, dimensional lumber, hand sanding tools.
- Choosing a selection results in a full page refresh.
Favorite Your Store
Form field Zip or City is required. Please fill out the value.
Favorite Store
Hours of Operations
JavaScript seems to be disabled in your browser. You must have JavaScript enabled in your browser to utilize the functionality of this website.
WE ARE OPEN
Our other sites:

Routing, Woodworking & Industrial Tooling
(Approved Official Stockist of Trend)
Recently added item(s) ×
You have no items in your shopping cart.
- Trend Router Cutters Disabled pages >
- Cutting with router bits >
- Feed direction for routers
- Why Wonkee Donkee Trend Tools
- About Wonkee Donkee Trend
- What is a Trend router cutter?
- What are the different types of Trend router cutter?
- What are the different Trend router cutter sets?
- What are the parts of a Trend router cutter?
- Trend router cutter shanks
- Trend router cutter flutes
- What is the guide on a Trend router cutter?
- What Trend router cutter spares are available?
- What are the different Trend router cutter materials?
- How are Trend router cutters sized?
- Wonkee Donkee's top tips for choosing router cutters
- What are the different Trend router cutter ranges?
- What is the Trend Professional range?
- What is the Trend Trade range?
- What is the Trend CraftPro range?
- What are the different types of Trend replaceable tip router cutters?
- What Trend replaceable tip router cutter spare parts are available?
- How to change the blades on a Trend replaceable tip router cutter
- What are Trend straight router cutters?
- What are the different types & sizes of Trend straight router cutter?
- What are Trend rebate router cutters?
- What are the different types & sizes of Trend rebate router cutter?
- What are Trend trimming and profiling router cutters?
- What are the different types of Trend trimming and profiling router cutter?
- What Trend trimming and profiling router cutter sizes are available?
- What are Trend spiral router cutters?
- What are the different types & sizes of Trend spiral router cutter?
- What are Trend chamfer and V-groove router cutters?
- What are the different types of Trend chamfer and V-groove router cutter?
- What different Trend V-groove router cutter sizes are available?
- What are Trend ovolo / rounding over router cutters?
- What are the different types & sizes of Trend ovolo cutter?
- What are Trend radius router cutters?
- What are the different types & sizes of Trend radius router cutter?
- What are Trend ogee router cutters?
- What are the different types & sizes of Trend ogee cutter?
- What are Trend bead router cutters and reed router cutters?
- What are the different types & sizes of Trend bead cutters?
- What are Trend edge moulding router cutters?
- What are the different types of Trend edge moulding cutter?
- What are Trend jointing router cutters?
- What are the different types of Trend jointing router cutters?
- What Trend dovetail router cutter sizes are available?
- What Trend finger jointing router cutter sizes are available?
- What Trend mitre corner & mitre lock router cutter sizes are available?
- What other Trend jointer router cutter sizes are available?
- What are Trend scribe and profile cutters?
- What are the different types of Trend scribe and profile cutter?
- What are Trend raised panel router cutters?
- What are the different types of Trend raised panel router cutter?
- What are Trend panel moulding router cutters?
- What are the different types & sizes of Trend panel cutter?
- What are Trend slotting and grooving router cutters?
- What Trend slotting and grooving cutter parts are available?
- What are the different types of Trend slotting & grooving cutter?
- What are the different types of Trend weatherseal cutter?
- What are Trend router cutters for drilling?
- What are the different types of Trend drilling router cutter?
- What Trend drilling router cutter sizes are available?
- What are Trend miniature bearing router cutters?
- What Trend miniature bearing cutter sizes are available?
- What are Trend solid surface material router cutters?
- What are the different types & sizes of Trend solid surface cutter?
- What are Trend burrs and rasps?
- What are the different types & sizes of Trend burrs and rasps?
- Door hanging router cutters and accessories
- Doll's house router cutters
- How to fit a Trend router cutter
- How to change the guide bearing on a router cutter
- What is a router?
- What are the different types of router?
- How does a router work?
- What are the basic parts of routers?
- What accessories are available for routers?
- Trend router jigs
- What to consider when choosing a router
- What is a router table?
- What are the parts & accessories of a router table?
- Mounting a router in a router table
- Using a router in a router table vs. using a router hand-held
- Tips for using a router
- Common routing applications
- What are the different methods of guiding Trend router cutters?
- Adjusting the cutting depth on a router
- Trend router speed rate
- Trend router feed rate and feed direction
- Routers and dust extraction
- Router kickback
- Working in different materials with a router
- Using a beading router cutter
- Using a plugmaker router cutter
- Plunge cutting with router bits
- How to use a guided router cutter
- How to use a plunge-cutting router cutter
- How to cut a groove or housing with a router & guide fence
- How to cut a circle or arc with a router and beam trammel
- How to cut out inlays with a router
- How to carve letters and numbers with a router
- How to round over an edge with a router
- How to make a finger joint with a router table
- How to cut a stopped groove on a router table
- How to cut curves or irregular shapes on a router table
- How to plane straight edges on a router table
- Using a router jig
- PCD tooling
- Planer blades - Solid carbide
- Professional jigsaw blades
- Professional oscillating tool blades
- CraftPro circular sawblades
- Professional circular sawblades
- Bore size and compatibility chart for Trend sawblades
- Trend sawblade colour codes explained
- The Trend Snappy Quick Release Drill System
- Trend diamond sharpening stones
- What are the different types of diamond sharpening product?
- Usage guide for diamond sharpening products
- Mitre shears
- Folding flush saw (pull saw)
- Biscuit jointers
- What are the different clamping systems and accessories from Trend?
- What is the measuring and marking equipment available from Trend?
- Trend Digital Angle rules
- What are the different safety products available from Trend?
- Trend respirators and safety goggles
- How to check, clean, and store Trend router cutters
- Honing Trend router cutters
- Router maintenance and care
- Router glossary A-C
- Router glossary D-H
- Router glossary I-R
- Router glossary S-Z
© 2016 Wonkee Donkee Trend Tools
Wonkee's Information:
- Terms and Conditions
- Privacy Policy
- Delivery and Returns
Other Group Sites:
- Wonkee Donkee Hand & Power Tools and DIY
- Wonkee Donkee Richard Burbidge Stair Parts
- Wonkee Donkee XL Joinery Internal & External Doors
- Wonkee Donkee Forest Garden Sheds & summerhouses
- Pear Stairs Bespoke Staircases and Stair Parts
- Boys and Boden Stonemarket Paving, wall & Setts

Please use the form below to contact us. We will respond to your enquiry as soon as possible.
Alternatively, please send an email to [email protected] .
Please include your name and telephone number. If you are enquiring about an order with us, please remember to include your order number.
- * E-mail =0){this.value = this.value.replace(' ','');}" />
- Contact No.
* Required Fields
Office Hours: Mon - Fri / 9am - 5pm
By logging into your account , you can: View and amend your billing and delivery address; Update your email address; Change your password; View your wish list; View past orders and re-order if you wish; Change your newsletter subscription.
- Pocket-Hole Jigs
- Jig System Components
- Pocket-Hole Screws & Plugs
- Commercial Machines
- General Joining
- Screw Selector Tool
- Pre-Cut Projects

- Band Saw Cutting
- Circular Saw Cutting
- Miter Saw Cutting
- Table Saw Cutting
- Track Saw Cutting

- Clamp Accessories

- Routing Systems
- Routing System Components

- Cabinet, Drawer & Shelf Jigs

- Bench Systems
- Bench System Components
- Workshop Accessories
- 3D Workbench Builder

- Best Sellers
- Gifts Under $25
- Gifts to Get Started
- Trending This Month

- News & Media
- Product Registration
- Redeem a Plan
- Request a Catalog
- Become an Influencer
- Discount Programs
- Track My Order
- Shipping & Order Policies
- Product Warranties
- Product Manuals
- Discontinued Products
- Customer Reviews
- Satisfaction Guarantee
- Replacement Parts
- Find a Dealer
- Retailer Request Form
Remove Product?

Point the way to routing right
- By Michelle Authorson
- Tags, Categories
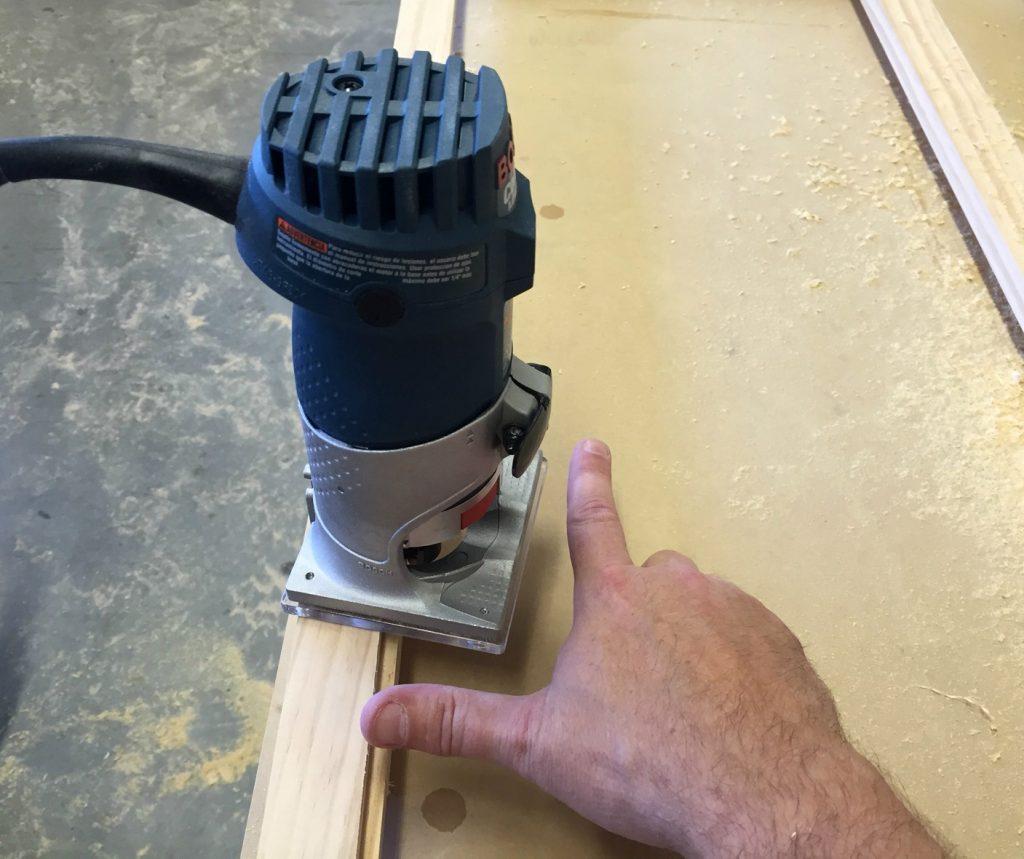
Use this simple tip to guide your router safely and confidently
When you’re using a router on the edge of a board, it can be challenging to know which way to move the router. You should always be moving against the rotation of the bit to maintain the best cut and control. But, how can you tell which way the bit rotates?
Here’s an easy tip. With your bit installed and the router turned off, place it on the piece you are cutting so that the bit is against the edge you want to rout. With your right hand, point your thumb at the edge, and your forefinger will point the way you should move the router. It’s a simple trick, but as long as you use your right hand, it works every time!
Related Articles

Related Plans

Associated Products

Precision Benchtop Router Table

Kreg® Pocket-Hole Jig 720PRO
- Best Seller

Precision Router Table System

Precision Router Table Setup Bars

Kreg® Pocket-Hole Jig 320
- Limited Time Offer
- Award Winning

True-FLEX™ Featherboard - Single
This website uses first party and third party cookies to improve your experience and anonymously track site visits. By visiting this website, you opt-in to the use of cookies.

- Forum Listing
- Marketplace
- Advanced Search
- General Woodworking
- Starting Off
Help please router direction
- Add to quote

Think of it this way, if you have both hands on the handles, the part of the bit closest to your right hand will be moving toward you. That should help you visualize the rotation of the bit, so you are always moving the router so the bit is going forward on the side that is doing the cutting, against the cutter's motion. If you are making a dado or a groove, use a straightedge, and move the router as if you were cutting a shape on the straightedge. This helps me get through my routing day.
This will not help in Routing. But when I was very young, my father taught me to use a right hand rule of thumb when backing up a trailer. You place your hands on the bottom of the steering wheel and the way the the thumbs move left or right is the way the trailer behind you is going to move that direction. No help, I know, just a rule of thumb.

A picture is worth a thousand words.
Attachments

Ideal explanation, Mike. Where did you get the pictures?
Hi Dave. As you look down at the router in your pic, the bit will be turning clockwise, just like the arrow points. If you were to be using a round over bit, for instance, with a bearing to guide it, and the work piece was on the other side of the router, you would go from left to right, so that the cutter was turning into the work. If you were dressing the entire circumfrence of a board that way, the router would be moved in a counter-clockwise direction all the way around it.
The first photo was an Email tip from one of the magazines, the second photo is from one of the router manuals but I don't remember which one.
Thank you all so much for your answers. @ Mike, the second pic is very similar to the one in my bosch manual, but I didn't really understand it. Best Regards. Dave.

Hi, James and Mike. I have seen the second one at Patrick Spielman's book. Best regards for all of you.
- ?
- 129.4K members
Top Contributors this Month


For Home Internet customers:
- Category: Internet Devices
Internet Devices Category
Learn How To Connect A Router To A Modem

- Share "Learn How To Connect A Router To A Modem" on Twitter
- Share "Learn How To Connect A Router To A Modem" on Facebook
- Share "Learn How To Connect A Router To A Modem" on LinkedIn
Before we get started, however, it's worth mentioning that one way to forego the hassle of dealing with standard modem-router setups would be to choose a connection that’s wireless, like 5G Home Internet , which takes just minutes to set up .
If you can't upgrade to 5G Home Internet just yet or it's not available in your area —read on for everything you need to know about how to connect a standard router to a modem.
What you’ll need
First, it’s important to understand the terms for everything you’ll need to connect your router and modem. Here are a few key definitions 1 :
Coaxial Cable
This is the same type of cable used to connect a television to the wall for cable TV. It is a cylindrical cable that ends in screws to connect with outlets.
Ethernet Cable
Sometimes called network cable, this is a specially designed cord wired to connect routers, computers, TVs and many internet and network-enabled devices. Ethernet cables look similar to telephone cables and have a small modular plug on each end. These plugs connect securely to your modem and router. Though ethernet cables come in different colors, they perform the same functions. Internet service providers often use different colored ethernet cables to help distinguish between leads.
This is the term for the device that connects your home to the internet by taking signals from your internet service provider and translating those signals to your local devices. Each modem is assigned a public IP address that identifies it; this address is different from your wide area network (WAN), which is the connection between your house and the internet.
This acts as a gateway between your devices and the modem (some have the modem built in), creating a local area network (LAN) within a home or office. A Wi-Fi router is sometimes known as a (WLAN). These networks keep devices connected. For example, a LAN allows computers to share files with printers. A Wi-Fi router is not the same as a Wi-Fi network, which is the term used for the network that connects all home devices to the internet wirelessly.
How to connect in 4 easy steps
In order to connect your router to a modem, you’ll need the router, modem, and an ethernet cable.
- Unplug your modem’s power source from the wall. Then, make sure your modem is connected to the wall via coaxial cable.
- Once the modem is unplugged from its power source but connected by coaxial cable, plug an ethernet cable (which should be included with your router) into the router’s WAN/uplink port. This port should be marked. If not, it looks like a telephone jack, and the ethernet cable should clip in securely. Often, the WAN port is also a different color from the other ports on your router. Plug the other end of the ethernet cable into your router.
- Plug the modem’s power source into an electrical outlet, then plug the router into an electrical outlet as well. There might be multiple lights on your modem, but the main light is the power light, and it is usually green.
- When this light stops flashing and stays solid, attempt to connect a device, like phone or laptop, to your Wi-Fi network.
Once your router is connected to your modem and both are plugged in to the wall, you should have internet access on all your connected devices. If devices are showing the name of your Wi-Fi network and you’re able to connect but you still don’t have access to the internet, you may need to reboot your router or modem.
Still don’t have internet access?
If your Wi-Fi network is not appearing as an option on your devices, there is probably an issue with your router. When the network appears and your devices say you’re connected but you still can’t access the internet, there is likely an issue with your modem. Your internet service provider can also help troubleshoot these issues.
Some other issues that could be interfering with internet access are damaged coax or ethernet cables, loose connections, or malfunctioning equipment. It’s also possible that service is down in your area, which you can determine by calling your internet service provider. It’s also possible that objects are obstructing your router. You can also purchase Wi-Fi extenders if there are certain parts of a home or office that aren’t getting a clear signal.
After you’re connected
Getting started with a new router.
Once you connect your router to a modem, there are a few precautions you should take to protect your wireless network. The first step to protecting your privacy is changing the default Wi-Fi password that comes with your router. This can prevent hackers from accessing your network. In order to change the password, you’ll need to log into your router.
You can make changes to the settings of your router by opening a web browser or app and entering your router’s IP address in the search bar, then logging in with your username and password. There, you can change passwords and set up guest networks to safeguard privacy.
Using a router without a modem
You can also use your router without a modem to transmit data to printers and external drives. However, to access the internet, you’ll need both an internet service provider and a modem. Now that your router and modem are connected to each other and a power source, your devices should be ready for internet access.
Want to try wireless home internet instead? T-Mobile is America’s fastest growing Home Internet provider. Try T-Mobile Home Internet for 15 days to see if it works for you.
Cancel within 15 days of Home Internet service activation. Limited-time offer; subject to change. Qualifying new Home Internet line and timely gateway return required. Refund via one-time bill credit. Max 1/account. May not be combinable with some offers or discounts.
- https://www.gartner.com/en/information-technology/glossary/
Related Articles

How to Set Up a Wi-Fi Access Point at Home

5 Next-Level Security Wi-Fi Tips for Home

How to Install a Mesh Wi-Fi System at Home
Flooding forces dozens of Iowa road closures. Here's where to avoid.

Travel continues to be discouraged across parts of northwest Iowa as flood waters block roads.
The Iowa Department of Public Transportation strongly discourages travel in Lyon, Sioux, O'Brien, Clay, Emmet, Dickinson, Cherokee, Woodbury and Plymouth counties. More than a dozen roads around those counties are closed.
Are interstates closed in Iowa due to flooding?
The Iowa Department of Transportation expects to close Interstate 29 and Interstate 680 near Council Bluffs on Tuesday night. The DOT originally expected to close the interstates around 11 a.m., but have been able to keep them clear of water and open.
I-29 is expected to close from mile marker 55 (25th Street on the north edge of Council Bluffs) to the interchange with I-880 near Loveland.
The state also plans to close a portion of I-680 west of I-29.
Live updates from Tuesday: Levee breached on Little Sioux River, Interstate 29 closing due to flooding
Where are there road closures in Iowa from flooding?
Many city and county roads are closed in flooded communities.
Here are the highways closed by the Iowa DOT due to flooding:
- US 169 at County Road C10 near Saint Joseph.
- IA 14 between County Road B53 and US 18 one mile south of the Emmetsburg area.
- US 18 between the branches of IA 4 one mile west of the Emmetsburg area.
- US 71 between County Road C13 and IA 10 in Sioux Rapids.
- US 18 county roads M50, one mile east of the Spencer area, and M54 near Dickens.
- US 71 between county roads B40 and B17 near Spencer.
- US 18 county roads M44 and B19 one mile west of Spencer.
- IA 9 between County Road M34 and IA 86 around three to four miles east of the Lake Park area.
- IA 10 between county roads M12 and M36 near Peterson.
- IA 10 between county road M12, four miles east of Sutherland, and M36 around three miles west of Peterson.
- IA 3 between US 59 and County Road C38 in Cherokee.
- US 59 between County Road C44 and IA 3 in Cherokee
- IA 141 between IA 31 near Smithland and IA 175 near Mapleton.
- IA 31 between IA 141 in Smithland and County Road D30 in Oto.
- IA 31 in between IA 141 in Oto and County Road D30 near Anthon.
- IA 31 between 141 near Anthon and US 59; County Road C63, three miles south of the Washta area.
- US 20 between IA 140; County Road K64 near Moville and County Road L43 near Correctionville.
- IA 12 between I-29 in Sioux City and IA 3 near Westfield.
- IA 3 between the South Dakota state line and IA 12 one mile west of the Westfield area.
- IA 12 between IA 3 and county road C12 near Akron
- At the South Dakota border two miles west of the Hawarden area.
- US 18 between county roads K18 and K24 five miles west of the Rock Valley area.
- US 75 between county roads A52 and A34 roughly four to nine miles south of the Rock Rapids area.
How can you check current road conditions? 511 Iowa has latest information
You can check road conditions online through Iowa 511 , with an interactive map that can show you road closures, current radar, crashes and more.
If you don't have internet, you can call 800-288-1047, or 511 for updated road conditions.
Kate Kealey is a general assignment reporter for the Register. Reach her at [email protected] or follow her on Twitter at @ Kkealey17 .
More From Forbes
Tp-link introduces pocket-size wi-fi 6 travel router with vpn support.
- Share to Facebook
- Share to Twitter
- Share to Linkedin
The little TL-WR1502X is small enough to go anywhere and can even be run from a power bank. The ... [+] router can tether to a smartphone using USB so you can set up a Wi-Fi 6 network almost anywhere.
TP-Link has just launched a brand-new Wi-Fi 6 travel router designed for people on the go who want secure wireless networking, whether they are working in a hotel bedroom or a coffee shop.
The TL-WR1502X offers Wi-Fi 6 speeds and includes robust security features that protect your data. This pocket-sized device is built for digital nomads and it’s small enough to fit in a pocket or work bag. Sadly, it doesn’t come with a carry case, which I think it should but a third-party case should be available from Amazon.
The TL-WR1502X has two Gigabit ports, one for LAN and one for WAN. It provides dual-band Wi-Fi with a maximum speed of 1.2 Gbps on the 5 GHz band and 300 Mbps on 2.4 GHz, which is certainly fast enough for 4K streaming, fast file downloads and Zoom video calls.
The TL-WR1502X enables users to stay connected using USB tethering to their smartphone, piggybacking off the mobile data service with a Wi-Fi connection for multiple devices. On the side of the router there is a sliding Mode switch to set the device in Router/Hotspot/AP/RE modes so that the WR1502X can work as a traditional router, piggyback on an existing network or as a simple access point or range expander. There is also a WPS button next to the Mode switch for automatically adding devices to the network.
This pocket router has advanced support for OpenVPN and WireGuard for a secure and private network, even when connected to a public Wi-Fi hotspot such as a coffee shop. Many people don’t realize how insecure public Wi-Fi can be to hacking attacks. Using a VPN is the easiest way of protecting a laptop or smartphone on a public network.
The TL-WR1502S wireless travel router from TP-Link is small and light. You can set up your own ... [+] protected wireless network almost anywhere, even in a hotel room or a coffee shop.
Best High-Yield Savings Accounts Of 2024
Best 5% interest savings accounts of 2024.
Another handy feature of this little router is its one-step captive portal authentication. This feature makes it easy to connect multiple devices to a public Wi-Fi network. The user just needs to authenticate one time on the router and then all their devices can connect without the need to log in again.
The TL-WR1502X also has a USB 2.0 port for plugging in a USB thumb drive to provide centralized storage or support for a mobile data dongle. The router can also work almost anywhere as its USB-C power port means it can be run with a power bank. This means the router can be used almost anywhere, even where there are no available power outlets.
Setting up the TL-WR1502X is simple. TP-Link’s Tether app is easy to use on a smartphone or tablet. Alternatively, there is a web-based interface that enables users to configure and manage the router using a web browser. Also included in the box are Ethernet and USB cables as well as compact power supply for use on the move.
Verdict: This neat and affordable wireless router offers an enhanced level of security when accessing public Wi-Fi networks. It’s also ideal for turning an Ethernet connection in a hotel room into your own personal Wi-Fi network so a partner or family can also access the Internet on phones, laptops or gaming devices. The TL-WR1502X is a neat solution. You may also want to consider the ExpressVPN AirCove GO Wi-Fi router that I reviewed recently which ties in with ExpressVPN service baked into its firmware.
Pricing & Availability: The TP-Link TL-WR1502X Wi-Fi 6 AX1500 Travel Router is available now from Amazon.com and is priced at $59.99.

- Editorial Standards
- Reprints & Permissions
Join The Conversation
One Community. Many Voices. Create a free account to share your thoughts.
Forbes Community Guidelines
Our community is about connecting people through open and thoughtful conversations. We want our readers to share their views and exchange ideas and facts in a safe space.
In order to do so, please follow the posting rules in our site's Terms of Service. We've summarized some of those key rules below. Simply put, keep it civil.
Your post will be rejected if we notice that it seems to contain:
- False or intentionally out-of-context or misleading information
- Insults, profanity, incoherent, obscene or inflammatory language or threats of any kind
- Attacks on the identity of other commenters or the article's author
- Content that otherwise violates our site's terms.
User accounts will be blocked if we notice or believe that users are engaged in:
- Continuous attempts to re-post comments that have been previously moderated/rejected
- Racist, sexist, homophobic or other discriminatory comments
- Attempts or tactics that put the site security at risk
- Actions that otherwise violate our site's terms.
So, how can you be a power user?
- Stay on topic and share your insights
- Feel free to be clear and thoughtful to get your point across
- ‘Like’ or ‘Dislike’ to show your point of view.
- Protect your community.
- Use the report tool to alert us when someone breaks the rules.
Thanks for reading our community guidelines. Please read the full list of posting rules found in our site's Terms of Service.

New TP-Link Wi-Fi 6 Travel Router Provides Secure Wireless Networking On The Go

Dr. Hura Anwar
A dental surgeon by profession and a freelance content writer by passion
You might like
IMAGES
VIDEO
COMMENTS
The normal feed direction on a router table for making outside cuts is to feed the work piece from the left to the right. A safety issue you'll face every time you turn on a router is which direction to feed the tool over the wood or the wood over the tool. In most situations, you want to feed the router into the wood against the rotation of ...
1. THE RIGHT HAND TRICK. When you're first getting started, this trick is the easiest way to quickly remind yourself of the correct feed direction. It uses your right hand — with your fingers and thumb representing different elements of the router. Start by making a "thumbs up" sign with your right hand.
What is a climb cut. The climb cut is the opposite of the conventional cut. The wood is fed in the same direction as the rotary router bit. So when the router bit is turned clockwise, and you move the router from right to left, you make a climb cut. The climb cut is therefore the unsafe way to work with the router.
Leah from See Jane Drill demonstrates the most commonly recommended direction to push your router, also known as a push cut.Support See Jane Drill by shoppin...
Router Direction. Always feed into the cutter, never with it. Routers generally run clockwise when hand held, and counterclockwise when turned upside down in a table. Check Before Cutting. The easiest way to make sure you are doing things right with the table-mounted router, is to get your eye at table level and look at the bit. You will want ...
Learn how to use a router safely and get great results with a simple tip that ensures you're always movingthe router in the right direction. Get more how-to ...
Left to right? Right to left? Here's a simple, foolproof way to remember router feed direction.MY ROUTER RECOMMENDATIONS:DeWalt Cordless DCW600 - https://amz...
Occasionally router bits equipped with bearings are used in the router table without the fence. We have to remember that the router bit rotation is counter clockwise and adjust feed directions accordingly. When the front edge of the bit is used, the stock is fed right to left. If the rear of the bit is engaged, feed direction is left to right.
Then bring a straight edge up until it's touching the edge of the router's round part on the base, and clamp it down. After that, use the router to check the other end of the groove, and then clamp that side of the straight edge down as well. Now if you route along this line, you will get a perfectly straight line.
STEP 1: Select a suitable bit, set the depth, and position the router. To cut a dado or a rabbet, it's usually best to use a straight or rabbeting router bit. Set the desired depth for the ...
Start by cutting a template to the desired shape out of plywood, MDF or hardboard. When making a template, take into account the offset between the outside edge of the bushing and the cutting edge ...
Lock the collet in place following the manufacturer's directions. Consult your router manual. Put a wrench on the nut with the handle pointing toward you. Push down on the wrench, toward the table, to loosen the bit. To tighten the bit, turn the router so the bit points left. Follow the same steps as above.
Learn how to use a router safely and get great results with this simple tip. With some tools, such as a saw, it's easy to tell which way to move them so that they'll cut effectively and safely. That isn't the case with a router, because there's no simple indicator for which way the tool should move. Here's a simple tip that will ...
Proper Routing Direction. When freehand routing, the bit will be spinning in a clockwise direction. To maintain control of the router, move the router so that the feed direction is against the rotation of the bit.This moves the router along the work piece with a cutting action rather than allowing it to dig in and skip along the surface.
If you are using a router table, hold your hand with your thumb pointing to the sky. Curl your fingers, and that's the direction your router bit is spinning. That way you will never get confused again and always know the correct feed direction. And it works for almost anything that spins: faucets, screws (regular thread), changing a tire (if ...
For a bit to cut as intended, the router needs to be fed in the correct direction, as shown in Figure 1. Proper feed direction ensures that the rotation of the bit pulls it against the workpiece edge (in the case of a bearing-guided bit) or against a fence. ... A router is seldom guided freehand. Its travel is usually directed by the pilot ...
The best way to understand feed direction is to reenact the motion of a router bit. All you need is a pencil and the edge of a table or a bit of wood. Hold the pencil by its eraser-end and place it up against the right-hand edge of your material. The pencil is your router bit, and you are holding it by its shank.
Here's an easy tip. With your bit installed and the router turned off, place it on the piece you are cutting so that the bit is against the edge you want to rout. With your right hand, point your thumb at the edge, and your forefinger will point the way you should move the router. It's a simple trick, but as long as you use your right hand ...
A detailed tutorial about router feed direction and climb-cutting safely! EXPAND THIS SECTION FOR MORE RESOURCES RELATED TO THIS VIDEO *Tools used in thi...
12004 posts · Joined 2004. #2 · May 19, 2015. Katie, another easy to remember trick is to use your right hand. Make a fist, extend your first finger and point your thumb to the left. Put your thumb against the edge you are guiding off of and your first finger shows you the direction of travel.
Hold the thumb and forefinger of your right hand at a right angle to each other and point the thumb at the straight edge. The forefinger will point in the direction of router movement. This of course also works when edge routing. We have a story on this very subject at the link below.
Others are right, a router in a table normally feeds right to left. Only thing I can think of is somehow your cutter is grabbing on the backside to pull it. Also, depending on the size of your cove, it may take several passes. Probably should take more than a 1/16" at a time depending on wood species.
As you look down at the router in your pic, the bit will be turning clockwise, just like the arrow points. If you were to be using a round over bit, for instance, with a bearing to guide it, and the work piece was on the other side of the router, you would go from left to right, so that the cutter was turning into the work. If you were dressing ...
For example, a LAN allows computers to share files with printers. A Wi-Fi router is not the same as a Wi-Fi network, which is the term used for the network that connects all home devices to the internet wirelessly. How to connect in 4 easy steps. In order to connect your router to a modem, you'll need the router, modem, and an ethernet cable.
SIOUX CITY, Iowa - June 22, 2024 - If you are planning a trip in northwest Iowa this weekend you need to be aware of several road closures that may slow down your trip. Between the evening of June 20 and morning of June 22, portions of northwest Iowa received significant rain, resulting in flooding along various primary highways. There are currently widespread flash flooding and river ...
Travel continues to be discouraged across parts of northwest Iowa as flood waters block roads. The Iowa Department of Public Transportation strongly discourages travel in Lyon, Sioux, O'Brien ...
TP-Link has just launched a brand-new Wi-Fi 6 travel router designed for people on the go who want secure wireless networking, whether they are working in a hotel bedroom or a coffee shop.
TP-Link is giving travelers another reason to celebrate with the launch of its latest Wi-Fi 6 travel router. The new device is said to provide secure and seamless internet connectivity for those in need of uninterrupted wireless networking activity. This is designed to enable them to work with the best connections, no matter where they might be ...