
The Ultimate Guide to Kjeragbolten Hike – 2024
Kjerag (the mountain) and Kjeragbolten (a 5 cubic metre boulder wedged in the mountain’s crevasse) have become very popular over recent years, especially because of social media.
Nowadays thousands of hikers, BASE jumpers, thrillseekers and Instagrammers alike from all over the world come to hike to Kjeragbolten and get the daredevil no-photoshopped picture.
I’ve done some of the best hikes in Norway and it’s the reason I decided to write this guide to Kjeragbolten hike with all the information you need including difficulty, time, distance, altitude, how to get there, best time of the year, what to wear, where to stay and safety tips.

* Affiliate disclosure : Some of the links below are affiliate links, meaning I earn a small fee if you click through and make a purchase. There is never any additional cost to you, and I use some of these earnings for my monthly charitable donations .
Some of the most popular tours in Stavanger:
Table of Contents
Kjeragbolten Hike: What to Know Before You Go
Kjeragbolten is one of the most challenging yet spectacular hikes in Norway and provides unparalleled and breathtaking views of the 42Km-long Lysefjorden.
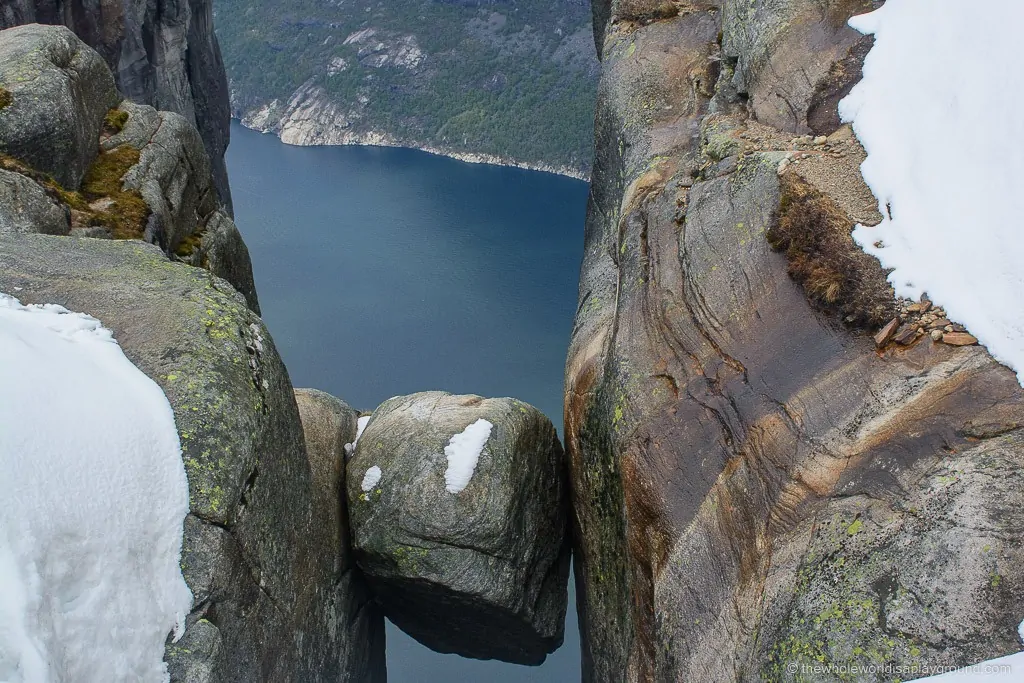
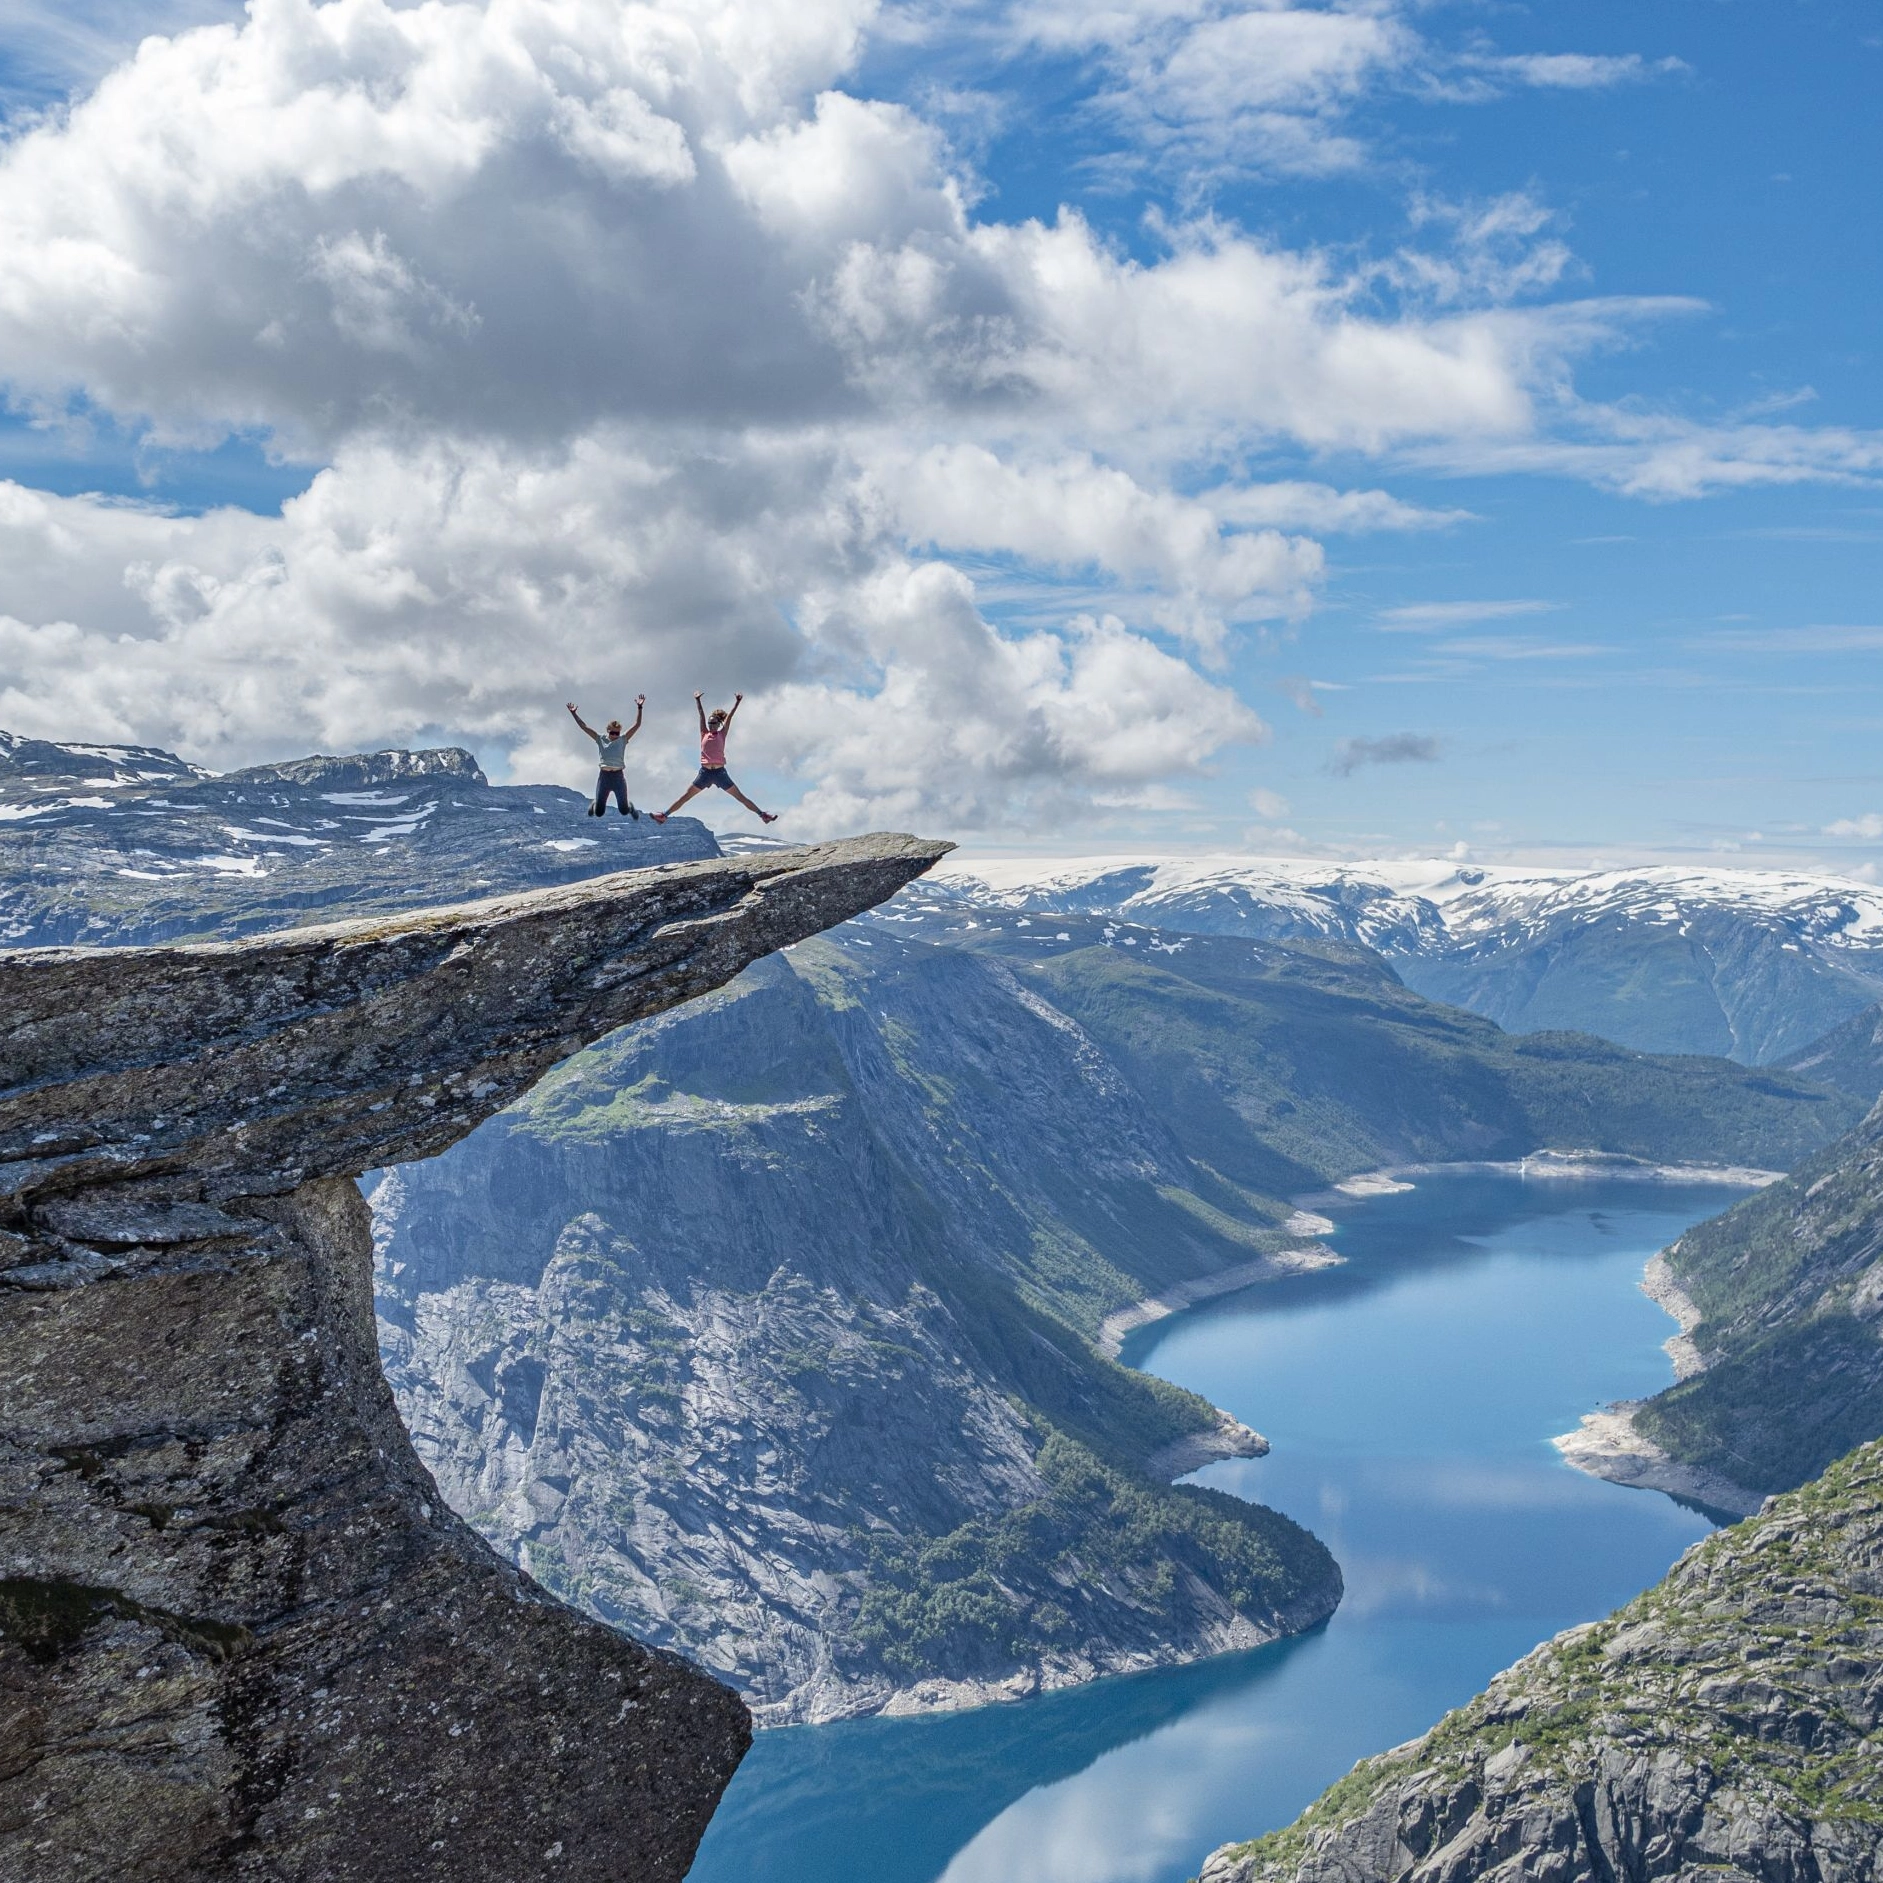
The climax of this hike is standing atop the Kjerag Boulder, a rock suspended above a 984-metre (3,228 ft) deep abyss.
As Kjerag is a popular BASE jumping site, if you’re lucky, you may be able to see BASE jumpers diving from cliffs and down to Lysefjord.
Where’s Kjerag located?
Kjerag is a mountain located in Sandnes municipality, in southern Norway. The closest town is Lysebotn, 100Km (59mi) away from Stavanger and 480Km (300mi) from the capital Oslo.
How to get to Kjerag parking?
Driving from Oslo to Kjerag parking in Øygardstøl is a very long journey and takes approximately 9h.
If you’re in Oslo and want to hike to Kjeragbolten, the best option is to fly to Stavanger and then hire a car or take the available bus in the summer.
You can book your flights to Stavanger with Skyscanner , which is the website that I use and trust.
From Stavanger
To get to Øygardstøl you can take the ferry to Lysebotn and continue by car, or drive via Sirdal (this road is closed in the winter from around October to May/June). Travel time: 2,5 hours each way.
You can hire your car with Discover Cars or Rental Cars here, without any extra costs for you.
There’s a bus from Stavanger to Kjerag (Øygardstøl) operated by Go Fjords . In 2024, it will run daily in July and August and on Saturdays and Sundays in September.
The bus departs from Byterminalen track 6 at 7:45, arrives at the starting point at 10:15 and returns from Kjerag at 16:30.
The roundtrip ticket costs 880 NOK (US$ 80) for adults and 460 NOK (US$ 42) for children. Tickets must be booked online.
Kjerag Mountain is towering 1,020m (3,346 feet) above sea level.
Elevation gain
The difference in altitude is 380 meters (1,246 feet).
Slippery and steep granite terrain with few gravel paths.
The trail is well-marked with signs, and a red T (trail) is painted on many rocks along the path.

Where does the Kjeragbolten hike start?
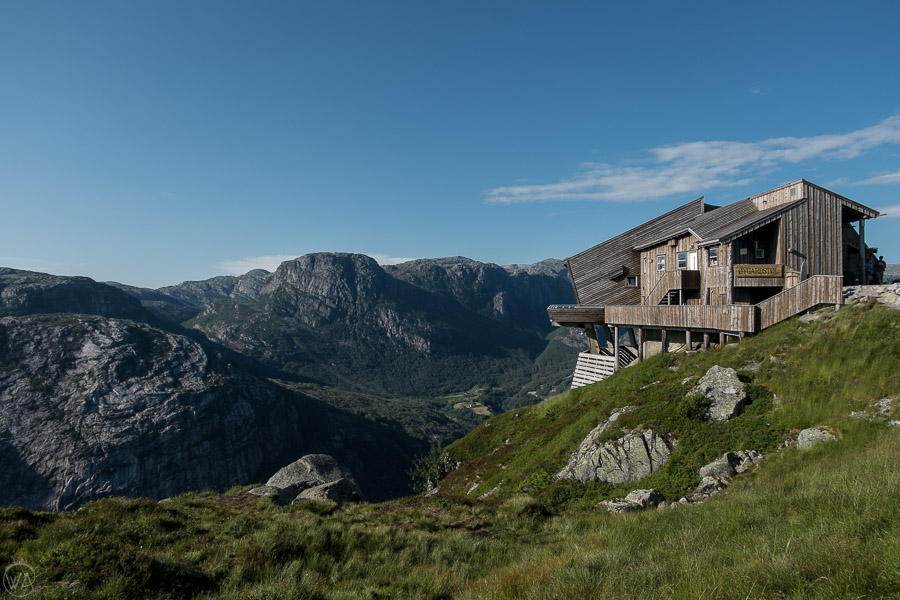
Øygardstøl Mountain Lodge, south of the Lysefjord, is the starting point of the hike.
There’s a café, restaurant, service facility with toilets and tourist information. The car parking fee is 300 NOK (US$ 36).
How long does it take to hike Kjeragbolten?
Kjeragbolten hike time is between 5h and 6h the entire journey. It depends on your fitness level, pace, the amount of snow on the mountain and also how many stops you make to admire the views and take pictures.
I did it in August and took me 1h50min to walk up to Kjerag Boulder from the car parking in Øygardstøl.
How hard is the hike to Kjerabolten?
The Kjeragbolten hike is challenging and recommended to experienced hikers and adults. Because of the steep drops, it isn’t suitable for small children.
The 9.8 km (6 mi) demanding trail will take you up and down hilly mountaintops, with 3 periods of steep climbing interspersed with 2 shallow valleys.

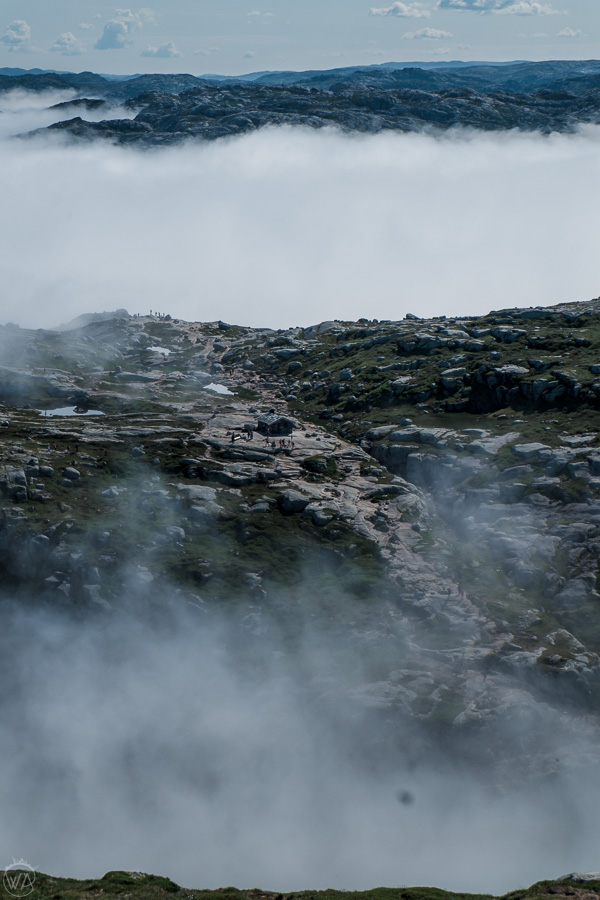
You’ll walk on a moon-like landscape, scramble over rocks, and pass through water streams, waterfalls, mud and even snow.
There are some chains attached to the ground to aid with stability and it also serves as trail markers.

When is the best time to do the Kjerag hike?
You can hike up Kjerag Mountain from mid-May to mid-November, but the best time to do it is from June to September when the weather is more pleasant, and the trail isn’t covered in snow.
If you go during the off-season, you must book a Kjeragbolten hike tour . Note that the snow can cover the roads and trail until May.
You cannot hike to Kjerag in the winter, as the road is closed due to the snow conditions.
What to wear/bring for the hike?
Lysebotn doesn’t get hot in the summer and the temperature ranges from 9 to 22C during this time of the year.
So, you should dress in layers, starting with tight/warm hiking pants and long sleeves, followed by a short, t-shirt and a jacket or lightweight fleece. Wind and waterproof outwear are also recommended.
You should also wear hiking shoes or walking boots and bring a backpack along with water bottles, food, a sun blocker, a small towel and some extra clothes in case you get wet.
Avoid wearing rubber-based / plastic-based materials and denim clothes because they can be uncomfortable.

How much does it cost?
The hike is free, but if you hire a guide, it will cost you approximately 120 euros, including transportation, hotel pickup, and drop-off.
* Note that only the bus to Kjerag is around 68 euros. So, I think it’s a good idea to join a guided hike to Kjerag and you can also select a fjord cruise.
Is it worth hiking Kjerag Mountain?
Hiking up Kjerag Mountain is challenging, but worthwhile. You will be rewarded with astonishing panoramic views of the Lysefjord fjord and take one of the most incredible pictures of your life.

My Experience Hiking to Kjerag & Kjeragbolten
After spending one and a half days in Olso, I took a flight to Stavanger to start doing some of the best hikes in Norway .
After a 50-minute flight, a bus from the airport to Stavanger’s terminal, and a 15min walk I arrived at the hotel.
I just checked in, drooped off my stuff and went to explore the city a little bit.
There are many things to do in Stavanger , including a visit to the very charming old city, with whitewashed houses, dotted with plenty of flowers and cobblestone streets.
After a quick walk and some snaps, I went to the supermarket to get some groceries for the next day (cereal bars, nuts, a sandwich, juice and probably the most expensive mineral water I’ve ever gotten, almost US$ 4.00 each).
After leaving the supermarket I started wondering how expensive is to travel in Norway . I heard that Norway is one of the priciest countries in Europe…

On the next day, I took the bus from Stavanger to Kjerag.
As soon as we left the city, I could appreciate the beautiful Norwegian countryside. The weather was cloudy but pleasant.
The drive was telling us a little bit about the local life. He also said they had a lot of snow, in some places up to 2 to 3m, and in the mountains up to 10m of snow, that year.
So, I was imagining that the fjords would be covered with snow, which for me would make it even more picturesque.
The ride took three hours and 15 minutes, and at 10:45 we arrived at Øygardstøl, the start point of the Kjeragbolten hike.
The hike was not easy!!
It starts with a steep climb up the cliffs from 640m above sea level to 825m. This is the steepest and most challenging part.
The path then follows a track up and over a new ridge before coming down into a valley.

The trail is full of ups and downs, and there are so many rocks, that sometimes I wondered if I were walking on the moon…

The chains attached to the ground help a lot with footing, pulling yourself up and sliding down.
One of the most exciting parts was when I walked to the edge of the mountain and could see the fjord. What a breathtaking view!
I’ll never forget when I stepped on the fjord’s edge for the first time.
It was so high, so high that I was scared of falling, but at the same time, the adrenaline motivated me to be there for a while.
A mix of feelings that is very hard to explain… I just opened a smile like an innocent child in an awe-inspiring moment.
Of course, I could not miss the opportunity to register it.

Once I was on the top of the plateau, there were just a few small climbs and descents, before getting to Kjeragbolten.
After 1:50 hiking, I arrived at Kjerag boulder.
The final 10m was covered with snow, and I even warned people who were taking pictures and said that it was more dangerous than on the top of the rock itself.
As soon as I got in line to take my picture, I heard from an Italian lady: “Ma che paura.” (I’m so scared.). As I replied, her boyfriend warned her to not look down.
I can confess that before I stepped on the suspended rock, I looked down and got some butterflies in my stomach because it was around 1000m high.
However, when I was on the top of Kjeragbolten I was so self-confident that even did a tree pose (a yoga pose in which one stands with just one foot, putting the other foot on your knee and your hands together facing each other up to one’s head).

The weather changed a lot that day, partly cloudy, mostly sunny and foggy.
The view of the fjord was unbelievably beautiful!! Three waterfalls, snow and the fjord’s “lake” pictured magnificent scenery!
I was surprised by this scenery because I had seen only pictures of people on the top of the rock, but I wouldn’t imagine all those waterfalls. Kjeragfossen waterfall is one of the tallest waterfalls in the world.
I couldn’t resist and sat down on the edge again to contemplate the stunning view and take some pictures.

After the lunch break and getting some rest, it was time to take the way back, and I did that with the Italian couple.
We went back admiring the landscape, taking pictures, drinking clear water directly from the fountain, and talking about some of our trips.

At 4:45 the bus departed for Stavanger.
When I arrived, I took a shower, had dinner and went to get some groceries for the next day.
Stavanger is a small city, with a lake in the city centre.
Something about this city reminded me of Switzerland, and I’m almost sure that was not only the prices…
Safe travels and have fun in Norway.
More posts that might interest you:
- Trolltunga: the Number One Hike in Norway!
- Preikestolen Hike, Norway
- Top 35 Quotes About Life Full of Adventures !
I always recommend that you buy travel insurance! It can literally be your lifeline if something happens to you , or your luggage is lost or stolen.

Play safe and get yours. Get a quote with World Nomads here or buy your travel insurance now with SafetyWing using the widget below.
Watch the video: Kjerag Hike

Where to stay in Stavanger?
I stayed at Scandic Stavanger City and it was very nice.
If you’re looking for accommodation in Stavanger, my recommendations are:
* Budget: Stavanger Lille Guesthouse and Stavanger Pop Up Hostel .
* Great Value for Money: Stavanger Bed & Breakfast , Scandic Stavanger Park and Radisson Blu Atlantic .
* Luxury: Frogner House Apartments – Nygata 24 , Hotel Victoria and Thon Hotel Stavanger .
Extra Tips for the Hike
∗ All the hikes in Norway are at your own risk.
∗ Use appropriate hiking clothes.
∗ Bring enough food, water, maps, and a first aid kit.
* Always check the weather forecast before planning your trip.
* Even if sunshine and fair weather are predicted, it can change quickly. Make sure that you are prepared for changing weather.
* Do not hike if the forecast predicts strong winds, heavy rain, or fog.
* The trail gets very slippery when it rains. Use appropriate footwear and hold on to the chains.
∗ There is no cellphone coverage in certain areas.
∗ More information regarding accommodation, transportation and mountain safety can be found at www.visitnorway.com

- Book Your Flight Find deals on airlines on my favorite search engine: Skyscanner . Be sure to read my How to find cheap flights article.
- Rent A Car Rental Cars is a great site for comparing car prices to find the best deal.
- Book Accommodation Booking.com is my favorite hotel search engine. But Hotels.com and Hilton Hotels have very interesting reward programs.
- Protect Your Trip Don’t forget travel insurance! I always use World Nomads for short-term trips and SafetyWing for long-term ones. Find out why Travel Insurance: Much More Than a Precaution, a Necessity .
- Book Tours in Advance Book unforgettable experiences and skip-the-line tickets with GetYourGuide or Viator .
- Book Ground Transportation BookaWay offers a stress-free experience with secure payments and no hidden fees. You pay online and receive your itinerary by email.
- Luggage Solutions Rent your luggage with Cargo or if you need to drop off your own luggage and enjoy your time without dragging it all over a city, find a LuggageHero shop here.
- Get a Travel Card Revolut Card is a pre-paid debit card that enables cash machine withdrawals in 120 countries. I’ve been using my Revolut Card for over a year and never paid foreign-transaction fees again. Get your Revolut Card with free shipping here .
- Packing Guide Check out my How to Pack a Carry-on Luggage For a Five-month Trip to help you start packing for your trip. Don’t forget your camera, chargers and other useful travel accessories.
How to hike Kjeragbolten: Everything you need to know about hiking Kjerag!
This post may contain compensated links. Find more info in our disclosure policy
Hiking to Kjeragbolten was one of the absolute highlights of our Norway trip. In fact, it was a photo of a daredevil hiker standing on the boulder that sealed the deal on our decision to do a road trip through the country!
Kjerag is a challenging climb and we had lots of questions around the practicalities of the hike and what it was like to stand on the infamous Kjeragbolten boulder. Now that we’ve done it, we wanted to share the benefits of our experience with you. Here’s our ultimate guide with everything you need to know about climbing Kjerag and standing on Kjeragbolten!
Click here to read about our Kjerag adventures!
1 | How difficult is the Kjerag hike?
Let’s get this straight: climbing Kjerag is difficult! It’s a 9km route with 3 steep ascents all mixed in with lots of climbing on rocks which can be really slippery if it rains. In total, there are around 600 metres of uphill hiking and, at times, it’s steep enough to need to use the guide chains which line the most challenging parts of the route.
I found the third and final climb a bit of a struggle as it seemed to keep giving and giving but overall the hike always felt manageable and I would consider myself to be of average fitness. My marathon running, fitness loving husband found the whole day a breeze!
The steepest parts of the climb are lined with guide chains:

2 | How do I find my way to Kjeragbolten?
Most of the route is clearly marked with stone piles which have prominent red T’s painted onto them. The markings are positioned closely enough so that the next marking is visible making it easy enough to find the way. There are also some very pretty signposts that provide reassurance of being on the right path!

3 | Where we stayed before hiking Kjerag
We arrived in Oslo the morning before our Kjerag climb and made the 7 hour drive to Lysebotn on the same day. Our aim was to stay as close as possible to Kjerag as we wanted to start the hike bright and early the next morning. We opted to pitch our tent at Lysebotn Camping which is a 5 minute drive to the Kjerag car park. It was a little more expensive than other campsites we stayed at during our Norway road trip but the location was perfect and the views of Lysefjord were breathtaking.

We had planned to stay in Flørli 4444 Hostel, a beautiful hostel located right on the shores of Lysefjord with incredible views across the one of Norways most beautiful fjords. The hostel is only accessible by ferry and unfortunately the ferry had not started for the season when we visited so we never made it. This stunning hostel comes highly recommended and is not to be missed on a trip to Lysefjord – Check prices now!
Click here for the best places to stay at Kjerag
4 | Kjerag and Pulpit Rock (Preikestolen)
After we finished our Kjerag hike we drove to Stavanger and took the ferry to Tau* where we spent the night in Wathne Campsite. Tired, frozen and wet, we treated ourselves to a cabin to thaw out and dry off! The next morning it was a 30 minute drive to Preikestolen where we took on the stunning Pulpit Rock!
*1 day later and the Lysebotn to Songesand ferry was in operation. It runs during the peak tourist season and saves some driving.
A well deserved cabin after Kjerag!

Where to Stay When Visiting Pulpit Rock
Hiking Pulpit Rock is one of the must do Norway experiences, however the hike is very popular and can get very busy during peak periods. We recommend booking your accommodation well in advance and staying as close to the hike as possible to allow for an early morning or late evening hike to the summit.
- Wathne Camping: We stayed here in a cosy cabin in Lysefjord between our hikes of Kjerag and Pulpit Rock. The cabins are spacious and very comfortable with everything you’ll need to relax and unwind after hiking. This was one of our favourite cabins in Norway. It’s a 30 minute drive to the Pulpit Rock car park from the site – Click here for best prices!
- Hostel Ryfylke Vandrerhjem Vaulali: A good budget option if you’re looking for something basic to get some rest on your in between hikes check out this cosy hostel – Click here for best prices!
- Lilland Hotell Apartments: A modern apartment option located in Tau close to the ferry from Stavanger with free parking. Perfect for a short stay while visiting Pulpit Rock – Click here for best prices!
- Haabakk on Sea: Another perfet apartment option located just outside Tau and less than 20 minute drive to the Pulpit Rock car park. close to the ferry from Stavanger – Click here for best prices!
Click here for the best places to stay at Pulpit Rock

5 | Can I hike Kjerag if I’m scared of heights?
I’m not the biggest fan of heights and I found Kjerag manageable. The return journey is more difficult as there are lots of steep downhill sections and I was glad to have my awesome hiking buddy to help me along. As soon as I saw the Kjeragbolten boulder I knew stepping out onto it wasn’t an option as I’d potentially get dizzy and take a tumble. Not recommended when 1,000 metre drops are involved!

The inclines are intense!

6 | What’s it like to climb onto the Kjeragbolten boulder?
DON’T LOOK DOWN are probably the best words of advice we can offer! The boulder is accessed by edging around a small ledge and stepping out onto the rock. The step out onto the boulder does involve a small leap of faith but, if it wasn’t for the 1000 metre drop on one side, there would be plenty of room to maneuver!
7 | Is it safe to climb onto the Kjeragbolten rock?
The most difficult part of Kjeragbolten is stepping around the ledge onto the boulder. The rock itself is quite large and flat so there is a little wiggle room. We’ve googled this and apparently there have been no falls from the boulder which added to our peace of mind.
Front view of the boulder:

The boulder from above:

8 | What to wear to hike Kjerag
Layers! The altitude makes for very changeable weather and temperatures and we experienced rain, snow, wind and blistering sunshine during our hike! Our gear included:
- Hiking boots (we recommend boots rather than runners for the challenging terrain)
- Waterproof pants
- Long sleeve cold weather top
- Lined waterproof jacket
- Waterproof dry bags for our camera equipment. These are extremely useful for protecting your electronics in wet environments
When it rains, it pours! All wrapped up:

Loving my pink layers!

9 | Food and Drinks for Kjerag
There are no shops on the climb so bring enough food and drink supplies for the hike! We brought 1.5 litres of water and some sandwiches, crisps and energy bars. For hikes, I am the designated water carrier while Dave takes care of the camera equipment. I used a Camelbak rucksack which holds 1.5 litres of water and has a bite valve at the front to make for easy sharing between the two of us. I don’t even notice I’m carrying it most of the time which can only be a good thing!
Check prices on Amazon

10 | What else to bring?
We also brought our cameras and a GoPro to record the action – not forgetting lots of spare batteries and an extra memory card! We didn’t see very many hiking poles on the day we climbed but it did seem like they would be difficult to handle on the steepest parts of the route.
Check out the camera gear we use here

11 | Base Camp! Kjerag Information Centre
The hike starts from Øygardstøl which is a few minutes drive above Lysebotn. There’s ample parking, a hiking map, toilets, a small information centre and a cafe. We popped into the information centre to check on the hiking conditions and pay for our parking for the day (100 NOK). At the end of the hike we rewarded ourselves with an expensive diet coke in the cafe and soaked in the incredible views of Lysebotn.
Kjerag parking:

The Information Centre:

Check out the views from the cafe:

So there you have it, all our best tips on hiking Kjerag! Most of all have fun and enjoy the incredible scenery along the way!
Disclaimer: As an Amazon Associate I earn from qualifying purchases.
Norwegian Scenic hike
Weather forecast, the highest peak along the lysefjord.
Approx. 10.000 years ago, massive glaciers formed the Norwegian fjords and mountains, and in this process the Kjerag boulder was wedged into a mountain crevasse at 1.000 metres above sea level. When at the boulder you have the most amazing views over the 42 km long Lysefjorden.
Towering 1,100 meters above sea-level, Mount Kjerag is the highest peak along the Lysefjord. Due to its sheer, almost 1,000 meters high cliffs looming over the fjord, the mountainous area is often referred to as the Kjerag Massif.
Kjerag Trail Information
The trail to Kjerag’s Boulder makes up a demanding 11-kilometer hike, which takes 5-6 hours in total (roundtrip). The trail, which includes significant changes in terrain, includes three steep hills separated by shallow valleys. Total elevation gain: 750 meters.

(+47) 40 30 68 65 [email protected]
Total distance
Elevation gain, gpx-file kjerag.
Click to download
Local weather
Open in new window
Kjerag Trail Map

Kjerag Height Profile

Kjerag Trail Video

Parking fee
Less than 2 hours - free, more than 2 hours - 100 nok, more than 2 hours - 300 nok.

No camping at/around Kjerag Parking
Camping or sleeping in vehicles is strictly forbidden at Kjerag Parking, which is exclusively for hikers. We do not offer any camping facilities. For camping, please visit the campsite in Lysebotn, 7.5 kilometers down the road. For safety and hygiene reasons, parking rules will be strictly enforced.
Getting to Kjerag by car
You can reach the Kjerag trailhead by driving the mountain pass from Sirdal Valley to Lysebotn. From Stavanger, driving around the mountains is the fastest/easiest. You can also take the car on a ferry to Lysebotn, from Lauvvik, Forsand and Songesand. A ferry ride through the Lysefjord can be a welcome break from driving and will be an unforgettable experience.
The ferries have limited capacity and departures and must be pre-booked. More info here .
Driving from the East / Setesdal, the shortest and most scenic route is driving Suleskard mountain pass.
All roads to the trailhead are closed from November to mid-May, due to ice and snow conditions.
Getting to Kjerag by ferry
Lysebotn is the closest ferry quay for hiking Kjerag. It takes time to travel by ferry and hike Kjerag, so we recommend to stay the night in Lysebotn before/after your hike.
The year-round local speedboat calls at the quays in the Lysefjord – Lauvvik, Forsand, Bratteli, Bakken, Songesand, Flørli, Håheller and Lysebotn. Tickets must be booked in advance. More info here .
When arriving as a passenger, you can take the local shuttle bus from Lysebotn to Kjerag Trailhead / Øygardstøl.
Getting to Kjerag by bus
From Stavanger, you can take the Kjerag express bus straight to Kjerag Trailhead / Øygardstøl.
There is a local shuttle bus operating between Lysebotn and Kjerag Trailhead / Øygardstøl.

The famous boulder
Traditionally, locals and tourists admired Kjerag from aboard a ferry. Nowadays, Kjerag is mostly known for its famous boulder, wedged into a mountain crevasse, 984 meters above the fjord. Every year, about 70,000 hikers make their way up the trail to the plateau above the cliffs. For many visitors, having their picture taken while standing on the boulder is the climax of their hike. Kjerag has also become one of the best locations in the world for BASE jumping.
Lysefjorden Rundt
The Kjerag trail is part of the Lysefjorden Rundt Trail: one of the most spectacular multi-day hikes in Norway. The trail is 100 kilometers long and divided in 8 stages. The classic hikes of Kjerag, Preikestolen and Flørli are world-renowned hiking icons, and all located along the Lysefjorden Rundt Trail. Click on the logo below for more information.

Visit Lysebotn & Kjerag
Lysebotn, a charming village nestled at the base of towering cliffs, is your starting point for the exhilarating Kjerag hike, where you’ll stand atop the famous Kjeragbolten, a suspended boulder wedged between two cliffs, offering an adrenaline-pumping adventure and awe-inspiring views of the Lysefjord.
The road to the Kjerag trail head is open from late May throughout October. The parking lot facilities and tourist information office are open from late May to mid-October.
The trail to Kjerag is well facilitated and marked and should be easy to find and follow. However, there is always a risk of accident or sudden illness. Mountain rescue and emergency services are on standby.
In case of an emergency – dial 113
“Allemannsretten”
The Norwegian ‘allemannsretten’ (pronounced ALL-eh-mahns-ret-en) gives people the freedom to roam in nature, regardless of whether the land is publicly or privately owned. In Norway, and at Kjerag, you hike at your own risk. The allemannsretten also assumes hikers behave responsible, taking other hikers´ and nature´s wellbeing into account.
Preparations
The trailhead at Øygardstøl is located on the southern side of the Lysefjord, 7.5 kilometers from Lysebotn. Kjerag is a demanding hike. You must be fit, healthy and up for the challenge.
Remember to eat a proper breakfast before the hike to ensure you’ll have energy throughout the day. Make sure you bring a backpack with a packed lunch, extra snacks and plenty of water
When hiking in the Norwegian mountains you need to be prepared. Be a pro and bring the right equipment. Your safety, wellbeing and a great experience depend on it. In the video, you can see what type of clothes and equipment we recommend using throughout the year.
Garbage facilities
There are garbage bins at the parking lot/trailhead only – there are no garbage bins along the trail.
We believe all hikers are nature lovers, who do not like to see garbage in nature. Please respect the common ‘leave no trace’ practice. Take nothing but pictures and leave nothing but footprints. If you can take something with you up the mountain, you can also take it back down.
Do not take disposable barbeques to Kjerag. It is our experience that many people do not take them home because they are hot. Smoke can be inconvenient for other hikers, and during periods of drought barbeques may pose a fire hazard.
There are toilet facilities at the parking lot/trailhead only – there are no toilets along the trail.
Be prepared to be out in nature 6 to 7 hours, without having access to a toilet. Make sure you have visited the toilets at the parking lot before starting your hike. During peak-days, there can be a few thousand people on the trail. It is our desire that all visitors will have a pleasant hike, without having an impact on nature. Therefore, if at all possible, we kindly ask you not to relieve yourself in nature. If you really must, please do not leave any toilet paper or other sanitary products behind.
The parking lot is run by Lysefjorden Utvikling and has a capacity of 400 cars. Upon arrival, you will be met by parking attendants. To ensure a smooth parking experience and avoid unsafe traffic situations, please cooperate with the crew and follow their instructions.
The parking fee is 300 Norwegian kroner per car. 100% of the parking fee revenue is used to finance daily operations and reinvest in infrastructure. This includes staff salaries, security and rescue measures, cleaning, maintenance and improvement of the parking and toilet facilities, the trail and signposting, and much more.
Hiking with kids
Kjerag is a demanding hike, part of the trail goes alongside high cliffs. Here, it is very important to take good care if you bring children. It is not recommended to take smaller children to Kjerag. Several sections of the trail are very exposed and/or steep. Using child carriers is therefore not recommended.

Respect Nature

Be Part of the Local Community

Choose Sustainable Alternatives
For å gi de beste opplevelsene bruker vi teknologier som informasjonskapsler for å lagre og/eller få tilgang til enhetsinformasjon. Å samtykke til disse teknologiene vil tillate oss å behandle data som nettleseratferd eller unike ID-er på dette nettstedet. Å ikke samtykke eller trekke tilbake samtykke kan ha negativ innvirkning på visse funksjoner.
- Things to do
- Outdoor activities
Your guide to Kjerag

Where is Kjeragbolten?

How do you get from Pulpit Rock to Kjerag?
When is kjerag hike open.

Where is best to stay when hiking up Kjerag?

How long does it take to hike Kjerag?
The best things to do in stavanger, all hiking activities, hiking in norway.

Hiking in Norway - A beginner´s guide
Walkers, hikers, ramblers and explorers, whatever terminology you prefer, Norway has something for you all with a myriad of mountains and forests, fjords and jagged coastlines.

The Pulpit Rock - history and hiking advice
Pulpit Rock, known as Preikestolen locally, is one of Norway’s most popular tourist destinations. In this article, we’ll tell you all about its fascinating history and look at the reasons why this unique rock formation continues to attract visitors from near and far.
Experience Trolltunga on your tour
Get ready for a true Norwegian mountain adventure! Soaring 1,180 meters above sea level, Trolltunga is one of Norway's most famous landmarks. A hike to the top is a memorable (and Instagramable) experience.

Best activities for mountain lovers in Norway
No matter what experience you may or may not have, there are loads of stunning mountain trails waiting for you in Norway. Reach some amazing and unique summits, and get your exercise while enjoying the stunning landscape.
Kjeragbolten Hike Without The Crowds – The Iconic Rock in Norway & Kjerag Hike Tips
I finally stepped up on the most famous rock in Norway! The Kjeragbolten hike was full of beautiful views, steep inclines, and not so many people. How did we manage to do the Kjerag hike without the crowds? Have a look at some tips below!

I don’t normally write a lot about very popular places, I prefer off-the-beaten-path locations like Senja Island or Svalbard. However, since Worldering Around is also an outdoor travel blog and hiking is a big part of it, I try to include more common sites from time to time, giving you tips on how to go there and avoid crowds.
The hike to Kjerag is really worth doing and is one of the best hikes in Norway . I wouldn’t want anyone to skip it, just because it’s popular ( because it’s popular for a reason ). And on the way from Kjerag, you can also visit another unique rock in Norway – Trollpikken . This one is less known and definitely interestingly shaped – check here to see what I mean ;-)
KJERAG HIKE NORWAY
Kjerag is actually the name of the mountain, that stands high up at 1084 meters above the waters of the Lysefjord , Forsand in Ryfylke, Norway. The mountain is taller than the other ones around it, so it is easily noticeable. It has been a tradition to admire Kjerag in Norway from the waters of the Lyfesfjord. Thanks to the increasing popularity of the Kjeragbolten, hiking to Kjerag is also getting more and more popular.
Kjerag is a popular place for base jumpers . Unfortunately, many of the jumps end in an accident or even death.
This post may contain affiliate links, which means that I may receive a small commission, at no cost to you, if you make a purchase through a link. More details here .

KJERAGBOLTEN NORWAY
Kjeragbolten is a giant boulder wedged between two cliffs, sitting almost 1000 meters above the waters of the Lysefjord in Norway. It is located on top of the mountain called Kjerag. Every year it is visited by many people, locals and tourists alike. It’s not a surprise, as you won’t find a similar rock anywhere else in the world. And the views are gorgeous!
But if you don’t like waiting in queues for photos (yes, queues in the mountains), you’d better take a few steps to avoid the crowds, that flock there in the summer months.

KJERAGBOLTEN HIKE
The hike to Kjerag and then to Kjeragbolten will probably soon jump to the list of top hikes in Norway (unless it is not already there?). Together with the Trolltunga hike and Preikestolen hike, it makes for one of the best hikes in Norway .
The location of a hike to Kjerag
The location of the Kjerag hike is in south Norway, near Lysebotn, and above the Lysebotn fjord. From Oslo , it is around a 6-7 hour drive to get there. It is quite a long journey, but perfect for a picturesque road trip.
Kjeragbolten hike tours
Kjeragbolten is also a popular excursion from Stavanger. Many people combine it with the Preikestolen hike (Pulpit Rock hike), located on the other side of the Lysefjorden, near Stavanger.
From Stavanger, you can also go on an organized Kjeragbolten hike tour, like Guided Hike to Kjeragbolten with Get Your Guide, with the transfer there and back included. It’s a good option for someone without a car, but it might mean more people on the trail.
If you still prefer a guided hike and want to beat the crowds, you can try early bird summer Kjeragbolten hike with a speed ferry ride through the Lysefjord included, or an off-season autumn Kjerag hike , when you can see the colorful foliage.
The Kjerag hike
The hike to Kjerag starts from the car park near the restaurant Øygardstølen located at 640 m. n.p.m. The building is beautiful in itself!
The Kjerag car park is located on the famous Lysevegen road , which rises above the Lysefjord with 27 sharp hairpin bends.
The hike takes around 5 hours in total. It is 2,5 hours to get to the Kjerag plateau and 2,5 hours back. The hike is 9.8 kilometers long.
Kjerag hike difficulty
The trail to Kjerag leads mainly on the barren rock and it’s supported by the chains. The path is also very steep. To get closer to the stone itself, you need to go through a quite narrow passage walking on the big boulders.

How to step on top of the Kjeragbolten?
In order to step on Kjeragbolten, you need to go behind another rock and make a big step. You can see it in the picture below.
It is not as scary as it looks unless you have a fear of heights, vertigo, or problems with balance – then I do not recommend that. After all, it just takes one slip for an accident to happen.
The boulder has a volume of 5 m3, and there is enough space on the top, even for two people. However, it is recommended to step on it one by one. On the left side of the Kjeragbolten, you can see a rock and behind it, there is a small, 1-meter-wide path. This is where you need to wait for your turn for the photo on top of Kjeragbolten. To get on the stone you need to make a bigger step. Getting off was easier for me than stepping on the rock. Remember, that you still need to be careful, next to you is a 1000-meter drop!

Getting on, and off the rock.

How to take photos on Kjeragbolten?
To take photos on top of the rock, you need to have someone on the other side taking them for you.
It’s possible to stand on rocks in front of the Kjeragbolten for the famous picture. Drones are not allowed in the park. The distance between the rock and the stones is not that big, so in theory, even the tripod with a remote could work – although I wouldn’t trust it as if it falls it can fall off the cliff. There is also a small stream going down the rocks. If you travel alone, you will see some other people on the trail who you can ask to take photos of you, or you can join a tour .

Chilling on the rock:

Read more: The magical less known island in Norway – visit Senja in Norway
Kjerag hike trail
The trail to the Kjerag boulder is very well marked. We took the path in the mist and the clouds, and we were fine with the directions. However, because of the chains and slippery stones, it might be much more difficult to do the Kjeragbolten hike in the rain.
You can see how the trail looks from the photos below.

HOW TO HIKE KJERAG WITH NO CROWDS
We climbed Kjerag in July, which is peak season, and yet we walked to the famous rock almost by ourselves. We also didn’t need to wait to take a picture on top of Kjeragbolten. I actually went up there three times, because it was entirely empty!
Below you can find some tips for hiking to Kjeragbolten with no crowds.

#1 Leave early
We started hiking at 7 am and there were already some people departing before us. The earlier you start, the more chance you’ll have to beat people arriving from further places. The group tours also don’t normally get to the car park that early, so you will be able to avoid them on the trail.
#2 Stay nearby
If you don’t like waking up in the middle of the night and then driving hours to the location of the hike (and then hiking!), then try to stay as close to the beginning of the Kjerag trail as possible. In order to leave early for the trail, you want to stay close. I recommend wild camping in the area nearby. There are tons of places for tent pitching and all with wonderful views. We camped twice by two different lakes and the views were just beautiful and the area very peaceful.

#3 Don’t take breaks
This one would depend on your level of fitness. The trail is only around 2-2,5 hours up. If you want to get there before other people, apart from leaving early, it’s better not to stop for too many pictures on the way up ( it’s always hard for me because – the views and the light and… you need a strong will ).
If you know that you will probably need a break or two on the way up, account for that time in advance and leave even earlier.
#4 Hike to Kjerag during the week
Weekends are the busiest days on the trail, as this is when people normally have off from work. Expect Saturdays to be the busiest. If you can, do the hike during the weekday.
#5 Visit out of high season
The end of June, July, and August are the busiest months for the Kjerag hike. This is the time for summer holidays in Norway and in other places in Europe, so people tend to travel a lot. This is not a place if you look for less touristy destinations to visit for the holidays . The season for the Kjeragbolten hike is from June to September. It is not recommended to attempt the hike in winter.
If you prefer a guided hike, Get Your Guide offers the high season Autumn hike to Kjerag .
#6 Start late and sleep on the trail
When we arrived at the beginning of the Kjerag trail late in the afternoon the day before our hike, the car park was almost empty. Do not try that if you are not sure you can come back before the darkness. Alternatively, take the tent with you and camp on the trail (we’ve seen several people doing it). Keep in mind that it might be tricky to climb the steep trail with a heavy backpack. There are chains through a big part of the route.

KJERAGBOLTEN INFORMATION AND TIPS
Where to stay in kjeragbolten.
I recommend trying to wild camp in the area nearby. There are a lot of nice spots by the lakes, where you can pitch your tent. Remember to leave no trace.
If you prefer a place with a shower, you can check Lysebotn campsite. There are also some hotels in Lysebotn, or you can stay in an unusual place along the Lysebotn fjord in Flørli 4444 Hostel .

Additional tips for the Kjeragbolten hike and what to take
- Take enough food and water. There is a cafe Øygardstølen near the car park, but it’s rather pricey and not open very early. On the trail, I do not recommend drinking water from the streams, unless you have a bottle with a filter , as there are some sheep roaming around and a lot of tourists. Check prices for the GRAYL filter and LifeStraw bottle .
- Wear proper hiking shoes. Merrell has good hiking shoes. Check the price and models here.
- Take also warm clothes, even in the summer. I recommend merino wool base layers, it’s a game-changer. I have the top merino wool baselayer and the bottom merino wool base layer .
- Take a good sun cream . I can recommend this sun cream .
- Take the first aid kit . Make it yourself or get a ready-made small first aid kit here .
- On colder days, you can take hiking gloves to help you with the chains. Check here for the prices .
- I took walking sticks, which I normally love, but I needed to carry them half of the way. Consider leaving them behind.
- The car park costs 300 NOK per day. You can pay by card or cash.
- Dogs are meant to be kept on a leash, although not everyone follows that. We’ve witnessed a small dog running around looking for his owners in the thick fog. It’s the mountains, take care of your dog and be responsible for other people on the trail. In bad weather consider putting a safety reflective vest on your dog.
Read more about Norway:
Trollpikken hike – uniquely shaped rock in Norway
Senja in Norway – the best things to do on a magical island
Best Norwegian gifts and souvenirs – Norway gift guide
30 Best Hikes In Norway Explained + Map
Have you ever been to Kjeragbolten? Did you step on the rock? Let me know in the comments!
Like it? Pin it!

Published:2019, Updated: 2023
Sharing is caring!
Related posts:
- Hike to Trollpikken Norway – Interesting Rock Formation in Magma Geopark
- Segla, Senja Island – Best View Of The Iconic Mountain From Hesten Hike
- Romsdalseggen Ridge in Norway Hike – A Local Guide With Tips And Photos
- Trollveggen Troll Wall Norway – Hike To The Highest Vertical Wall In Europe
5 thoughts on “ Kjeragbolten Hike Without The Crowds – The Iconic Rock in Norway & Kjerag Hike Tips ”
This is fantastic! This hike is high on my list, though I’m not sure if I’ll have the guts to stand on it. Thaks for all the info :)
The hike is worth it even without standing on the rock! I hope you will manage to do it one day :)
great hike destination, but really really long hike.
Do you have any information about buying gas canisters for jet boils in Norway?
Try XXL or Fjellsport
Leave a Reply Cancel reply
Your email address will not be published. Required fields are marked *
Kjerag Express Bus Round trip
Easy access to complete the hike to the world famous kjerag boulder.
Byterminalen spor 5, Stavanger, Norge
15 minutes before departure
June - September
Attracting thrillseekers from all over the world, the Kjerag Boulder is a famous conundrum. Our bus will bring you from Stavanger to Øygardstøl, the starting point of this spectacular hike, and back again.
- Enjoy the thrilling sight of the Kjerag Boulder suspended 1,000 meters above sea level
- Breathtaking views of Lysefjord and surrounding mountains
- Challenging 9.8 km hike with a total elevation gain of 460 meters – unguided!
- Safety ensured with a well-marked path and cautionary advice
- Comfortable round-trip transportation from Stavanger to Øygardstøl
The Kjerag Boulder
Wedged in a mountain crevice sits the Kjerag Boulder. Suspended nearly 1,000 meters (3,280 feet) above sea level, the plain sight of the boulder gets the adrenaline pumping. Our bus takes you from Stavanger city center to the starting point of the hiking trail up Kjerag mountain.
Hiking Kjerag
This is a challenging hike. The total elevation gain is 460 meters (1,500 feet). The boulder is located at Kjerag mountain, which towers high above the other peaks surrounding the beautiful Lysefjord. When you reach the boulder, you’re spoiled with breathtaking views of the boulder itself, as well as the other majestic mountains around you and the Lysefjord running beneath you.
Be mindful of your surroundings and exercise caution near steep areas, especially when it’s wet, to ensure a safe hiking experience.
Completion and return
You have 6 hours to complete the 9.8 km (6 miles) return hike and the path is well-marked. When you’re down safe and sound, our bus drives you back to Stavanger.
Important information
- Tickets are not sold on board the bus. Please make sure to buy tickets online before boarding the bus. Ensure you have your digital ticket handy on your mobile device.
- Duration: The round-trip from Stavanger to Kjerag takes approximately 3 hours each way, allowing you to soak in the breathtaking landscapes along the journey.
- Preparation: The Kjerag hike is demanding and requires good physical condition. Wear sturdy hiking shoes and bring sufficient water, food, and warm clothing. Always check the weather forecast before setting out.
- Child Seats: For those traveling with young children, please contact Go Fjords in advance to arrange a child seat on the bus, as availability is limited.
Popular experiences from Stavanger
Fjord cruise and guided preikestolen hike winter, preikestolen & kjerag combination, preikestolen express bus round trip.

The Steps 4444
Kajakk Safari
Pulpit Rock
Kjerag Blog

Kjerag - The Majesty of the Lysefjord, in Ryfylke. At 1084 metres, Kjerag towers above the other peaks along the Lysefjord. NB! Do not hike to Kjerag in the winter! Go with a nature guide off season.
Kjerag - The Majesty of the Lysefjord, Ryfylke.
NB! Do not hike to Kjerag in the winter! The hiking season is from June to September. Off season, you should hike with a nature guide. For more information about guided hikes, see here.
At 1084 metres, Kjerag towers above the other peaks along the Lysefjord. It has been traditional to admire this mountain face from the fjord, but in recent years, it has become increasingly popular to walk up the path to the plateau. Most people are happy just to enjoy the view of the Lysefjord from the plateau itself, but for some hikers, the climax of the excursion is to be photographed on the Kjeragbolten, a round rock wedged solidly in a mountain crevice. Kjerag has also become a popular attraction for mountain climbers and base jumpers.
How to get to Kjerag
During summer, you can get to Kjerag by taking the tourist car ferry (The Fjords) to Lysebotn and then go by car or taxi further up to Øygardstøl, the starting point of the trip. In high season, you can also go by bus from Stavanger to Øygardstøl (Go Fjords). If you have your own car, you can either take the ferry or drive through Sirdal to Lysebotn (closed road during winter from around October to May/June, contact Statens vegvesen, phone 175). Parking: There is parking with a fee at Øygardstøl. If you are travelling without a car, there are several options for car rentals in the region. It is possible to pick up your rental car at the Stavanger International Airport, Sola.
The trail to Kjerag is now certified as Norwegian Scenic Hikes.
Season: June - September. Time: 5 - 6 hours round trip, 9,8 km long
Hike to Kjerag
The hike starts from the parking (fee) at Øygardstøl south of the Lysefjord by Lysevegen above Lysebotn. Located here is a service facility with toilets and tourist information. The demanding trail will take you up and down hilly mountaintops, and the difference of altitude is 460 metres. It is always important to take weather precautions. If there is snow in the mountain it is not recommended to do the hike, or you should use a nature guide. Remember good footwear, preferably mountain shoes, warm clothing, food and drinks. Should the weather indicate difficult conditions, please use walking sticks/ski poles on the hike. A general good physical fitness is necessary. To avoid the loss of daylight on your return hike, you must not embark on this hike too late in the day. Get informed on the time for sunset as well as other weather conditions.
Experience Kjerag from the fjord
Kjerag is just as impressive seen from the fjord, from either a ferry or a sightseeing boat. You can catch a glimpse a 1000 metres above you. Are you lucky, you might see base jumpers during summer.
Fun facts about Kjerag
At mountain Kjerag, in one specific place just before reaching the top of the mountain, you can sometimes hear a sound similar to that of a gunshot and see smoke coming out of the mountain. This happens again from time to time. A surveying engineer experienced this phenomenon in 1855. His story goes: “I first heard a few bangs that gradually became more frequent and stronger, then I heard a terrible noise as I witnessed a beam of light shooting horizontally out from the rock and into the middle of the fjord, where it dissolved and vanished. “ Why this happens, nobody knows for sure, however the locals have for years assumed that it is water being forced out of the mountain.
Services at Visit Kjerag
Here For You

Accommodation Kjerag
Holiday Cottage
How to get to the Kjerag
Transport and tips
Guided Tours
Check for more

Thanks for submitting!

Kjeragbolten Hike in Norway | How to Get to Kjerag Boulder
By Author Christian L.
Posted on Published: June 21, 2021 - Last updated: July 6, 2021
Categories Adventures , Europe , Hiking , Norway
High above Lysefjorden, the same fjord which Preikestolen overlooks is a giant boulder called Kjeragbolten. This magnificent rock is wedged in a mountain crevasse 959m (3,156 feet) above the fjord.
Kjeragbolten, together with Preikestolen (Pulpit Rock) and Trolltunga, is one of the three most famous natural landmarks in Norway and one of the most popular hikes in the whole country – both for Norwegians and foreign tourists.

Every year, many people flock to take their turn standing on this death-defying boulder. Although it might seem crazy, Kjeragbolten is completely safe and there have been no tragedies so far. If you’re a lover of heights and stunning mountain views, then Kjeragbolten should be on your bucket list.
Where is Kjeragbolten?
Kjeragbolten is found in the Kjerag mountain plateau which runs along the 42km (26 miles) southern side of Lysefjorden. It is a world-famous destination not only because of this unique boulder, but also for Base Jumpers who come in drones to jump off the steep cliffs.

Hiking to Kjeragbolten is a must-do for all nature lovers visiting Norway and can easily be combined with a trip to Preikestolen. If you have your own car you can enjoy both popular tourist destinations in one day, but if you’re relying on public transportation it will be better to split it over two days.
This guide is written from when I did the hike in late June 2020, when there was still a lot of snow along the trail. Depending on what time of year you visit, your experience with the weather can be significantly different.
Kjeragbolten Hike
The hike to Kjeragbolten starts from the parking lot at Øygardstøl, also known as the Ørneredet (The Eagle’s Nest), a restaurant nestled 640m above Lysebotn. Øygardstøl is located at the top of Lysevegen – one of Norway’s steepest roads that has 27 hairpin bends, an attraction on its own.
Tip: This is probably the restaurant with the best panoramic view in the whole of Norway, a great place to stop for lunch or a coffee after you have finished your hike.

Lysevegen, one of Norway’s steepest roads with 27 hairpin bends on the way to Øygardstøl, which is located on top.

Starting Kjerag Hike, Norway
At the start of the hike, there are a few clean public toilets and a kiosk which rents out hiking shoes and trekking poles if you didn’t bring your own gear along. Be sure to use the toilets here if you have to as there are no toilets along the trail to Kjeragbolten.
Before you start the hike to Kjeragbolten, you should be aware that it is considered to be a Challenging hike, with some very steep parts. Although it might not be a walk in the park, the experience is definitely worth the effort.
Kjeragbolten is also considerably steeper than both the hike to Preikestolen and Trolltunga.
The hike starts immediately after you leave your car at the car park, and it’s straight upwards from the beginning – so much for a smooth start. Be prepared, because this is the first of three steep climbs on the trail.

It’s smart to start the hike at a slow pace, so that you don’t get burned out too early. There are not too many flat sections before you reach the end of the hike.

When you make it to the top of the first steep climb (which should take around 20 minutes if you are in decent shape), make sure to look back towards the car park and take in the magnificent view.

When you’re ready to continue, you can look out over the small valley you will have to cross. You can see the trail snaking its way up the mountain in the distance.
You will first have to climb down to the valley floor. Although the terrain can get very wet if it has been raining, there is a nicely made walkway that you can use to keep your shoes dry.

Once you reach the end of the Valley, you will have to start climbing once again. This ascent is not as long as the first climb, but some of the steepest parts of the whole trail are on this section – so make sure your legs are ready.

During my hike here in mid-June ,there were still some parts of the climb that were completely covered in snow, making it even harder to reach the top.

Be sure to hold on and pull yourself up with the chain railing that has been installed. It’s almost impossible to get up without the railing and you don’t want any unnecessary accidents.

Once you are done with this climb, you will have time to rest at one of the only flat sections on the hike. This is also where the emergency hut is located. The shelter is locked, but if you encounter some nasty weather or get injured you can call the phone number on the cabin door to get the code.

There are benches outside the cabin that you can rest at if you need to have a break. After the cabin, the trail heads downhill for a bit towards a river. This is the last place you can refill your water bottle on the trail, so make sure to top up if needed.

This is the 3rd climb, and I’m sorry to say it, but it’s also the hardest of them all. But at least when you reach the top, it’s almost completely flat all the way to Kjeragbolten.

Be sure to stop for a view back towards Lysebotn on this section as well. The view is breathtaking and you will be able to appreciate how high you have climbed.

Once you reach the top of the last climb, you are finished with the hard part but you still have around 1km to walk.

Be sure to follow the red “T” markings towards Kjeragbolten. It’s easy to get lost here in mist and fog that often accrue here. A lot of hikers have built small cairns dotted all over the plateau, which is strongly discouraged by the Norwegian hiking association because it often confuses hikers.

During my visit there was still a lot of snow on the last section when you go down towards the plateau. But since Norway closed its border in early 2020, I had the whole place to myself – a rare experience for sure.

When you reach the plateau, if you’re lucky, have a lookout for base jumpers jumping from the high cliff right across from where you are having a rest. Three base jumpers jumped while I was enjoying the view.

Getting on to Kjeragbolten
The scariest thing is not standing on Kjeragbolten itself, but the very narrow path that leads to it. Unless you’re an adrenaline junkie, this part is probably going to require a little bit of courage but you’re only a few small steps away from your goal.
And you only have a small metal knot to hold onto along the path. It’s much much scarier to do this than stepping out on the boulder.

Once you have finished enjoying Kjeragbolten and are ready to head back to your car, just take the same trail back to Øygardstøl. Don’t underestimate the descent, people will often spend the same amount of time walking back down as hiking up. This is due to the descent being tougher on people’s knees than the ascent.

How to get to Kjeragbolten Norway
Kjeragbolten, Norway is located on the west coast, with the closest city being Stavanger (the fourth largest city in the country). It is easily reachable from all over Norway with domestic flights or via road.
Oslo to Kjeragbolten
From Oslo to Kjeragbolten is 363km (225 miles) along the E134 and E9, two beautiful roads which will take you past three of the famous Stavekirker In Norway – including the stunning Hedda Stav Kirke. The drive from Oslo to Lysebotn/Kjeragbolten takes around 6.5 hours.
It’s a beautiful drive with tons of places to stop along the way. So make sure to budget for some time to stop and take photos along the way.
Stavanger to Lysebotn/Kjeragbolten
By car : The best option is to drive south along the E39 before you take the RV 45 in Ålgård. Continue down Suleskarvegen and follow the sign for Lysebotn, which takes around 2 hours and 42 minutes.
By bus : In the summer season, Go Fjords offers return-trip tours to Kjearg from Stavanger for 629 kr per person.
By boat: In the summer, there are two types of ferries: the tourist ferry and the local ferry . The boat only goes twice a day and it’s highly recommended to book in advance. But be aware that the ferry doesn’t leave from Stavanger itself but from Lauvvik – which is located 44km south of Stavanger.

Closest Airport To Lysebotn/Kjeragbolten
Stavanger Airport Sola is the closest airport to Kjeragbolten, which is connected to all of Norway and has more than 20 daily flights from Oslo Airport Gardermoen. Stavanger Airport also has flights to most of Europe with the following airlines:
KLM (SkyTeam): Amsterdam .
SAS (Star Alliance): London, Manchester, Copenhagen, Stockholm.
Norwegian and WizzAir: Budget airlines like these two also have daily flights to Stavanger from all over Europe.
Shortcut to Kjeragbolten
You’re not allowed to park there, but if you get someone to drop you off at the first car meeting spot (about 600 meters north of Øygardstøl) there is a trail which will bypass the first steep climb of the hike.
Tip: The shortcut is easily visible from the mobile phone app maps.me.
You will arrive at the first small lake where you will meet up with the original trail from Øygardstøl.

Facts about Kjeragbolten
Apart from knowing where the hike starts, there are a few things you should consider before starting the hike. These simple facts will help you plan the perfect trip.
Entrance fee to Kjeragbolten
Like every hike in Norway, Kjeragbolten is free. There is, however, a 300 NOK parking fee at the parking lot at Øygardstøl. The parking is valid for 24 hours from when you park your car, so it’s perfect if you decide to camp along the hike.
What to Pack for the Kjeragbolten Hike
Weather in this part of Norway is notorious for changing fast. You can start the hike in completely sunny weather and clear blue skies, but only after 5 minutes you could find yourself hiking in the rain. Because of this, you should pack for any weather conditions, rain, sun, or wind.
- Rain jacket – even if you start the hike in sunny weather.
- Solid hiking boots – the trail gets very slippery if it rains.
- Warm/windproof clothes – to change into if the weather turns for the worse.
- Food and beverages – there’s nothing to buy after you leave the parking lot.
What’s the Kjeragbolten Hike Distance?
The hike is about 10km (6.2 miles) long and 570 meters (1,870 ft) in altitude. This usually takes around 5 – 10 hours for a return journey, but the official time is 2.5 hours each way (excluding the time you spent at Kjeragbolten).
Personally, I spent 2 hours to reach Kjeragbolten and 1 hour 40 minutes to get back to the car. At the peak, I spent around 1-hour taking photos and having lunch. But that speed is faster than most people, so rather plan extra time to be safe.

What’s the Best Season to Hike to Kjeragbolten?
The hiking season on Kjeragbolten depends on the snow, which is pretty short compared to other hikes in Norway. This is due to the winter closure of the highland access road to Lysebotn.

I was planning to hike to Kjeragbolten during my trip to Preikestolen in May, but the snow was still too deep, and the road to Lysebotn was still closed in mid-May, 2020. So I had to come back a month later and do the hike in mid-June instead, and there was still snow along the trail.
The typical hiking season is June – September. But this can vary from year to year, and occasional snowdrifts should be expected all season.
The best place to check the current situation at Kjerag is at the Facebook group Kjerag Tourist Information which is updated almost daily.
Drone laws at Kjeragbolten
Drones are strictly forbidden over the whole of Kjerag, Norway, due to heavy helicopter traffic, base jumper activity, and being part of a nature reserve.
How big is the Kjeragbolten Boulder?
Kjeragbolten is a 5-cubic-metre (180 cu ft) boulder, which is more than big enough for you to comfortably stand on. The drop is a direct 241-metre (791 ft) fall below and then another 735-metre (2,411 ft) gradient down to the Lysefjorden.

Kjeragbolten Deaths
Despite it seeming very dangerous, there hasn’t been a Krejagbolten death recorded due to someone falling from the rock. There are, however, 11 Kjerag deaths of people who have died from Base Jumping, but none of those deaths have been from falling off this world-famous boulder.
Best Time to Visit Kjeragbolten Rock
Kjeragbolten rock is a unique tourist attraction that will get most hikers and adventure enthusiasts excited. The hike might not be easy, with a very steep ascent, but the views that you will be rewarded with are well with the effort. Along with the most beautiful valley in Norway and nearby Preikestolen, Kjeragbolten is another must-see Norwegian nature location.

Kjeragbolten: A Challenging But Memorable Hike in Norway - Life in Norway
Wednesday 14th of June 2023
[…] “When you reach the plateau, if you’re lucky, have a lookout for base jumpers jumping from the high cliff right across from where you are having a rest. Three base jumpers jumped while I was enjoying the view” – Unusual Traveler […]
Benjamin Ong
Monday 10th of April 2023
Hello from Malaysia! 😊 Thanks for this post and lovely photos. Will hope to do this place someday soon.
Thursday 9th of June 2022
Amazing guide! Loved the photos of every single step. Now I don't have to do it. I am the reverse of what they call adrenaline junkie but this boulder is too interesting to not read about.
Sunday 9th of January 2022
Hi Christian, what a good and clear article! Thank you. We would like to do the Kjeragbolten by the end of May. We are not experienced with walks in the mountains. Last year we did a few in Slovenia which were really terryfying for us. But we would like to try Kjerag anyway. The thing that reassured us, was that there would be chains all over the track. Is that right? That was often missing on the steeper parts in Slovenia ...
Thanks a lot! Regards Sharon & Sofie
Christian L.
Hello Sofie.
The hike itself to Kjeragbolten is very easy but steep, and done by thousands of tourists a year, with all levels of experience. Yes, there are chains on all the steepest parts along the trail. So you will always have something to hold onto while going up and down, but there can be a line of people if there´s a lot of people the day you decide to do the hike, so it can sometimes be very busy to get to use the chains. But the hike it´s really nice and well worth it.
Search Site

How to Hike Kjeragbolten Guide

Kjerabolton is one of the most scenic and exhilarating hikes you will ever complete. The views and challenge (requires the use of chains) to reach the summit, combined with stepping out onto the terrifying yet electrifying Kjerag rock (boulder in between two large rocks with an over 2400 foot drop into the fjord) makes it a hike you will never forget. The adrenaline rush from it is truly invigorating. Here is our guide on how to hike Kjeragbolten in Norway.

FYI: This post is written based on a hike taken in late August. See our 2 Week Norway Road Trip guide for all the details on this trip. We took this trip with our 12 month old daughter. For all our baby travels tips and tricks see our Top 10 Baby Travel Tips , 5 Top Baby & Toddler Flying Tips and our How to Hike with a Baby post.
Note: Kjerabolton is one of our top 5 favorite hikes we have ever completed. That is saying a lot too as we have hiked more miles than we can count all over the world including many US National Parks and Europe . Definitely add Kjeragbolten to your bucket list!
Disclosure: This article contains affiliate links. That means that, at no cost to you, we may get a small commission if you purchase through these links. This helps us keep providing travel resources for you!
Hiking Kjeragbolten FAQs
How long of a hike is kjeragbolten how much elevation gain on the kjeragbolten hike .
Kjerabolton hike is 7.5 miles (12 km) with 1870 feet (570 m) of elevation gain. It is an out & back hike.
How do I hike Kjeragbolten? What are the Kjeragbolten hike logistics?
The Kjeragbolten hike has 3 steep and strenuous climbs, mostly completed in the first half on the way out. During these climbs, there are chains to hold onto to help you hike up/down. We really used these chains to help us stay upright on the steep rockside during our descent and ascent. Kjeragbolten is a total of 7.5 miles (12 km) with 1870 feet (570 m) of elevation gain.

The first climb is the most technically difficult and steep while hiking Kjerabolten. You do not need technical climbing skills per se but must be very careful with your footing while climbing these areas with the chains, especially on your descent. Many people turn around during the first climb as they find it to be too strenuous and scary. However, if you can complete the first climb while hiking Kjerabolten, you can complete the whole hike. Don’t give up! Natalie hiked these ascents and descents with our daughter in the backpack carrier.
When not completing these steep climbs, you hike into valleys and over ridges. You will feel like you are on top of the world at times! The views are spectacular.
After the third climb, you enjoy a relatively easy hike for about a mile until you reach Kjerag.
Tip: Be sure to follow the red T’s painted on the ground while hiking Kjeraboton. During foggy conditions, people have lost their way and had to be rescued. Even on a very sunny day, we were sure to stay on track with the red T’s as it would be easy to get off the path on the boulders.
Can I hike Kjeragbolten in the rain?
No! Caution: Do NOT hike Kjeragbolten if it is going to rain or recently rained.
When we hiked Kjeragbolten, it had not rained in over a week. Yet, there were still some slightly damp spots on the rocks that were VERY slippery. With only a couple spots like this, it was manageable taking these spots very slow and using the chains to aid us. However, if all the rocks were wet, this would not be safe to hike. You are hiking up a large smooth slick boulder with chains in several sections. One big slick smooth rock is not conducive to staying upright even with the chains.

Tip: Check weather prior to attempting to hike. Avoid foggy or rainy weather at all costs. People have needed to be rescued after losing their way in the fog.
Looking for great hiking boots? Here are links to the ones we’ve used for 8+ years and highly recommend: Men’s Keen Waterproof Hiking Boots & Women ‘ s Keen Waterproof Hiking Boots
How far is the drop from Kjerag into the Fjord?
Sources vary on exactly how far the drop is but we can verify, it’s far! It is at least a 2400 foot (750 meter) drop from the iconic Kerag boulder between the two rocks into the Fjord.
How is stepping onto the Kjerag Boulder when hiking Kjeragbolten?

It is scary. Like really scary! We are not going to sugar coat it. Stepping on to Kjerag is terrifying yet exhilarating. About a ⅓ of the people we saw who attempted to walk onto the Kjerag couldn’t do it. Sam was almost one of them. He made the mistake of looking down (at the 2400 foot fall) on his first attempt before stepping onto the boulder. He just gave a cute little wave from the side of the boulder instead of stepping onto it (see picture) with his first attempt. After Natalie persuaded him that we were not hiking Kjerabolten anytime soon again, he decided to try it again and was able to go out onto the rock. Natalie got onto the rock with her first attempt. Our best advice, take it slow and don’t look down!
Here are pictures of what the Kjerag boulder looks like from behind:

Off to the left of the boulder is where people line up to step onto it one at a time. There is a chain link drilled into the rock you can grab onto to help you get down to the boulder that we both did use. See our Always Have A Trip Planned Instagram for footage of us walking on the boulder versus the shot on the boulder.
The boulder is actually bigger than it looks in pictures. We both agree that Kjerag is stable and plenty big for you to step onto. However, despite being able to see this clearly with our own eyes, we were both scared to step onto the boulder. We still think this hike is worth it even if you do not step onto the Kjerag boulder because the views along the hike and at the boulder are truly stunning. Stepping out onto the boulder is just the adrenaline rush icing on the cake!
Has anyone died hiking Kjeragbolten/stepping onto Kjerag?
No! At the time of writing this post, no one has died hiking Kjerabolten. We actually find this surprising as one wrong step on this boulder would send you plummeting to your death in Lysefjord. Stepping onto this boulder is, in our opinion, scarier than Angel’s Landing in Zion National Park where 10+ people have died in the chains section. However, fewer people hike Kjeragbolten and only stepping out onto the Kjerag boulder itself has a dangerous drop. The rest of the hike is not along steep drop offs, differing from Angel’s landing whereas wrong step throughout the chains section may send you falling to your death.
How long does it take to hike Kjeragbolten?
It takes about 6-8 hours to hike Kjeragbolten. It took us about 6.5 hours total to hike Kjeragbolten, including stopping at the summit for about an hour taking pictures and a break. If you do not have 35 extra pounds strapped to your back and/or a 12 month old with you, you may be able to hike it faster.
Is the Kjeragbolten hike busy?
In comparison to other Norway hikes, such as Pulpit Rock , no. We hiked Kjerabolten from approximately 9:30 AM-4PM on a Sunday. There were definitely other people on the trail but there was plenty of space on the trail to have our own room. We never felt crowded or traffic jammed on this hike. The number of people was similar to that we saw while hiking Trolltunga .

When to hike Kjeragbolten?
Only hike Kjeragbolten in the summer as the road leading to the trailhead is closed in the winter. Ideally, hike it June 1st-September 1st. Outside of that window, it is likely the road to the Kjeragbolten trailhead will be covered in snow/closed and the trail will be covered in snow as well.
How much does it cost to hike Kjeragbolten?
Parking fee 300 NOK that you pay to the attendant when you arrive.
How to find Kjeragbolten Hike?
Type in Kjerag parking to Google Maps to locate the Kjeragbolten Trailhead
What is the closest town to Kjeragbolten?
Closest town is Lysebotn (15 mins away), 7.5 hours from Oslo, 2.5 hours from Stavanger (many people set up base here and also hike Pulpit Rock (post coming soon***)).
Where to stay while hiking Kjeragbolten?
We highly recommend staying at Fidjeland Hytteutleige between Stavanger and the Kjeragbolten Trailhead. These cute cabins are located less than an hour from the Kjeragbolten trailhead. They are just off the main road yet in a peaceful farm setting. This was the perfect cozy cabin for us. There also was a fun swing in the backyard our daughter enjoyed.
What else should I do while at the Kjeragbolten trailhead?
Make sure your driving route takes you on the whirlwind road Lysevegan either before or after your hike to Kjeragbolten. This road has 32 hairpin turns and a 9.4% gradient. To access, turn left out of Kjerag Parking lot.
Can you hike Kjerabolton with kids?
Yes! We completed this hike with our 12-month old daughter in a backpack carrier. We would not recommend front carrying on this hike though as it is very steep in spots, making the decent while front carrying dangerous. However, we felt comfortable with her in the backpack carrier the whole time. We saw one person carrying a baby that was maybe 3 months old (in a front carrier, again would not recommend) but other than that, we saw no kids under 10. We did see about 5 kids likely between 10-15 years old on this hike who did not seem to have any problem with completing it. If not carrying your child, we’d recommend kids be 10+ years old and have a decent amount of hiking experience to complete this hike. It is long, strenuous and requires some skill using the chains.

For all our tips on hiking with a baby, see our How to Hike with a Baby post.
Can kids step out onto the Kjerag Boulder?
We would say no but that is up to you as the parent. We did see a boy who was about 10 years old step out onto the boulder with a rope tied around his waist that his mom held. We both stepped out on to Kjerag separately without our baby and were terrified enough without our child.
Can you step onto the Kjerag Boulder with someone else?
Yes, but we do not recommend it. We both stepped out onto the boulder alone and would advise stepping onto it one at a time. The boulder is large enough that two people could step out on it together but it is certainly safer to do it one at a time.
Is Kjeragbolten one of the best hikes in Norway?
Yes! WE LOVED hiking Kjerabolten. We highly recommend you complete this hike at some point in your life. It is a challenging hike with the chains on the climbs and exhilarating with stepping out onto the rock. In comparison, we both did like hiking Trolltunga a bit better than Kjeragbolten but it is hard to compare both as they are very different hikes. Hike both and let us know your thoughts!
Note: You have to be on your A-game at most times during this hike due to using the chains and the steep nature of the climbs. It is not a flow state hike.

Hiking Kjeragbolten was one of the highlights of our 2 Week Norway Road Trip . See this guide for all the details on planning an epic fjord road trip of your own.
We hope this guide helps you plan your trip to Kjeragbolten. Anything you’d add to our guide? We’d love to hear your feedback and questions. Please leave us a comment!
Did you find this post helpful? If so, please share it with a friend, like our Always Have a Trip Planned Facebook Page , follow our Always Have A Trip Planned Instagram and subscribe to our emails below.
And remember, Always Have A Trip Planned!
You may also like
How to hike levada das 25 fontes.
March 13, 2023
Top Things to do Madeira
March 12, 2023
Top 3 Levada Hikes on Madeira
Leave a reply cancel reply.
Your email address will not be published. Required fields are marked *
Save my name, email, and website in this browser for the next time I comment.
How to Get to Lysebotn (To Start the Kjerag Hike)
The Kjerag hiking area, including the hike to Kjeragbolten, is one of Norway’s most famous hikes, and you need to get to Lysebotn to start your Kjerag adventure. But like many of Norway’s top natural attractions, even getting to the starting point is a journey in itself.
Lysebotn is no different, and you do need to prepare ahead of time to actually get to Lysebotn to start the Kjerag hike. So, how do you get to Lysebotn, and what are the different options?
The main way to get to Lysebotn is to ride the passenger ferry from Lauvvik or Forsand. This is operational all year round, but you should book tickets ahead of time during the summer season. You can reach Lysebotn by car during the summer, but all roads are closed at winter.

So you have a few options to get to Lysebotn during the summer season when the roads are open, but you’re pretty much stuck with riding the ferry if you’re visiting in winter or spring.
We’re going to look closer at both the ferry and the road in the rest of the article, giving you a detailed guide on how to get to Lyseboth by either options. So keep reading to find out how to book tickets for the ferry, check if the road is open, or just want to be prepared for your visit to Kjerag.

PS. make sure to check out the offer below if you’re interested in a guide to get to Kjeragbolten!
How to get to Lysebotn by ferry
The main method of getting to Lysebotn is by riding the passenger ferry. Most tourists board the ferry “MS Lysefjord” at Lauvvik port terminal, which is reachable by bus from Stavanger and other big cities.
The MS Lysefjord ferry can transport 8 cars, and I really urge you to book tickets in advance if you want to bring your car to Lysebotn since it tends to fill up fast.
You might even consider booking at least a few days in advance for regular passengers during the main summer season . It rarely fills up with regular passengers, but it does happen every once in a while in the main tourist season in July, so it’s best to be on the safe side.
The ferry is operational all year round, so you can get to Lysebotn by ferry even in the middle of the winter.

Lysebotn ferry departure times
The ferry depart from Lauvvik roughly 2 or 3 times daily at around 6 in the morning, around noon and either in early or late afternoon depending on the day. Check out the time table board by clicking here to see updated information on exactly when the ferry departs.
Please be aware that the times depend on the day of the week, and that there are different departure times outside of the tourism season.
How to buy tickets for MS Lysefjord
You can purchase tickets for the ferry at Kolumbus’ website , and the price is surprisingly affordable at 72 NOK per adult. However, be prepared to shell out over 300 NOK if you want to bring your car along for the ride.
You can board the Lysebotn ferry at different ports
The ferry to Lysebotn begins in Lauvvik, but you can actually board it at the following ports if they are closer to you:
The Forsand dock is closed for maintenence during the 2023 season , but will be open and operational again in 2024. This means that you need to ride the ferry from Lauvvik or any of the other ports in 2023 if you want to get to Lysebotn.
Pretty much all tourists board the ferry at Lauvvik, which is the port that is closest to Stavanger.

Driving to Lysebotn during the summer season
It’s an absolutely amazing experience to drive to Lysebotn, especially for the final stretch down the mountain where you pass the incredible 27 hairpin road descent. This is without a doubt breathtaking, especially if you’re in the passenger seat and can enjoy the ride without looking out for traffic.

The road itself is called Fv500, and is only open in the summer season. The exact opening dates depend on the snowfall, but it generally opens in early June and closes in October.
To get to Lysebotn by car, drive your car to the Sirdal area (you can get there from Stavanger by E39 and Rv450, then drive north on Sirdalsveien ). From Sirdal, follow the signs pointing towards Lysebotn and Øygardstøl until you take a left towards Fv500.
The full ride from Stavanger is roughly 3 hours long.
The Fv500 road itself is a typical mountain pass road, which is narrow and difficult to drive . Be prepared to face some challenges along the road, especially when it comes to passing cars or buses on the narrow road. That said, most drivers will handle it without too much trouble in good conditions.

Other options for getting to Lysebotn
There are a few other options for getting to Lysebotn besides the ones we’ve already looked at, but these are far less used. However, they might be worth checking out if they fit your planned trip better than driving or riding the ferry.
Getting to Lysebotn by bus
There are certain buses who drive between places like Stavanger and Lysebotn during the main tourist season. These are all guided tourist buses, and there are no public buses going to Lysebotn.
The price point can very, but it’s generally much more expensive than riding a public bus.
Getting to Lysebotn by bus is a pretty good option if you want to experience the road down to Lysebotn, but I would personally rather recommend taking the bus to Lauvvik, then switching to the passenger ferry. I guess it depends on whether you want to arrive by the hairpin bends or in the fjord.
That said, these guided tour buses also stop at some pretty cool attractions and places along the way!

Cruise ship from Stavanger to Lysebotn
Certain cruise tour operators stop by Lysebotn, so it’s absolutely possible to book a cruise tour from Stavanger to Lysebotn. One of the most popular cruise tour operators who offer this is Rødne Fjord Cruise, but there are also a few other options available.
This is definitely a great way to get to Lysebotn since day cruises like these ones are an amazing experience in themselves, but the price tag is for sure going to be very different from riding the public ferry.
But if you’re looking to both experience a day cruise tour as well as want to get to Lysebotn, combining these two makes for a truly great trip!

Leave a Comment Cancel reply
Save my name, email, and website in this browser for the next time I comment.
Kjerag Express Bus from Stavanger
The express bus takes you to the starting point of the Kjerag hike, one of the world's most spectacular hiking experiences.

Practical information about the bus to Kjerag
Join the Go Fjords express bus on this round-trip tour from Stavanger to Øygardstøl, the starting point of the Kjerag hike. The bus arrives at Øygardstøl at around 10 a.m. and returns at 4:30 p.m. You will have 6 hours to complete this majestic trip. The reliable service gives you time to explore the Kjerag mountain and enjoy the stunning views when you reach the top.
Clothing and preparations for your hike to Kjerag
This tour is without a guide and is undertaken at your own risk. Always check the weather forecast for Kjerag before you set off on your trip. The weather can change rapidly in the mountains and extra clothing, food and drinks are required if the hike takes longer than expected. A hike in the high mountains requires hiking boots, warm clothing and windproof and waterproof outerwear.
About the hike to Kjerag
Kjerag is one of the world's most spectacular hiking experiences. Why? Well, because the experience of standing on the rock elevated above the Lysefjord is spectacular. Standing tall at a mind-blowing 1084 metres, Kjerag towers above the other peaks surrounding the picturesque Lysefjord.
How long is the hike to Kjerag?
The hike itself is around 10 kilometres long. The path is marked and chains have been installed to hold on to in several places. It is a demanding route with several steep sections and an altitude difference of 570 metres. You should allow 5-6 hours to walk back and forth - longer if you want to take plenty of breaks along the way.
See everything Go Fjords has to offer
Bus departures 3 June - 30 June
Bus departures 1 july - 3 september, bus departures 4 september - 24 september.
- Stavanger bus terminal, track 7
Where is Kjerag Express Bus from Stavanger ?
Guided hike to Kjerag

Visit Website
Visit us on Facebook
Visit us on Instagram
Send us an e-mail
+47 99709096
Lysefjorden Adventure AS, Ulsberghagen 12
Guided hike to Kjerag The fjord adventure would be incomplete without a trip to Kjerag bolt. The five cubic meter glacial deposit is mysteriously suspended between two rocks, with the location being a world of its own. It inspires to humbleness and gratitude for having been allowed the privilege to experience nature in its utmost purity, from the top of the world. Standing on the boulder itself is not for the faint of heart and visitors to Kjerag should be reminded that what this place has to offer is more than just an impressive boulder. Chances are you will be in awe of nature's unmistakable beauty the entire trip, culminating with the breathtaking vistas over the Lysefjord. BASE jumpers challenge their limits on a regular basis from this majestic location and visitors may get the chance to see the "flying" daredevils in action. We also offer the Lysefjord cruise option for the way back.
- Guided trips
Source : Region Stavanger
Your recently viewed pages
IMAGES
VIDEO
COMMENTS
The hike to Kjerag is around 11 kilometres long and the round trip takes 6 to 10 hours. You need to be in good physical shape before heading out on this mountain hike which has an elevation gain of 800 metres. In some places, you have to pull yourself up and slide down with the help of wires, so it is a demanding hike even for experienced hikers.
There's a bus from Stavanger to Kjerag (Øygardstøl) operated by Go Fjords. In 2024, it will run daily in July and August and on Saturdays and Sundays in September. The bus departs from Byterminalen track 6 at 7:45, arrives at the starting point at 10:15 and returns from Kjerag at 16:30. The roundtrip ticket costs 880 NOK (US$ 80) for adults ...
In fact, it was a photo of a daredevil hiker standing on the boulder that sealed the deal on our decision to do a road trip through the country! Kjerag is a challenging climb and we had lots of questions around the practicalities of the hike and what it was like to stand on the infamous Kjeragbolten boulder. Now that we've done it, we wanted ...
At 3,556 feet above sea level, Kjerag is the highest peak in the Lysefjord. When is the best time to hike to kjerag? Kjerag is a seasonal hiking destination, and the season is very short. The plateau is normally covered in snow until late June. The season ends when the road closes for the season due to snow conditions around October.
Lysefjorden Rundt. The Kjerag trail is part of the Lysefjorden Rundt Trail: one of the most spectacular multi-day hikes in Norway. The trail is 100 kilometers long and divided in 8 stages. The classic hikes of Kjerag, Preikestolen and Flørli are world-renowned hiking icons, and all located along the Lysefjorden Rundt Trail.
Kjerag is also a popular destination for rock climbers and base jumpers. How long is the hike to Kjerag? The hike to Kjerag (1000 masl) is about 11 kilometres long in total and you should expect to spend around 6 hours round trip. The time spent depends a lot on the weather and conditions, and whether you are used to hiking in mountainous terrain.
The Kjeragbolten hike. The hiking trail to Kjeragbolten is challenging, but the payoff is undeniably worth it. But, no matter how keen you are to emulate the famous photos, this is not for the inexperienced hiker. The full trail spans 12 kilometres with a total elevation gain of almost 800 metres along the way. This is no walk in the park.
Kjerag is the highest point on the Lysefjord in Forsand Municipality, Norway. It is also home to the Kjerag rock (Kjeragbolten), the famous rock firmly anchored between two cliffs. On the north side of the mountain, there is a massive cliff that is almost perpendicular to the fjord and plunges approximately 984 metres to the water - and this is a popular spot for daredevil BASE jumpers.
Kjerag is also a popular destination for rock climbers and base jumpers. How long is the hike to Kjerag? The hike to Kjerag (1000 masl) is about 11 kilometres long in total and you should expect to spend around 6 hours round trip. The time spent depends a lot on the weather and conditions, and whether you are used to hiking in mountainous terrain.
Kjeragbolten and Pulpit Rock (Preikestolen) are two of Norway's most famous hikes and epic fjord viewpoints. Both offer absolutely incredible views of the fjords and are both worth a visit. In terms of difficulty, the Kjargbolten hike is a little longer and steeper, at 6-8 hours compared to 4-6 hours for Preikestolen.
The location of a hike to Kjerag. The location of the Kjerag hike is in south Norway, near Lysebotn, and above the Lysebotn fjord. From Oslo, it is around a 6-7 hour drive to get there. It is quite a long journey, but perfect for a picturesque road trip. Kjeragbolten hike tours. Kjeragbolten is also a popular excursion from Stavanger.
Duration: The round-trip from Stavanger to Kjerag takes approximately 3 hours each way, allowing you to soak in the breathtaking landscapes along the journey. Preparation: The Kjerag hike is demanding and requires good physical condition. Wear sturdy hiking shoes and bring sufficient water, food, and warm clothing. Always check the weather ...
The hike to the Kjerag boulder takes 1,5-2,5 hours (maybe more), depending of you fitness, The hiking is going up very steep hills, and it can be pretty hard. It is high mountain, and pretty hard hiking, so you need good shoes, hiking boots is the best, and you need to check the weather forecast before you go and be prepared for a change in the ...
Visit Kjerag .Kjerag is a seasonal hiking destination. Before the county road between Sirdal and Lysebotn opens around the middle of May, Kjerag is considered to be accessible only to guests with special equipment and accompanied by a tour guide. ... Time: 5 - 6 hours round trip, 9,8 km long . Hike to Kjerag. The hike starts from the parking ...
Guided hike to Kjerag. The fjord adventure would be incomplete without a trip to Kjerag bolt. The five cubic meter glacial deposit is mysteriously suspended between two rocks, with the location being a world of its own. It inspires to humbleness and gratitude for having been allowed the privilege to experience nature in its utmost purity, from ...
Kjeragbolten Hike. The hike to Kjeragbolten starts from the parking lot at Øygardstøl, also known as the Ørneredet (The Eagle's Nest), a restaurant nestled 640m above Lysebotn. Øygardstøl is located at the top of Lysevegen - one of Norway's steepest roads that has 27 hairpin bends, an attraction on its own.
It takes about 6-8 hours to hike Kjeragbolten. It took us about 6.5 hours total to hike Kjeragbolten, including stopping at the summit for about an hour taking pictures and a break. If you do not have 35 extra pounds strapped to your back and/or a 12 month old with you, you may be able to hike it faster.
To get to Lysebotn by car, drive your car to the Sirdal area (you can get there from Stavanger by E39 and Rv450, then drive north on Sirdalsveien). From Sirdal, follow the signs pointing towards Lysebotn and Øygardstøl until you take a left towards Fv500. The full ride from Stavanger is roughly 3 hours long. The Fv500 road itself is a typical ...
Your destination is Kjeragbolten: the picturesque boulder mysteriously wedged between cliffs. Hike up to visit it, and soak up the extraordinary views as you go. Round-trip transportation from your hotel makes getting around seamless. This small-group tour, capped at eight people, offers a hands-on experience.
Join the Go Fjords express bus on this round-trip tour from Stavanger to Øygardstøl, the starting point of the Kjerag hike. The bus arrives at Øygardstøl at around 10 a.m. and returns at 4:30 p.m. You will have 6 hours to complete this majestic trip. The reliable service gives you time to explore the Kjerag mountain and enjoy the stunning ...
Guided hike to Kjerag. The fjord adventure would be incomplete without a trip to Kjerag bolt. The five cubic meter glacial deposit is mysteriously suspended between two rocks, with the location being a world of its own. It inspires to humbleness and gratitude for having been allowed the privilege to experience nature in its utmost purity, from ...
The hike to the Kjerag boulder takes 1,5-2,5 hours (maybe more), depending of you fitness, The hiking is going up very steep hills, and it can be pretty hard. It is high mountain, and pretty hard hiking, so you need good shoes, hiking boots is the best, and you need to check the weather forecast before you go and be prepared for a change in the ...